HiYa! Just a short note to say I hope the facelift to my blog is pleasing. I know the last post wasn't overly original, well, kinda yawn really. I kinda thought so too. The thing is, playing with our supplies & making mistakes is the best way to push them to new levels of interesting & fun. It amuses me to experiment. This is how some of my best ideas wander into my head. I have more ideas to share coming soon. Thanks for taking a look.
PS I'm trying to figure out how to add a pintrest button but can't seem to get it figured out right now...
Saturday, April 6, 2013


Friday, March 15, 2013
CTMH Anniversary
Its a bit hard to believe, but today is my one year anniversary for being a Close To My Heart consultant. I got into this for the great incentive package, the learning opportunity, and they truly are top quality products. I've been kinda hostage to a little baby, 15 weeks and counting. Big bro is 15 years old now. Shudder. Oh, and a car crazy husband... Being overrun with male influence means I need to keep my own interests going to keep the winter crazies away. I will try to get back to blogging once a month minimum, I figure that's a reasonable goal.
I've accumulated a modest (cough, giggle, snort, I hear you laughing at my understatement out there in internet land, go ahead, it's good for ya!) stash of CTMH products. During precious baby nap time I played. Here are my results, click on any picture to enlarge details. The font stamp set used is Urban Alphabet, # D1507 and the white paper is white daisy cardstock item #1385. Read on for Stamping technique links at the bottom of this post.
I think there is great value to playing with our supplies. That is how
cool effects are found, and making our stash new & fun again. As promised, here are the Youtube links I've learned from. I hope they inspire you to go play with your stash or try something new too.
I will be posting more experiments as I play around with my supplies. It's better than grumbling about stupid winter thumbing its nose at us with big dumps of sn*w so close to the first day of spring.
I've accumulated a modest (cough, giggle, snort, I hear you laughing at my understatement out there in internet land, go ahead, it's good for ya!) stash of CTMH products. During precious baby nap time I played. Here are my results, click on any picture to enlarge details. The font stamp set used is Urban Alphabet, # D1507 and the white paper is white daisy cardstock item #1385. Read on for Stamping technique links at the bottom of this post.
 |
| Left to right shows my results using "Gypsy" colour water dye ink #Z2190. Top row is called generational stamping & shows how the dye ink lightens with subsequent stamping. The next row shows stamped twice in the same spot, a drop shadow, and then dripped with distilled water droplets. Third row shows swiped stamping, where I dragged the stamp across the ink pad to make streaks horizontal, vertical, then angled. The last row shows my result stamping without the foam pad (that comes with each CTMH stamp set) on bare table, and a plastic table. |
 |
| Left to right shows my results using "Holiday red" colour water based dye ink which is no longer available to purchase. All were stamped with the cushion insert under the paper. Top row is generational stamping again. Second row is drop shadow x 3 layers generational style, double stamped, triple stamped, then quadruple. Third row down is drop shadow x2 layers generational style, "kissed" with "Diverse Backgrounds" #D1508 floral clear acrylx stamp and it's mirror kiss from the texture stamp. The last one bottom left was done with the stamp freshly cleaned with My Acrlyx Spritz cleaner # 1778My Acrlyx Spritz cleaner item # 1778 |
 |
| These were all stamped using the cushion insert under the paper, first generation stamping. First line is direct stamp to paper. Second line & third line is Kiss texture technique, 2nd line with a woven food bag, 3rd line with a mesh onion bag shown in picture below. Fifth line down is swiped left to right. Bottom line is double stamped and spotted with water drops. |
 |
| Ink residue from stamping through the woven food bag & mesh onion bag. |
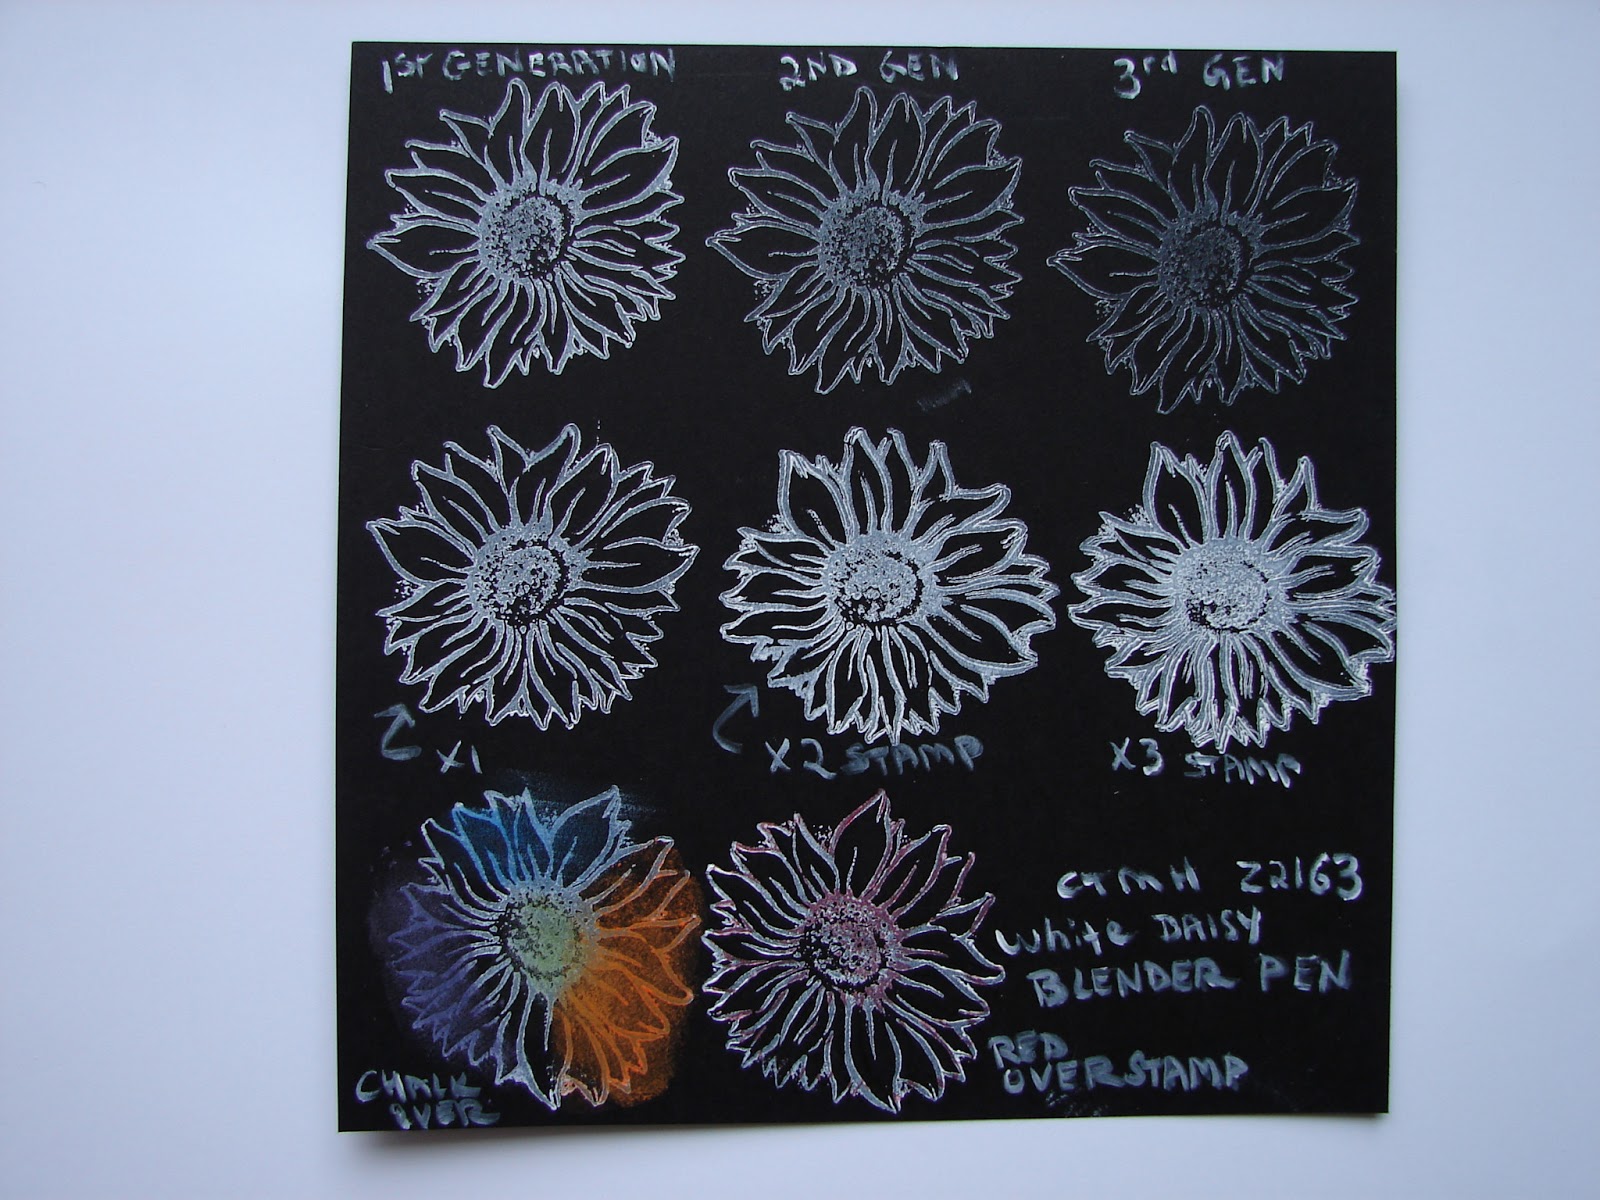 |
This is unknown source black paper from my stash. White Daisy pigment dye ink #z2163 was used. The stamp is from the now unavailable Stamp of the month May 2012 "FriendshipBouquet" S1205. I just needed to try a detail stamp & was tired of letters. Top row is generational stamping. Second row is single, double, then triple stamped. Third row was single stamped; left was rubbed with coloured chalk (unknown brand kids chalk) and the right was ovestamped with the same Holiday red ink. I wrote on the black paper by dipping my Blender pen #3174 into the white ink. |
 |
| Here is the mess from stamping off the extra ink on scrap paper & wiping away ink from the blender pen to clean it off. |
I will be posting more experiments as I play around with my supplies. It's better than grumbling about stupid winter thumbing its nose at us with big dumps of sn*w so close to the first day of spring.
Happy Crafting everyone!
Edit note: I've been reading CTMH product information, turns out the water based blender pen is essentially the same as a water brush. A water brush is refillable. A blender pen is always ready to use & finer control for blending. I still think distilled water needs to be used for crafting, as tap water is full of minerals that gunk up our supplies if stored for any period of time...
Edit note: I've been reading CTMH product information, turns out the water based blender pen is essentially the same as a water brush. A water brush is refillable. A blender pen is always ready to use & finer control for blending. I still think distilled water needs to be used for crafting, as tap water is full of minerals that gunk up our supplies if stored for any period of time...
Sunday, January 6, 2013
Nursery Vinyl
This project has been a labour of love. I planned & thought & was stalled multiple times. A friend helped me put up the vinyl in the nick of time, 4 days later my baby boy was born. I will give you the details of what I did & the pictures can be clicked on to enlarge if you like.
 I ordered Oracal 631 (indoor) vinyl from OhMyCrafts.com on a sale of irregular vinyl with bonus transfer tape. I
snipped colour samples of each piece for reference with the cartridge
handbook. I then planned out the colours for the animal layers. I had to do multiple pages on the gypsy with assigned colours for the layers. I used cricut Zooballoo cartridge & my Gypsy to plan out
the animals & letters. The animals are cute, and mostly only 2 layers. The animals are 10.6" and the letters are automatically sized to match. I spelled out the names of the animals on separate pages about 1/3 the size of the animal letters. After double checking everything I kiss cut the vinyl on my Expression cricut machine (12x24" cutting mats). I cut apart all the pieces, weeded the waste vinyl out, and sorted the animals layers so they would be ready to apply. I won't go into vinyl application instructions here, there are plenty of talented youtube videos & other bloggers who have explained it beautifully. My friend & I used a lazer level & post-it notes to guestimate positioning around the room. I didn't note what measurement we used but the top of the upper animals is one height, and the bottom of the lower animals is the second height. If I remember right it is about 2' between those lines. I also could've cut a shadow layer for the base of each animal but I didn't want to add more work to this project.
I ordered Oracal 631 (indoor) vinyl from OhMyCrafts.com on a sale of irregular vinyl with bonus transfer tape. I
snipped colour samples of each piece for reference with the cartridge
handbook. I then planned out the colours for the animal layers. I had to do multiple pages on the gypsy with assigned colours for the layers. I used cricut Zooballoo cartridge & my Gypsy to plan out
the animals & letters. The animals are cute, and mostly only 2 layers. The animals are 10.6" and the letters are automatically sized to match. I spelled out the names of the animals on separate pages about 1/3 the size of the animal letters. After double checking everything I kiss cut the vinyl on my Expression cricut machine (12x24" cutting mats). I cut apart all the pieces, weeded the waste vinyl out, and sorted the animals layers so they would be ready to apply. I won't go into vinyl application instructions here, there are plenty of talented youtube videos & other bloggers who have explained it beautifully. My friend & I used a lazer level & post-it notes to guestimate positioning around the room. I didn't note what measurement we used but the top of the upper animals is one height, and the bottom of the lower animals is the second height. If I remember right it is about 2' between those lines. I also could've cut a shadow layer for the base of each animal but I didn't want to add more work to this project.
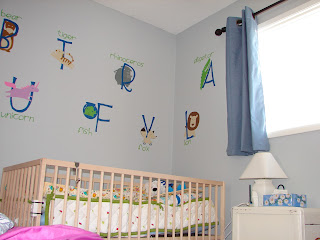
The alphabet is purposefully mixed up for visual interest. It will be a great memory game later, IE Where's the Fox?
Here they are on your left as you enter the room & look to your right.


 Hippo & Elephant are kind of traitors, they were difficult to align and demanded multiple attempts by hand to apply. Using transfer tape for the majority of the vinyl helped. But, those two brats are probably going to have to be recut & redone since they languidly hang on the wall, baiting everyone who looks to smooth them back down (petting?). They were threatened with the hairdryer to stay stuck but alas, they continue to rebel. Washing or wiping the walls pre-application might've helped too. The cricut tool kit was indespensible for this project.
Sitting nursing my little one I see picky things like funny spacing. Unicorn, Cat & Elephant layers are all the same with lilac as the top layer, pink as the bottom layer. Giraffe could have had his layers the other way with tan on top, brown on bottom. Interestingly, the tan vinyl seems to fade into the pale blue wall & is hard to see. Sharpie markers helped to distinguish mouthes & details on a few animals. I really like the hand doodling of lips, eyelashes & whatever other sweet details evolve with love. Quail was outlined while on the wall , Vulture & Tiger could also use outlining. It would've been smart to graffiti them before they go on the wall, but hey, they're up now & I might get to it, eventually.

The alphabet is purposefully mixed up for visual interest. It will be a great memory game later, IE Where's the Fox?
Here they are on your left as you enter the room & look to your right.


Sitting nursing my little one I see picky things like funny spacing. Unicorn, Cat & Elephant layers are all the same with lilac as the top layer, pink as the bottom layer. Giraffe could have had his layers the other way with tan on top, brown on bottom. Interestingly, the tan vinyl seems to fade into the pale blue wall & is hard to see. Sharpie markers helped to distinguish mouthes & details on a few animals. I really like the hand doodling of lips, eyelashes & whatever other sweet details evolve with love. Quail was outlined while on the wall , Vulture & Tiger could also use outlining. It would've been smart to graffiti them before they go on the wall, but hey, they're up now & I might get to it, eventually.
2 hours paper planning
4 hours planning on gypsy
2 hours cutting
2 hours weeding
1 hour organizing layers
5 hours visiting with friend & putting up
= 20 hour project worked on over 2 months, well worth it!

Happy New Year everyone!
Subscribe to:
Posts (Atom)