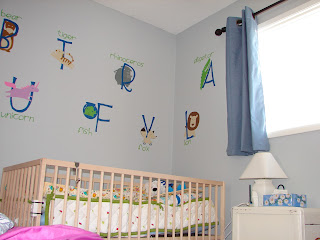
I ordered Oracal 631 (indoor) vinyl from OhMyCrafts.com on a sale of irregular vinyl with bonus transfer tape. I snipped colour samples of each piece for reference with the cartridge handbook. I then planned out the colours for the animal layers. I had to do multiple pages on the gypsy with assigned colours for the layers. I used cricut Zooballoo cartridge & my Gypsy to plan out the animals & letters. The animals are cute, and mostly only 2 layers. The animals are 10.6" and the letters are automatically sized to match. I spelled out the names of the animals on separate pages about 1/3 the size of the animal letters. After double checking everything I kiss cut the vinyl on my Expression cricut machine (12x24" cutting mats). I cut apart all the pieces, weeded the waste vinyl out, and sorted the animals layers so they would be ready to apply. I won't go into vinyl application instructions here, there are plenty of talented youtube videos & other bloggers who have explained it beautifully. My friend & I used a lazer level & post-it notes to guestimate positioning around the room. I didn't note what measurement we used but the top of the upper animals is one height, and the bottom of the lower animals is the second height. If I remember right it is about 2' between those lines. I also could've cut a shadow layer for the base of each animal but I didn't want to add more work to this project.
The alphabet is purposefully mixed up for visual interest. It will be a great memory game later, IE Where's the Fox?
Here they are on your left as you enter the room & look to your right.
Hippo & Elephant are kind of traitors, they were difficult to align and demanded multiple attempts by hand to apply. Using transfer tape for the majority of the vinyl helped. But, those two brats are probably going to have to be recut & redone since they languidly hang on the wall, baiting everyone who looks to smooth them back down (petting?). They were threatened with the hairdryer to stay stuck but alas, they continue to rebel. Washing or wiping the walls pre-application might've helped too. The cricut tool kit was indespensible for this project.
Sitting nursing my little one I see picky things like funny spacing. Unicorn, Cat & Elephant layers are all the same with lilac as the top layer, pink as the bottom layer. Giraffe could have had his layers the other way with tan on top, brown on bottom. Interestingly, the tan vinyl seems to fade into the pale blue wall & is hard to see. Sharpie markers helped to distinguish mouthes & details on a few animals. I really like the hand doodling of lips, eyelashes & whatever other sweet details evolve with love. Quail was outlined while on the wall , Vulture & Tiger could also use outlining. It would've been smart to graffiti them before they go on the wall, but hey, they're up now & I might get to it, eventually.
2 hours paper planning
4 hours planning on gypsy
2 hours cutting
2 hours weeding
1 hour organizing layers
5 hours visiting with friend & putting up
= 20 hour project worked on over 2 months, well worth it!
Happy New Year everyone!


