Saturday, February 18, 2012

Organizing ink

I like things simple and obvious in organizing.  If its complicated or fussy, its not gonna happen.  I have some of the TimHoltz brand inks.  I scored from a community sale and found the exact brand case for $2.  It looks more sturdy than it is, but it's functional.  Each ink pad is labeled, and stored upside down to keep the ink juicy.  The ring of tags clipped to the handle is a doggie footprint stamp of each ink colour, on the back of each tag I swiped the same ink to show the colour range and noted the colour.  This kit fits perfectly in my new cabinets, bonus!
 Here is one of the shoeboxes from Canadian Tire I am using to sort & store assorted flotsam & jetsam from the nasty plastic drawers that were replaced by lovely cabinets.  These boxes are labeled with their contents and easy to grab.  Click to enlarge if you need to.  This container has various inks, embossing powders and some chalk palettes too.
 They fit 6 sideways neatly in the new cabinets.  As you can see, its coming along but not really ready for reveal pictures yet.  As any organizing, once its all done, I'll probably change my mind when I get sick of it & change some things again.  One step at a time...
Happy organizing!  Sigh, who am I kidding, its work and not really fun at all, no excited exclamation point will change that.  It is satisfying to make my crap accessible and culling as I go.  Onward, I chip away at the mountain of everyday chores with my lil plastic spoon, hee hee!

Tuesday, February 14, 2012

Happy V day!

These "racy" cards have been popping up all over the cricut messageboard, very appropriate for Valentines day.  I made these awhile back & almost forgot to post!  Here I was trying to make a gypsy file to make the cricut cut them.  Take 2 symmetrical hearts, flip one, line it up with the x/y axis, group, then weld them together.  The diamond in the middle goes grey and will not cut out.  These are from the "Baby steps" cartridge, 5.22" x 4" to keep it within the size of a normal card when closed.

 Open a second mat, take the same 2 hearts overlap them to make 2 ovals, and group them together.  These will be for the brazier.  Take a third heart, right side up, and manipulate it by unlinking the yellow link under the width~Height button.  Increase the width and decrease the height until the top  curves of the heart look like the way you want them for the panty band.  The rest of the cut bits will be wasted so don't worry about them.  Click to enlarge the picture and you can see the 2 ovals with the band just above them.  Sorta looks like goofy glasses on an alien just now.  This file isn't perfected yet.
 These are my hand cut practice shapes before attempting on the gypsy.  They are fairly simple to figure out manually.  I folded scrap paper to cut a symmetrical heart & finessed the curves until they looked worthy.  The bottom curve of the heart, flipped upside down, lapped, and traced to cut becomes the same curve to cut the bra "cup."  I hope that makes sense.  The remaining becomes the panty, fold it in half & clip until it makes the top of the band.  I used a pencil and overestimated my clipping, much faster than redoing things by oopsie.
 Here's the front of one and the back of 2 finished cards shown with the same panty template.  I used deckle scissors to make the straps for the right hand card.

I gave one to a good friend with a similar twisted sense of humor, inside it said, "The world is full of tits & asses, Glad to be laughing along with you, Happy Birthday!"

Think of how funny they would look with feathers, racy with animal print, skimpy with string, or beautiful with lace trim.
Happy Valentines day!  Now, go make something fun!

Wednesday, February 8, 2012

The Smash Swap Book

I learned from a youtube video that the best way to bind irregular books is to start with a template.  How to bind a junque journal of different size papers.  I'm so glad to find the link to give proper credit.
The key is to make a template first.  Mine is 16 holes.
Here are some papers I used from my stash, and good ole simple Elmers glue-stick to make the covers pretty.
 After I covered the cardboard I used hockey tape to seal the edges to give a nice finished look.  Click on the picture to enlarge, it shows how I clipped the tape so I could lap it in layers at the corners.  Notice it is not matching up on both sides of the corner so that once it is beaten around it shouldn't come apart.
 I sealed the papers with ModgePodge glue, and while it was wet I used this glimmer spray, from Lindy's stamp gang.  A sweet friend sent me 2 bottles, very cool surprising contrast glimmer colour.  You add water to this product so it is very light to mail in its dry state.
 I won't show the swap pages yet.  I saw on another youtube vide "somewhere" that they used tabs and punched those to function in the binding.  I thought that was pretty neat since some pages are smaller and thicker.  I used the Bind-it-all on the ones on the left, and the Crop-a-dile on the yellow tabs.  They both work equally well in the binding.
 I added more pastel papers to pad out the book, the baggie shows the extras that are still waiting to get added in, and the band that will be needed to keep it closed.  It's my new favorite book for sure!
As soon as I have word all the participants have their swaps back I will show you the pages.

Saturday, February 4, 2012

Bath Bombs!

I was meaning to make & blog these before Christmas but that didn't happen.  These make a great Valentine gift to a friend or yourself.  Wikipedia - Bath Bombs (or BB's) shows the chemical formula, but the most interesting factoid is that they dissolve into water, carbon dioxide and salt.  I've been making these for awhile and play around with the recipe so no two batches are exactly the same.  The great thing is the base recipe is very forgiving.  In an hour I can make 3 batches if I don't do any soap grinding.


Words of caution:
  • This is very fine powder and should not be inhaled. 
  • When using essential oils, be sure to use oil to prevent skin irritation.  The oil acts as a carrier to help prevent skin irritation.  BB's are high in salt, your skin needs a bit of oil too.
  • Don't be too generous with the oil, it makes the bathtub dangerously slippery.
  • Be aware of other additives like sparkles, paper etc are hard on plumbing and make the tub no fun to clean afterward.  To avoid this I would recommend putting the BB into old pantyhose before dumping into the tub. That seems to be no fun though, who wants to bathe with pantyhose?  Better to skip using non dissolvable stuff.  Although, oatmeal would be great skin soothing bombs after sunburn or bug bites...  Hmmmm, Ideas brewing!
  • If you choose to grind up smelly soap as the "extra,"  keep that grinder only for soap.  Better yet, buy a used one from a thrift shop for this purpose.  These supplies should never again be used for food.
  • Do not use fragrance intended for room fresheners, your skin will thank you for skipping that experiment.
  • The gloves keep your hands from drying out from the saltiness of the ingredients.


Base recipe:
1 part citric acid  (available at the health food store)
2 parts baking soda  (cheapest from the bulk bins at the grocery store)
1/16 part oil  (food or skin grade)

Useful Supplies:
bucket
rubber gloves
1/2 cup measure
cheap sandwich bags & twist ties
spray bottle filled with tap water
scarf or protective face mask

Aren't they pretty!

Not Housework Bath Bomb recipe:
1 cup citric acid
2 cups baking soda
1 cup epson salt
2 tablespoons almond oil
pick ONE variable from the list below

Variables:
a bunch of drops of essential oils
shredded glycerine soap
shredded perfume soap
bath pearls
bath confetti
soap leaves
soap flakes
sugar candy or chocolate
It's okay to try different oils: olive, canola, shea butter...
The spray bottle can have a mix of water/glycerine/rose water if you like but water works just as well.

Method:

  1. Wear your gloves and mask.  Add to the bucket citric acid, baking soda, salt, and ONE variable you like.
  2. Mix it together well with your gloved hands.
  3. Add in the oil, and the essential oil if you are using, mix again.  (Picture below)
  4. Spray about 3-6 times with water, watch it fizz too long and you will have less ingredients.  The water activates a chain reaction which can make the mix too wet too fast.  The spray bottle helps you control the moisture closer.  Quick now, mix it around. (picture below)
  5. Repeat step 4.
  6. Grab a clump of the mix and squeeze.  It should hold its shape easily.  If it doesn't, the mix is too dry and will not form into shape.  If its too dry, repeat step 4.  If the mix is too wet, enjoy the fizz, wait for it to slow down a bit and proceed to step 7.  Channeling Goldilocks here, not too much, not too little but juuuusssst right.
  7. Measure out into bags.  They can be as big or as small as you like.  Half a cup of mix makes small BB's and seem a  bit stingy, but are perfect for a child's bath.  You're the creator!
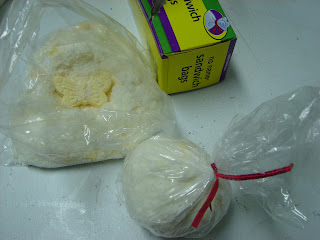
  8. Once all the mix is distributed and any left-over is dished out to the other bags, now is fun part.  Pick up a bag and squeeze it together into a ball.  Channel your inner child's snowball making days if you like!  Children can help out with this part too.  Tie them with twist ties or pretty ribbon if you prefer and set them aside overnight.  Or go use one right away if you like :)  I don't bother with cleaning out the bucket or washing the gloves or measure, it doesn't seem to affect the next batch.  Go ahead & clean them if you prefer.  I keep the supplies together in an old gift bag in the closet until the next time I make some.  (Picture below)
Dry mix with some fragile commercial butterfly bath fizzers broken up, see step 3.

Fizz after 3 sprays, see step 4


Attempting to add intact commercial bath fizzer to centre of BB, and how it looks after squeezing, see step 8.
I hope you enjoy this recipe!