Showing posts with label Sewing. Show all posts

Saturday, April 4, 2015

Busy Book aka Quiet Book aka Toddler interactive book

Long title, huge 16 page project!  We've been through 8 "bugs" since January so blogging went by the wayside.  I've been enjoying taking a detour from paper crafting to create a book for my toddler boy who is now 28 months.  Little hands will keep themselves busy, or we can guide them with interesting things.  Screens and electronics are nice, but they are only two dimensional.  How does anyone learn to manipulate their THREE dimensional environment without engaging with it?  Plus toddlers are major league growing and learning, even though their communication can't always keep up. 

So, last year I mined Pintrest and Google images and drove my family crazy planning 3 books.  All of March 2015 I've been driving everyone crazy as I try not to drive myself crazy building this one book.  I've had so much fun figuring out details and making sure it will grow with my boy for awhile.  I've also been researching "free motion sewing", basically doodle sewing by machine on Youtube. A new friend gave me her extra free motion sewing foot to try.  That lit a fire under my motivation and made it even more fun, and bonus it sped up the sewing.  Here are some process pictures to show the sheer mess I work with.  Trust me, I know what I'm doing and that works for me, LOL!  I think I take after my Dad's creative process, he would make a huge mess as he worked too.
organized piles of all my flotsam & jetsam donated and thrifted stuff

classic, sewing at the kitchen table complete with makeshift ironing board on a thick piece of felt fabric

free motion sewing in action

close up of altered free motion foot, zig zag stitch in use
Leah Day on Youtube shows exactly how to alter a generic free motion sewing foot to make this work.  The foot "hopping" she mentions wasn't a concern for my machine so I only altered the foot from closed (oval) to open (C) shape.  I recommend her videos if you are interested in learning free motion sewing.

Basically I checked my sewing tension, put on the free motion foot, left the feed dogs up, switched my stitch length to ZERO and switched from zig zag to straight stitch as needed, foot down of course.

After 7+ heavy days of sewing, many evenings of handwork details, I finished this book last night.  I will show more posts over the next few days since it is going to be an Easter gift to my little boy.  I'm so excited to see him enjoy it!  Happy Easter and Happy Spring everyone!!!

Wednesday, February 12, 2014

Baby washclothes

A break from paper crafting, back to an earlier project I tried, really liked & needed to repeat.  My first attempt at flannel/terry faceclothes were 7" x 7", a bit small but passable.  I got the idea from Pintrest, and I can't remember the original site to credit to save my life. 
On the left is paired & waiting for the serger, the right is waiting for tidying.
Another assembly line job.  A few days ago I did all the cutting out.  I ripped the flannel to save time.  I did the terry cutting with a rotary cutter & board on the floor.  I can tell you, it is a great "butt" workout, since all those muscles are still speaking up!
The top (pink) a perfect corner, the duckies show knobby corners, I will tell you more about that.

Hack away the excess before coming to the corner so the serger can make nice corners.

Boomer being a Ham!  He paused long enough in his rocketing around the house for a picture.

A fierce wilder-beast hiding among the vegetation.  Indoors is his natural habitat. 

A cat can pretend, a kitty needs to enjoy his imagination.  He's been dumped in the sn*w, It doesn't impress him for some reason.

I don't measure so well it seems.  My attention wandered, whatever.  It was easy to line up one corner (2 sides) make 2 sides flush & 2 sides goofy.  I start where my finger points, and serge along the 2 goofy sides, then it all works out by the end.

Here is where I pause serging to hack away a piece big enough for the blade to get around.  
 Some of them I didn't lop off, so the extra fabric bulges the stitches to make nice knobby corners, (shown in the second, tri-corner, picture) in case that is the look you want to go for.
Then stitch right down to the edge. 

Hand-wheel off the edge one or two stitches, leave the needles up.

Lift the presser foot, pull the fabric to your right & turn that corner.

Then jam it right back in there, back in alignment, lower the presser foot and continue sewing until you run out of corners. 

When the pile was all done I pulled the chain tail, tied an overhand knot as close to the stitching as possible, and clipped the remaining tail off.  There are great Youtube videos for many serger brands showing how to do this with all the specifics of their brands.  That's how I learned how to make my Brother serger turn the corner.  This would be a great student learning project, or a "re-acquainting with your patiently parked serger project."  Its also a good idea to show the serger some love by cleaning it before putting it away. Mine just got a mighty "puff" to blow the lint out ;-)

I hope everyone is surviving winter and enjoying making things, or at least goofing off!

Sunday, December 2, 2012

Quiet Book

I found this "Quiet Book," aka "Busy Book" at a rummage sale for 25CENTS!  What a score!  I made 2 of these types of books for my niece & nephew but picassa has sorted my pictures somewhere I can't find them to blog, of course.  These are such a labour of love to make, but so very worth it.

I cannot lay claim to making this book, I do not know who made it but I applaud their efforts.  It seems to be made from remnants & scrap fabric.  It looks to be well loved, some of the pieces are missing but it looks like it would still be appealing to any child. 

As always, click on any picture to enlarge.
Check out all the fun fabrics, all different qualities & types
Tie my shoe

Braid my hair...Put your hand in my mitten

Zip, now look inside...What time is it? (there is plastic hands on that clock to spin)

Make my face...Match the shapes

Fill my cars...Count the wheels

Hang the clothes...Tie my bow

Button my coat...Try my pockets

I can count...up to ten

Match the colours
It is on my list to restore the missing pieces of this book so my new little one will be able to enjoy it.  As with any activity a small child manipulates, they need to be adult supervised with common sense.  These home-made books do not come with safety certifications or recall notices.  If you choose to make a book for a child, please please please, advise the parents to be vigilant to choking hazard etc by supervising appropriate use of these fun manipulative little books.

Sunday, November 25, 2012

Teenage Sleep Shorts

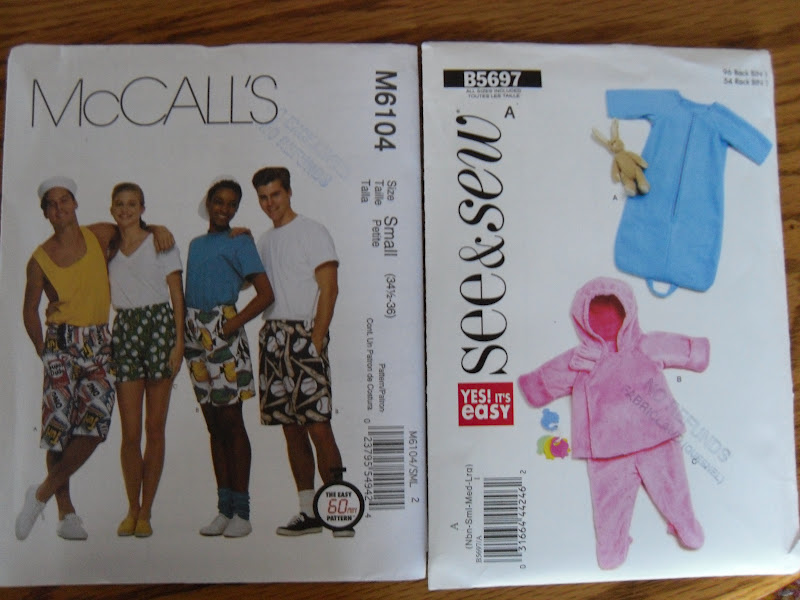
I've been slowly digging my way through my sewing pile.  I had a cheap McCalls patterm that said it is sized for teen or men's small.  Grumble grumble grumble, don't get me started on McCalls pattern sizing!  I got stung, AGAIN!  The silly thing is, I should know better by now since I have been stung by this lesson a few times.  McCalls patterns have always had crazy generous sizing. 

 I sometimes trace a pattern to save the multisize or simplify it.  I tape it onto a window & then tape stretcher paper over it & get busy tracing.  Stretcher paper is a little known secret of quilters that work in health care.  Some doctors clinics or hospitals will give you the end of the roll if you ask.  You can get a whole roll for very cheap from your local hospital.  I can't recall the price now since the roll I have is many years old & it goes a long way.  Remember to mark the cutting lines, grain lines, notches, and dots if you need them.  I was able to trace off the fly & pocket markings since they weren't needed.

 Here is the finished shorts, modeled by my 14 year old son who is as tall as me. 
 As you can see, they are clearly HUGE!  Oh well, they're comfy & he will remember them a long time since they will be in use for a few years I suspect.
I hope I've made you laugh, with this post, I do now but I wasn't so pleased at the time.

Wednesday, November 21, 2012

Heat packs

These are an older project I made but they never let me down.  These are about 8 years old now & just as nice as when I made them.  I used scrap fabric & plain sewing.  There was some covers that have gone missing so that will age them faster using the heat packs au naturale.  They are filled with flax seed, about 1lb each I guess.  They also freeze really well to function as cold packs.  The long one is 5 compartments, finished size 22+3/4" long x 4+3/4" high.  It is perfect for neck or joints.  The rectangular 6 compartment one is 9" x 10+3/4" and is perfect for belly or back ache.  They also work really well to prewarm the bed at night, we all need our toasty comforts. 
I wasn't overly fussy about making them since they were from scrap fabric.  I compartment-ed the flax seeds so they wouldn't become one mishapen lump.  I don't think I even measured the fabric but folded it once the overall shape was sewn to figure out the compartments.  Once I figured out the divisions I did use a measuring cup to evenly distribute the flax seeds & sewed the compartments closed as I filled them.  They lie nice & comfortably where they are placed which I really like.  This is what works for me.  These are well worth an hour of sewing time to make.  Thanks for looking :)

I will be doing a bunch of preposting now so this blog won't be totally abandoned.  As of this writing Nov 19, 2012 there is about 2 weeks to go until my baby is due.   I hope you have great days every day!

Thursday, November 8, 2012

Bassinette Baby Basket Bumper

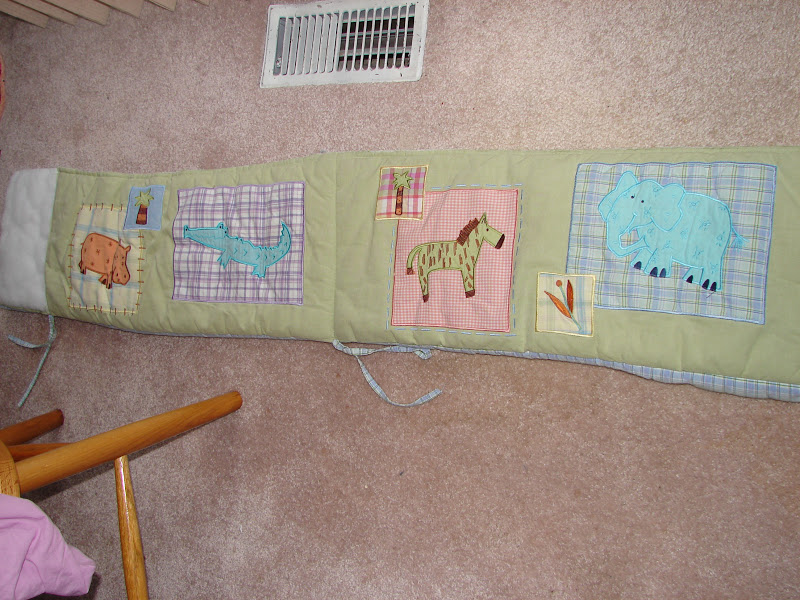
 Try saying that title 10 times fast!  Here is the sweet jungle animal fabric I found at a Fabricland store.  It is copyright 2010 Precious Moments Designer Collection, Inc.; Licence SPF Fabrics. 
 Here is the remaining crib bumper that I bought at Value Villiage for $4, its a bit worn out & way too big, but by far cheaper than buying new batting & backing fabric.  An hour in the recliner with the seam ripper and I had more than enough supplies.  I washed it twice before commencing & was a little surprised to find the previous owner's detergent perfume still came through.  I guess I forgot the vinegar rinse, since that usually kills perfumed detergents.  The panels are cute & may get re-used into something, but I'm lacking ideas right now.
 Here is the finished basket bumper, it is not tied in this picture.  I forgot to show a picture of the backing fabric, it is white, blue, & green plaid backing fabric from the original bumper.  I also reused the ties & bias fold tape on the top edge.  Why not, it all matched perfectly.  If you click on the pictures to enlarge you will see my sewing is not perfect.  I'll admit it was pinned to death to hold it's shape for sewing & still not easily cooperative.  4 rounds of stitch picking didn't really make this project popular with me.  I added vertical stitch lines at regular intervals to keep the stuffing in place.  I couldn't resist this fabric for this purpose, and for about $20, & a few hours time, it is so worth it.  I won't bother with all the boring measuring & sewing details since this is a project blog & I doubt anyone will have this exact same basket or supplies to duplicate this.  It works out that the bumper is a continuous loop, about 10" tall & about 70" long.  The mat in the base is waterproof & I can use a pillowcase or fold burp-cloth flannels over it.  I have some flannel serged but am not sure if I want to put an elastic edge on them to become custom fitted sheets.
This basket was used by my Mom for me & my brothers, and for my son & 3 other family members.  Over 14 years ago I made a different bumper for my son of fabric with cute cat faces.  I remember he would have the sweetest little mumbling baby conversations with them.  Sorry but I have no digital pictures of that to show.  It is said babies can see 7-15" as newborns, and they are most drawn to look at interesting faces.  I seem to do a mix of practical sewing like this or a binge of pattern sewing.  Thanks for looking at what I've been up to!

Thursday, November 1, 2012

Utility sewing

Some of you know we are expecting a baby very soon.  This means preparations galore of course.  Here is some practical but boring sewing.  I couldn't resist a picture since it looked so pretty spooling from the back of my Janome machine.  Click on the picture to enlarge if you like.
Nursing shields, to prevent icky milk leakage embarrassment
I used 3 metres of prewashed diaper flannel folded into 3 layers.  The glass ramekin was my template and a regular pen to trace.  I started out by cutting around the ramekin with the rotary cutter but it was faster & easier to ditch the ramekin & just go for it.  Once I had them all cut out I had a tower of disks.  I put them to the sewing machine 3 layers each & zig-zagged around the edges for about an hour until they were all done.  I didn't count them because I just don't care that much, honestly, it doesn't matter.  I did this for my firstborn & they are far superior to the store bought paper shields.  They do eventually get everywhere and some go missing.  Once they were done I snipped them apart & trimmed away rough edges.

An interesting side note:  A family member fixed the filters on Mozilla Firefox for me so I no longer need to use Safari to blog.  I had no idea that was why Mozilla Firefox was so hard to blog with when I first started blogging.  I'm not a technological gal so I am really happy to have this simplified.  Apple Safari browser works well, but I have a PC not an Apple so no wonder it was a slower process for me. 

Baby is due Dec 4, we shall see if the "wheel of fortune" dates predictor is accurate or not.

Cheers & have a great day!

Saturday, September 29, 2012

Sewing results: Bunting bag


Cute pattern, it was easy enough to sew.  I used polar fleece kitty fabric for the outside & flannel paw print fabric for the inside.  The biggest DOHHHHH! was realized after I cut the polar fleece out.  I'll let you see if you can spot the goof.  It should be nice & cozy anyways!

Tuesday, July 10, 2012

Sewing plans...

Sorry to be MIA for so long.  Life, fatigue, work, best intentions, blah de blah, I could offer more creative excuses I suppose.  That's boring so let's not & say I did :)

See that pile of fabric piled on the chair?  I have plans for that.

 Here are some of the patterns I've chosen.


I'm hoping to get 4 of these done by Saturday.  I just need to get the serger to live on the table too & then get busy cutting.  Good thing my boys don't mind eating in front of the TV.  I don't wanna see any comments about "why don't you use the craft room?"  That room is occupied in organization efforts, ya, that's it.  Better than calling it the craft-pit-of-despair room, LOL!  I will post how things turn out soon.
I have to snap a pix of them soon.

Thanks go out to my followers for patiently standing by for me.  Thanks to everyone else stopping by to take a look.

I hope everyone is enjoying summer weather!

Sunday, September 25, 2011

Stitch Sampler

In grade 8 we were challenged to create a stitch sampler. We received bonus points for every stitch example we achieved over the 10 or 12 we had to do. I still have my sampler kicking around. I loved to flip through an old hardcover "Reader's Digest COMPLETE GUIDE TO NEEDLEWORK: Embroidery, Needlepoint, Knitting, Applique, Quilting, Patchwork, Macrame, Crochet, Rug-Making, Lacework (WITH COMPLETE ILLUSTRATED INSTRUCTIONS)" I had to google it to find the right title, I'm leaving the capitalization as I found it.  Older copies can occasionally be found in thrift stores and garage sales, it is such a great resource. I see I used the full 6 strands of 6 strand embroidery floss.  I found the fabric in a scrap sewing bin, I remember we had to use a hoop which was sometimes a pain.
 I should take better care of it, but it is my "working reference." If it goes behind glass, I probably won't look at it again.  Besides, its not fine needlework or anything.  I keep it roughly folded with my embroidery stash and I think it is pretty great for grade 8 work.  I'm especially proud of the fact I haven't lost it.
Here's the back, I have no shame.  It is said that embroidery "should" look as good on the back as it does on the front.  I challenge that "should" with a big rude razzberry :^PPPP  Perfect sometimes just doesn't get done, I'm a big fan of "good enough."

Thursday, September 22, 2011

Creative mending

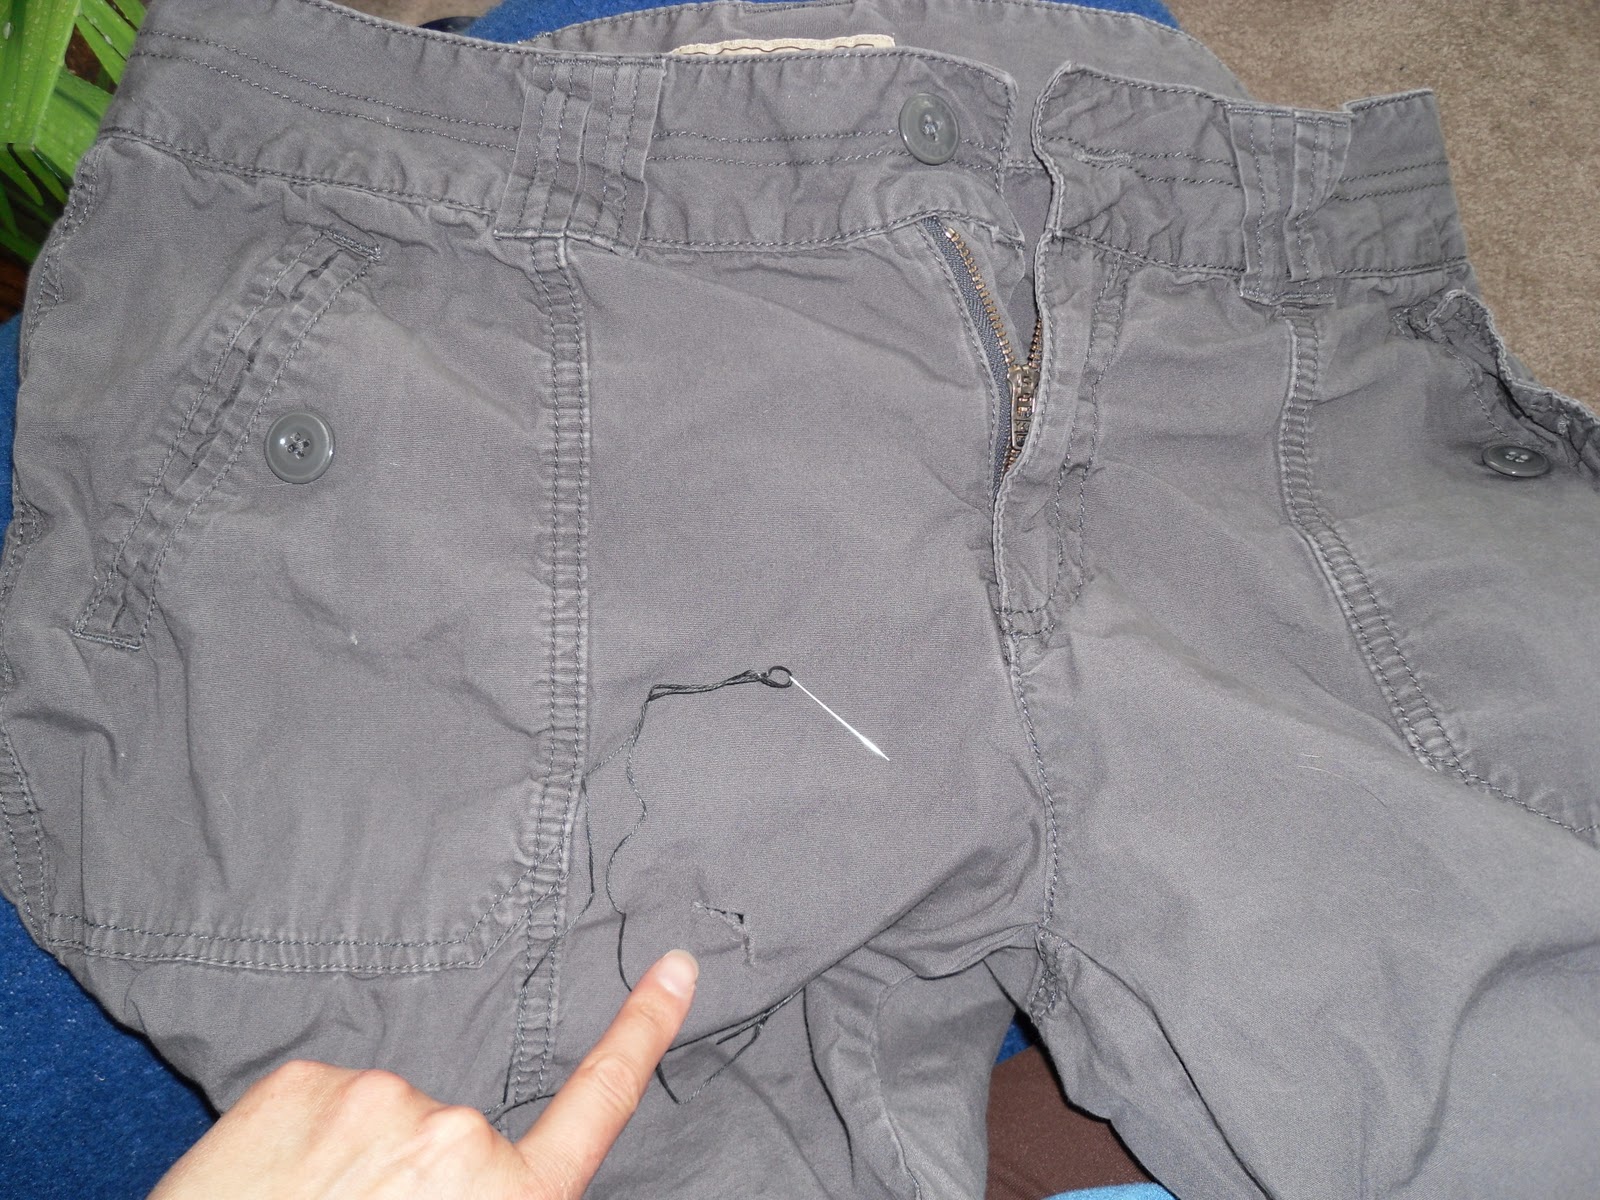
Holes in pants, not very appealing.  They still fit, they're comfortable but not ready to be tossed.  Only one thing to do, fix them to look better.  These pants started off with an odd L shaped tear in a not exactly flattering spot.

I don't bother with an embroidery hoop since these pants are always kinda wrinkly looking.  I thought on it awhile & then started with the baseball stitch mending, or that is what I call it.  The repair looks very industrial and chunky.  I used 2 strands of 6 strand embroidery floss, unknown brand for these repairs.

 I set it aside for a day to let the details develop.  When I looked at it again it made me think of squares since the pocket and stitching details are very linear.
 White chalk and an old phone card helped me to rough out placement of lines.  Since this is hand stitching, I am using, perfect is a term not needed.
 I added more stitching similarly on the pocket to echo the effect an make it more deliberate looking.  You can click on the picture to enlarge if you like.
Here's another pair I repaired awhile back.  The complete "flower" was a hole in the centre of the flower.  I used variegated blue/white embroidery floss.  I was pleased with how they turned out.
 Same repair, close up picture.


When I am needing inspiration I google doodling, doodle stitching, embroidery, henna tattoos, graffiti, cartoons, zentangle, squiggle drawing...  Clicking along the internet does not let me down for ideas.  I encourage you to try this type of repair some time, its just a needle and embroidery thread with a wandering idea.  The best part is, if its a flub, well, the clothing is already paid for & destined for the rag bag anyways.  Here's some more creative mending ideas if you need inspiration.  http://whipup.net/2011/03/26/creative-mending/