Showing posts with label Canadian. Show all posts

Saturday, April 4, 2015

Busy Book aka Quiet Book aka Toddler interactive book

Long title, huge 16 page project!  We've been through 8 "bugs" since January so blogging went by the wayside.  I've been enjoying taking a detour from paper crafting to create a book for my toddler boy who is now 28 months.  Little hands will keep themselves busy, or we can guide them with interesting things.  Screens and electronics are nice, but they are only two dimensional.  How does anyone learn to manipulate their THREE dimensional environment without engaging with it?  Plus toddlers are major league growing and learning, even though their communication can't always keep up. 

So, last year I mined Pintrest and Google images and drove my family crazy planning 3 books.  All of March 2015 I've been driving everyone crazy as I try not to drive myself crazy building this one book.  I've had so much fun figuring out details and making sure it will grow with my boy for awhile.  I've also been researching "free motion sewing", basically doodle sewing by machine on Youtube. A new friend gave me her extra free motion sewing foot to try.  That lit a fire under my motivation and made it even more fun, and bonus it sped up the sewing.  Here are some process pictures to show the sheer mess I work with.  Trust me, I know what I'm doing and that works for me, LOL!  I think I take after my Dad's creative process, he would make a huge mess as he worked too.
organized piles of all my flotsam & jetsam donated and thrifted stuff

classic, sewing at the kitchen table complete with makeshift ironing board on a thick piece of felt fabric

free motion sewing in action

close up of altered free motion foot, zig zag stitch in use
Leah Day on Youtube shows exactly how to alter a generic free motion sewing foot to make this work.  The foot "hopping" she mentions wasn't a concern for my machine so I only altered the foot from closed (oval) to open (C) shape.  I recommend her videos if you are interested in learning free motion sewing.

Basically I checked my sewing tension, put on the free motion foot, left the feed dogs up, switched my stitch length to ZERO and switched from zig zag to straight stitch as needed, foot down of course.

After 7+ heavy days of sewing, many evenings of handwork details, I finished this book last night.  I will show more posts over the next few days since it is going to be an Easter gift to my little boy.  I'm so excited to see him enjoy it!  Happy Easter and Happy Spring everyone!!!

Friday, October 24, 2014

Fourth Annual Canadian Cricut Circle Swarm Challenge #3


Challenge #3  by BarbPoll
"My challenge is to use your Cricut machine to create 6 treat boxes of some sort to give to elderly people in your neighborhood this Halloween."

I have no idea how to watermark pictures, so I've been busy doing it the old fashioned way, right with the picture.  This was fun to make.  I used #B1453 Frightfully Fun stamp set, black memento ink, Recollections brand paper, Mayarts.com thread-web-lace, or that's what I'm calling it.  The bags are cut at 4" from Artiste CTMH Cricut cartridge, page 79, button 49 Feature key "3D Objects."  The "repeat last" button is really useful for this type of project.
I arranged the clear acrylic CTMH stamps on the paper how I wanted, then stuck the stamp block to the whole works.
I curved "Happy Hauntings"to complement the scalloped edge on one side of the block, and "trick or treat" on the other side of the block to stamp the bottom flap. This makes it an easy assembly line.
 Aren't they pretty? I was watching the time, and from start to finish, this project was done in 1.5 hours.  I raced the machine, scoring one as the cricut expression machine cut another, and I couldn't win.  But I was close!  Scoring with a ruler and bone folder or stylus makes the folding so much simpler.  These only needed two strips of Sookwang adhesive tape to assemble them.  That tape is neat, no scissors required, just tear what is needed.

They are loaded with candy, ready for my pharmacist friend to give away to customers needing pretty happiness.  I will be taking the whole works to them tomorrow.  I'm looking forward to it.

I challenge you to try these challenges yourself.  Or create anything you like, just give the end result away.  We are so fortunate to be able to create the things we do, sharing it makes the world a better place.  Happy belated Thanksgiving!  
AND, Happy Halloween!!!

Fourth Annual Canadian Cricut Circle Swarm Challenge #2


Challenge #2  by Hrvatica
"Very simple challenge here. Make a fall themed tag or incorporate a tag in a fall themed card, scrapbook layout or other project. Fall themed can include Halloween, Thanksgiving or even just the use a fall colour palette."

My entries are kind of funny because of the size difference.  I had an idea, rushed through it and they're still nice, simple tags.  Using Artiste CTMH Cricut cartridge, page 32, button 2 I cut 2 tags from Recollections paper; the yellow at 7", the red at 6.75".  I originally thought to layer them but changed my mind half way.  I chose this size to fit the not available stamp of the month #S1309 "Poster Tidings".  They were seriously lacking at that point.  So I used another not available SOTM #S1209 "Fall Favorites."  I think I used Cocoa Ink.   I used some MayArts.com thread-web-lace, and some bakers twine to pretty them up a bit.  I look at these pictures and I could've coloured them, but I doubt I will get back to do any more to them now.
Using Recollections brand paper and the Artiste CTMH Cricut cartridge, page 79, button 49 at 4" I cut 6 tags. These are made using the not available SOTM #S1209 "Fall Favorites" stamp set, stamped in Memento Tuxedo black ink, and coloured with CTMH Watercolour pencils, and smoothed the colour with a Blending pen.  They are topped with Bakers Twine from "The Twinery" from my stash.
 Again I am giving these to my local pharmacist to give away to people who would love something pretty.  They've got a good bag of goodies coming!

Fourth Annual Canadian Cricut Circle Swarm Challenge #1

On the Canadian Chat in the Cricut Circle messageboard we do an online "swarm" where people that offer prizes can issue challenges to win their prizes.  Its a lot of fun to see what everyone creates.  Unfortunately this is probably the least active year since its begun.  Fortunately, I've found some time and done all 3 challenges!  As always, click on any picture to enlarge details if you like.

Challenge #1: 
My challenge has 3 parts. As everyone knows from previous swarms, we are soooooooooo (not) very strict about our rules, LOL! Just play along, have fun, cross enter your entries in other things if it suits you. Just show us what you make to count as an entry.

I challenge you to fulfill your entry with all 3 components.
A. Create 6 cards: all the same or all different, any size, any theme, but they must be functional cards, not tags or postcards.

B Stamp an image on each card and Colour it however you desire: colour all or part, colour with chalk, colour with ink, colour with markers, colour with pencil-crayons, colour with water-colour... You get the idea. You could even go crazy, colour the embellishments, colour the paper, have fun!
BigGrinBUT, at least one of the 6 cards must be Halloween themed, interpret as you like with colour, season, image, etc...

C. Post a picture of your creations, and then give them away, with envelopes to fit. Give them to a nursing home, an elderly neighbor, a charity group, a shelter program, it's your choice where, just give them away and let us know how that worked out for you. This is a way of celebrating being thankful for our creativity, and the Thanksgiving portion of this season's challenge.


 This is the Blooming heart Stamp #M1045 stamped with Memento tuxedo black ink, coloured with ShinHan twin touch alcohol markers, cut on white daisy cardstock to make 3 inch note cards.  With black pen I hand doodled a rustic outline.  The image is matted on retired CTMH paper.  I've seen these done on youtube and a few blogs and had to try it.  It's a great way to play around with the new markers.

The next 6 cards are made using the "Better with a Friend" #D1608 page 9 Hostess rewards, of the 2014-15 CTMH Idea book.  It (and 2 other stamp sets) came with my new ShinHan markers as a consultant perk.  Images are stamped using Memento Tuxedo black ink, and coloured with those fancy new markers.  The sentiments are stamped from the "Artfully Sent" cartridge.  Yes, I scraped together some cash and got my hands on it, more on that later!  Some of these cards are edged in CTMH Washi Tape.  That's fancy Japanese trend speak for patterned paper tape that is all the rage right now.  Really great value with CTMH, the rolls are not stingy!  A few of the cards are grounded using Bakers Twine, both CTMH metalic, or from "the Twinery" company which I won a few years ago.

 Honestly, I don't know why these are sideways.  If anyone out there in cyberspace can help me figure it out simply and easily, I'd appreciate it.  The silly thing is that I took all the pictures in the same orientation, baffles me why blogger turned some but not all.

 The one above uses remnants from my "Pathfinding Cardmaking Kit."  I doubled it and made 30 cards, and still have scraps to make more cards! 
 The green blocks pattern paper is from my stash, unknown manufacturer.  I love how it complements her skin tone, LOL!

Here is all 6 cards, thankfully not cockeyed!  I will be giving these cards to my pharmacist and his wife to give away to their customers.  Together they run a locally owned business called Tabour Pharmacy.  They are really kind, caring, generous people.  They will know just who will need a little something pretty to share happiness with.

Saturday, December 28, 2013

Endless Summer

This is a quick scrapbook layout of me, made with the CTMH Artbooking cricut cartridge.  It is on page 67 of the handbook, button 30; except the palm tree, I swapped that for the evergreen tree on  the other button (page 66).  British Columbia isn't known to have live outdoor palm trees.  The base paper is Kraft cardstock, the other papers are Recollections brand from my stash.  I inked up the edges with mini pigment ink, but I don't know which colours now.  I just played around on scraps until I liked the colour.  I did use White daisy pigment ink and a deep blue dye ink to stamp in the honeycomb corners.  I learned from another blogger Obsessedwithscrappin "fun hexagon background" on youtube that the honeycomb overlay perfectly fits the Honeycomb #c1537 stamp set.  I need to find my yellow chalk to tint the white on the upper right corner.  I think it will lend visual interest to the layout, even though its opposite the lighting on the picture, LOL!  This is my modest attempt at waiting out winter.  Stay warm & keep on craftin!

Wednesday, December 4, 2013

In case of Coffin


This was my entry for challenge #4 in the 3rd Canadian cricut circle online swarm.
The challenge was 
1. Make something for Halloween without using green purple yellow or orange
2. Make something for Thanksgiving without using orange, brown, red, or golden yellow.
3.  Make something for Christmas without using green red or pure white.
A prohibited colour may be used if it is a shade NOT traditional.  

My inspired is the "emergency (gift) kits" that are all over Pintrest and the internet.  
Materials used are listed at the end of this post.

I cut the coffin cut from the Artiste cartridge, button 46, page 76 feature 3D object at 7.5".  I tried 12" and found the lid uses less paper than the base.  Go figure, the base is deeper so it uses more paper.  Also, I found the lid is the "shift" cut, and the base is the non-shift.  That matters when planning papers.  What clued me in is the example and the layers are in different colours in the handbook.  I took a pen and wrote in my handbook (base, lid) so I don't forget.  I give you permission to write in your handbooks, and to rip out all the extra sheets of  languages you don't use.
 These little tiny stamps are for the note card.  I chose Art philosophy cartridge, button 50 cut at 3.5" because it looks a bit like a tombstone.  A nice way to use clear CTMH stamps is not having to think backwards like rubber stamps do.    Pick out the letters, arrange on a ruler face down so the letters & words read correctly.  Then use an acrylic block to pick them all up at once.  I recommend doing a few test stamps to check alignment and make sure there is no factory residues interfering with imprint quality.

Stamping before assembling the coffin makes the job easier.
I set in the potion stamp just for fun and tied it all up with the tag & brown bakers twine.
Materials used:
CTMH Artiste cricut cartridge
CTMH Art Philosophy cricut cartridge
CTMH slate ink
gold sparkle poster board ($3 for a big sheet!)
Super bright yellow cardstock from my stash
CTMH Creepy creatures stamp set #c1522
CTMH a typeface alphabet #a1117
CTMH Magic potions stamp set #c1509
CTMH CC1025A stamp of the month alphabet
redline super sticky tape
Honey, tea, tissues, cough candies
Bakers twine

What do you think?  Challenge me to try something a bit off the normal path, I dare ya!
Thanks for stopping by, now go make something unconventional & fun!!


Wednesday, November 20, 2013

Fall Banner Challenge

Banners are trendy in paper crafts these days.  I've never made oneand I wanted to try for a challenge in the 3rd Canadian cricut circle online swarm, closed Nov 15.  This was for challenge #2: Create a Fall or Autumn banner.
 Materials:
CTMH cricut Art Philosophy cartridge, button 28 cut at 1.5"
White daisy cardstock
D1558 Washi Wonder CTMH stamp set
CTMH inks: Cranberry, Juniper, Honey, Sunset, chocolate
E1027 Framework alphabet stamp
water based blending pen
Harvest bakers twine

Method:
1.  Cut the banner, stamp it with washi wonders patterns.
2.  Stamp letters in chocolate ink.
3.  Squish each ink pads as needed, the lids become colour palate for the blending pen.  Use the same colour pattern stamped to colour in the letters.  I originally left it like the top picture, but it looks unfinished.  I went back & used the blending pen to outline each pennant and it looks a lot better to my eye. 
4.  Tip:  Put a dot of liquid glass adhesive on the tip of the bakers twine, give the string a hard twist, let dry.  It is much easier to thread through the banner, think of the plastic coating on the tip of shoelaces and it makes sense.  Just a dot of this glue this way dries really quick, YAY!

I hope to use this on a scrapbook layout later.  Thanks for looking!

Thursday, November 14, 2013

Use it Challenge

Here is my entry for challenge #6, "Use it" hosted on the Canadian Cricut Circle messageboard.  I used paper & google eyes from my stash. "Robot Party" cricut cartridge, and Viva decor Pearl pens were brand new, unused until now.  I used button 7 for the bag, & 17 for the face, cut at 12" they sized together.  I enjoyed how quick & easy it was to create.  A certain little boy has a first birthday rapidly approaching.  He loves paper (well, tearing and eating it mostly) and I know the google eyes will be entertaining too!  Maybe I will win a prize?  Thanks Sara over at sarawandrews.com for posting such a nice challenge and supporting the online swarm!

Sunday, September 23, 2012

Seventh Challenge, reveal photos

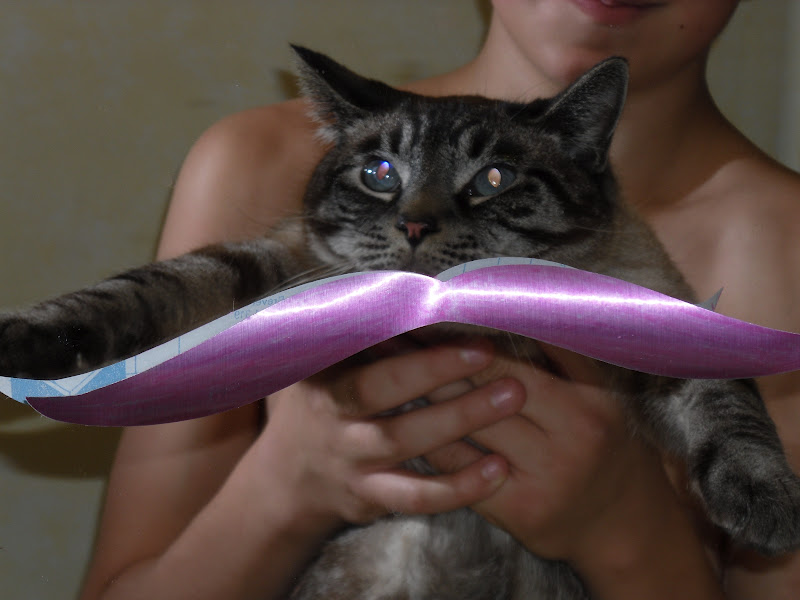
Here's the reveal photos of our photogenic felinne, hee hee!  You will have to pardon my shirtless teenage assistant in the background.  All cats have a super power, shedding like mad when they don't really want to do something.  I can't imagine why Boomer would have trouble posing for pictures?


The 'stashes were stuck to the bathroom mirror with temporary poster tack.  No one was injured in this photo shoot, thankfully!

I like the blue 'stashe since it complements Boomer's blue eyes nicely.  The red one is kindof rakish and dapper.  The white & silver ones are quite distinguished looking don't you think?  So many looks!  I didn't get photos of all the moustashes since Boomer ran out of patience.  That & 2 fell down behind the vanity never to be seen again.  Wouldn't these be a great April Fools joke too!