Saturday, July 27, 2013

Growth chart book

This is the top view of an accordion growth chart book I made. One side is to show growth in actual measurement, the other side is to showcase brag pictures.  I added extra accordion page with washi tape.  Read along if you like and I will tell you how I built it.
I cheated for the base and used the CTMH my creations memory showcase album z1195 as a starting point.  I cut it on the middle fold to split for lengthening.
Then I scored 3 pieces each of white daisy #1385 12"x12" cardstock at 6", turned each 90 degrees, then cut each into 2 6"x12" sheets.
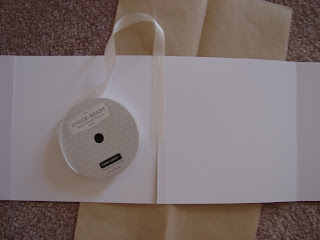
Then I joined the cardstock with CTMH Seam binding z1732 to make sturdy bendy hinges.  Accordion books this long would tear at the folds, plus it makes a regular design feature.  Tip: don't stretch the seam binding, and burnish well after adhering.  I put a piece of kitchen parchment paper underneath so the ATG glue wouldn't gum it up sticking all together while assembling.  Keeping the other pages folded together while I worked made it manageable.  I cut the seam binding at an angle, started on one side, flipped it over to do other side.  The finish joins in the middle, snip the other end to match when I got there.  I  rubbed away stray adhesive with my thumb.  Very technical tool :-)

Scrapbook papers from my stashI used to decorate.  Many are old Basic grey papers, perfect for boy theme. The plain colours are recollections brand papers.  I recommend minimum 3 double sided pattern papers, 3 complementary solid colours.  Even smarter would be to use a paper pack where all the matching is done for you.  I just squint in the sunlight & it becomes apparent who the troublemaker colours are that don't get along.

This shows CTMH grey wool ink, on the right side it is spritzed with (distilled) water in the spray pen z1380 which softens the colour, but also it separates into component colours.  Well worth trying on scrap paper to see if you like the look. 
I did simple "direct to paper" technique, rubbing the ink pad on the papers to give a more grunge/industrial look.  I swiped it on the seam binding too.  I chose grey wool colour ink for the industrial teen boy look.  I deliberately did unbalanced inking with some more coverage for visual interest.  This hopefully shows the book progress from original 6 pages to 12 pages long. 
This is the growth chart side.  I used unknown brand washi tape to add to the tape measure look.  I punched numbers from the same paper as the covers to add continuity. Age, some heights (at actual measurements) & weights are penciled in.  This book is to celebrate my teenager!  I just have to go back & find pictures now.
This is the other side.  I recommend taking a few days to decorate this side.  Once I chose which paper was for the cover & back, I cut those 6x6" since the covers are 6.25x6.25".  I struggled with paper decisions and decided to just cut the majority down to 5.5"x5.5", 5x5" and some became accordion foldouts (11x5.5") extra pages, and pockets, added in with washi tape z1817.  The extras are spaced every other page.  I tried to keep the colour range child to teen transition so it will complement the age range when I get pictures put in.  Scraps become fake washi tape, tags, accents.  I visually went with 2/3 + 1/3 or 1/2's or 1/4+ 3/4 for extra pages to add interest.  I didn't measure, I just eye-balled it.  To keep this monster book manageable since it opens both sides, I will probably just a hair band elastic.
I did this project in stages, about 3-4 days (precious baby nap time).  No marathon craft times for me right now.  It would make a great 12 month first year baby brag book, a holiday book, favorites collection, or even a life celebration book.   Let me know if you try this, I would like to see what you tried.  Thanks for looking! 

Sunday, July 21, 2013

Hectograph update

Just a quick update on the hectograph experiment.  Last night I remelted the small batch with vast improvement. The unmolding from the silicone pan was super easy.  The top surface is a little bubbled, probably from being poured too fast but look how smooth the bottom side is!!  It also became a little more clear looking which is neat to see.  Baby is waking up now so no time to play & try it out.  It sat out all night in the container on the kitchen counter.  There is no change between last night & this morning.    It no longer shows sticky finger prints.  I'm excited to play with this mini loaf, I have ideas!  I scraped out the bigger pan into the plastic measure & remelted one minute at a time in the microwave, about 4 minutes total.  It is cooling off & destined to go into the fridge for an hour once it is not hot.  I will update again when I can.
Cheers!

Saturday, July 20, 2013

?!Hectograph?! what?


I have happily stumbled into the world of youtube surfing.  And pintrest, and craft gawker...  I'm doomed to not have any free time with these great eye candy sites, and a busy family too.  I really enjoy Lindsay from "The Frugal Crafter."  permanent gelatin printing plate aka hectograph video & post.  I was inspired to try it too.  The first video I saw she showed a recipe using alcohol and water and gelatin.  Another youtuber told of her trial & error & this, and the horrible stink it made in her home.  Revisions were done & showed Linsay changed her recipe to 7 packages of gelatin, 1.5cups glycerine, 1.5 cups boiled water.  I also heeded cautions not to use equipment that would be used for food.  I even commented asking what type of tray she used, but I couldn't find anything similar.  So at the dollar store I bought a cheapie 8x8 pan, a plastic measure, and a little silicone loaf pan to try it out.  For the 8x8 pan I went with 3 packages gelatin, 3/4 cup glycerine, 3/4 cup boiled distilled water.  The mini loaf pan took 1 pack glycerine, 1/4 cup glycerine, 1/4 cup boiled distilled water.  Why distilled water?  Our water has a lot of calcium, some iron and fluoride, which I didn't want to chance react with it.  I prefer to use distilled water for my crafting because it doesn't get scummy as fast if it sits forgotten in the craft lab.

I left the experiment on the counter & it set up slowly.  I stuck it in the fridge to move it along.  Hours later it did indeed gel up firmly.  The little one  was disappointing to unmold.  I had high hopes since the silicone pan is bendy & easy to twist.  It was a gooey mess.  I put it back in the microwave, remelted & tried again in the fridge.  It did set up again, but is getting tacky at room temperature.  The 8x8 pan, straight from the fridge was nice & firm but sitting on the counter at room temperature became sticky.  Phooey.  I thought once it became plastic it would be okay at room temperature?  I'm not digging another thing to store in the fridge.  Did I mention we are currently in a heat wave?  Precious fridge space is for cold meals & drinks, priorities right?  Maybe I don't have quite enough gelatin in there?  I will remelt & add a bit of alcohol & see if that helps.  It can't hurt as it is destined for the garbage otherwise.