Showing posts with label Books. Show all posts

Saturday, April 4, 2015

Busy Book aka Quiet Book aka Toddler interactive book

Long title, huge 16 page project!  We've been through 8 "bugs" since January so blogging went by the wayside.  I've been enjoying taking a detour from paper crafting to create a book for my toddler boy who is now 28 months.  Little hands will keep themselves busy, or we can guide them with interesting things.  Screens and electronics are nice, but they are only two dimensional.  How does anyone learn to manipulate their THREE dimensional environment without engaging with it?  Plus toddlers are major league growing and learning, even though their communication can't always keep up. 

So, last year I mined Pintrest and Google images and drove my family crazy planning 3 books.  All of March 2015 I've been driving everyone crazy as I try not to drive myself crazy building this one book.  I've had so much fun figuring out details and making sure it will grow with my boy for awhile.  I've also been researching "free motion sewing", basically doodle sewing by machine on Youtube. A new friend gave me her extra free motion sewing foot to try.  That lit a fire under my motivation and made it even more fun, and bonus it sped up the sewing.  Here are some process pictures to show the sheer mess I work with.  Trust me, I know what I'm doing and that works for me, LOL!  I think I take after my Dad's creative process, he would make a huge mess as he worked too.
organized piles of all my flotsam & jetsam donated and thrifted stuff

classic, sewing at the kitchen table complete with makeshift ironing board on a thick piece of felt fabric

free motion sewing in action

close up of altered free motion foot, zig zag stitch in use
Leah Day on Youtube shows exactly how to alter a generic free motion sewing foot to make this work.  The foot "hopping" she mentions wasn't a concern for my machine so I only altered the foot from closed (oval) to open (C) shape.  I recommend her videos if you are interested in learning free motion sewing.

Basically I checked my sewing tension, put on the free motion foot, left the feed dogs up, switched my stitch length to ZERO and switched from zig zag to straight stitch as needed, foot down of course.

After 7+ heavy days of sewing, many evenings of handwork details, I finished this book last night.  I will show more posts over the next few days since it is going to be an Easter gift to my little boy.  I'm so excited to see him enjoy it!  Happy Easter and Happy Spring everyone!!!

Tuesday, November 5, 2013

Halloween Mini Book


Halloween Mini book cover
I have had this 'lil book done for awhile now but life keeps popping up keeping me from blogging it.  Excuses aside, are you ready?  This is a big blog entry, lots of pictures of my 22 page book made with the CTMH Artbooking Cartridge for the Cricut machine!  I will list the supplies as I go and at the end.  I set the dial at 6", used buttons 17 & 18 (pages 54, 55 in the handbook).   I found the 6" pages would tell my cricut expression I could only cut one.  I could see there was plenty of room on the page so I would unload the mat, remove the page cut, turn the mat around to reload & cut another page.  I always have the paper saver button on.  All cricut images are designed with an imaginary border to size on the machine so when it calculates cuts it can tell you if you have enough room.  Like using a GPS, sometimes you have to apply common sense to out-think the electronics, LOL!

This book is made with retired My reflections "spellbound" paper pack from CTMH from my stash.  The coloured part of the face is clear plastic portfolio scraps from back to school supply sales, that stuff cuts "like buttahhhh" in the cricut.  I hope to show you in another post what I've been doing with it.  Like I said, I've been busy busy busy, so I need to squeek in some crafting play time too.
 Page 2 & 3.  This is my sweet boy at 8 months age,  a teenager now.  The Happy Halloween words are backed with Black Shimmer Trim, the cat eyes are Epoxy bubbles, I really like the iridescent stare they give.

 Page 4 & 5. My pumpkin is 2 years here.  Page 5 is more of the clear plastic portfolio scraps sandwiched between 2 pages cut the same, glued with Liquid glass.  Interesting that one side is shiny & one side is matte for that plastic.
 Page 6 &7.  Page 7 is Distressed Backgrounds, sunset ink, black ink, slate ink.  The spider is an accent from the Artbooking cartridge.  It is easiest to cut a bunch of accents all at the same time while the paper is loaded on the mat.  I figure I've gone to the trouble of picking & loading papers, the scrap may as well get to work for me giving options to play with when assembling.  Of course it gives me loads of offcuts, but they go in a baggie to be used on other projects, or give away to school or a friend.  I also keep bigger scrap papers until projects are done.  That is the best way to test inks etc as I create.  No sense testing on the project itself if I don't need to.
 Page 8 & 9.  The cat in the hat is 3 years old. The embellishment is a tag from a toy.  The witch is me, I made that mandarin style dress for an event that fell through, but it made a fabulous costume!  Trick or treat I cut from 2 different papers to offset layers for a shadow effect.  The bonding memories glue pen makes easy work of adding little things like that.
 Page 10 & 11.  "Fright" is popped up on foam tape.  My Vampire is 5 years old here~ scary!
 Page 12 & 13.  There's a 4 year old running around on Page 12, and  the owl is popped up on foam tape.  Page 13 is 2 cuts the same with pale green vellum sandwiched in between, glued with Liquid glass. 
 Page 14 & 15.   My Ninja is 8 years old I think?  I used sparkles flourish, and the "zip strips" that are on the edge of CTMH pattern paper. 
 Page 16 & 17.  I had this idea stuck in my head for a long time. I've seen it done on fancy store bought cards.  I cut 2 spirals from the lolly pop swirl in the Artbooking cartridge and used the centre swirl.  Glueing them together by leaving one on the cricut mat and applying the second made it easy to do.  1 layer wouldn't be sturdy enough I think?  These are more accent cuts, 2 layers glued together right on the spiral.
 Page 18 & 19.  Page 18 is another zip strip border.  My pumpkin is about 11 years old here.  The spiderweb is decorated with Bakers twine- autumn terracotta, the spider got a slick of liquid glass to make her shiney.  The centre accent is from retired CTMH product that coordinated with the paper pack.  I wish I had used grey fun foam instead of white pop dots from my stash.  Tilting the page to the side it doesn't look very nice.  Oh well, I'm not changing it now.
 Page 20 & 21.  I glimmer misted the spider web on the grey page so it made a nice page waiting for a picture I can't find right now.  The grey paper had an oops cut out of it but I didn't want to cut another.  I stamped houndstooth in white daisy ink on the black layer of the pumpkin face & stuck it down with a brad.  Creepy creatures,  stamp set, stamped in black, white daisy, autumn terracotta.  The orange is matted on the houndstooth paper.  I used my corner rounder with the guard off to create the scallop edge.
Page 22.  I used 2" Office BinderZ, an old retired product from my stash, but they are like this 2-Piece-Fasteners.
I used retired My reflections "spellbound" paper pack, Liquid glass, bonding memories glue pen, MyAcrylix Spritz stamp cleaner, stamp scrubber, Distressed Backgrounds, creepy creatures, Bakers Twine, My Acrylix blocks, Inks:  sunset ink or Autumn terracotta ink, slate ink, black ink, white daisy ink. sparkles flourish, Black sharpie marker to edge, corner rounder, 2" scallop punch, mini medley accents, Black Shimmer Trim,

Overall I really enjoyed puttering along creating this book.  I have been working in batches these days.  One day I did all the cutting, another day finessing accents and picking pictures.  Then the fun part was choosing page order and playing in the details.  The nicest part about using the Artbooking cartridge was setting the dial to one size and not having to play around with sizes, it all coordinated.  EASY, simple, and I get all the credit, what's not to love?

Thanks for being patient with me, baby boy is 11 months old now, busier than ever of course!  I hope everyone had a Happy Halloween! 

Saturday, July 27, 2013

Growth chart book

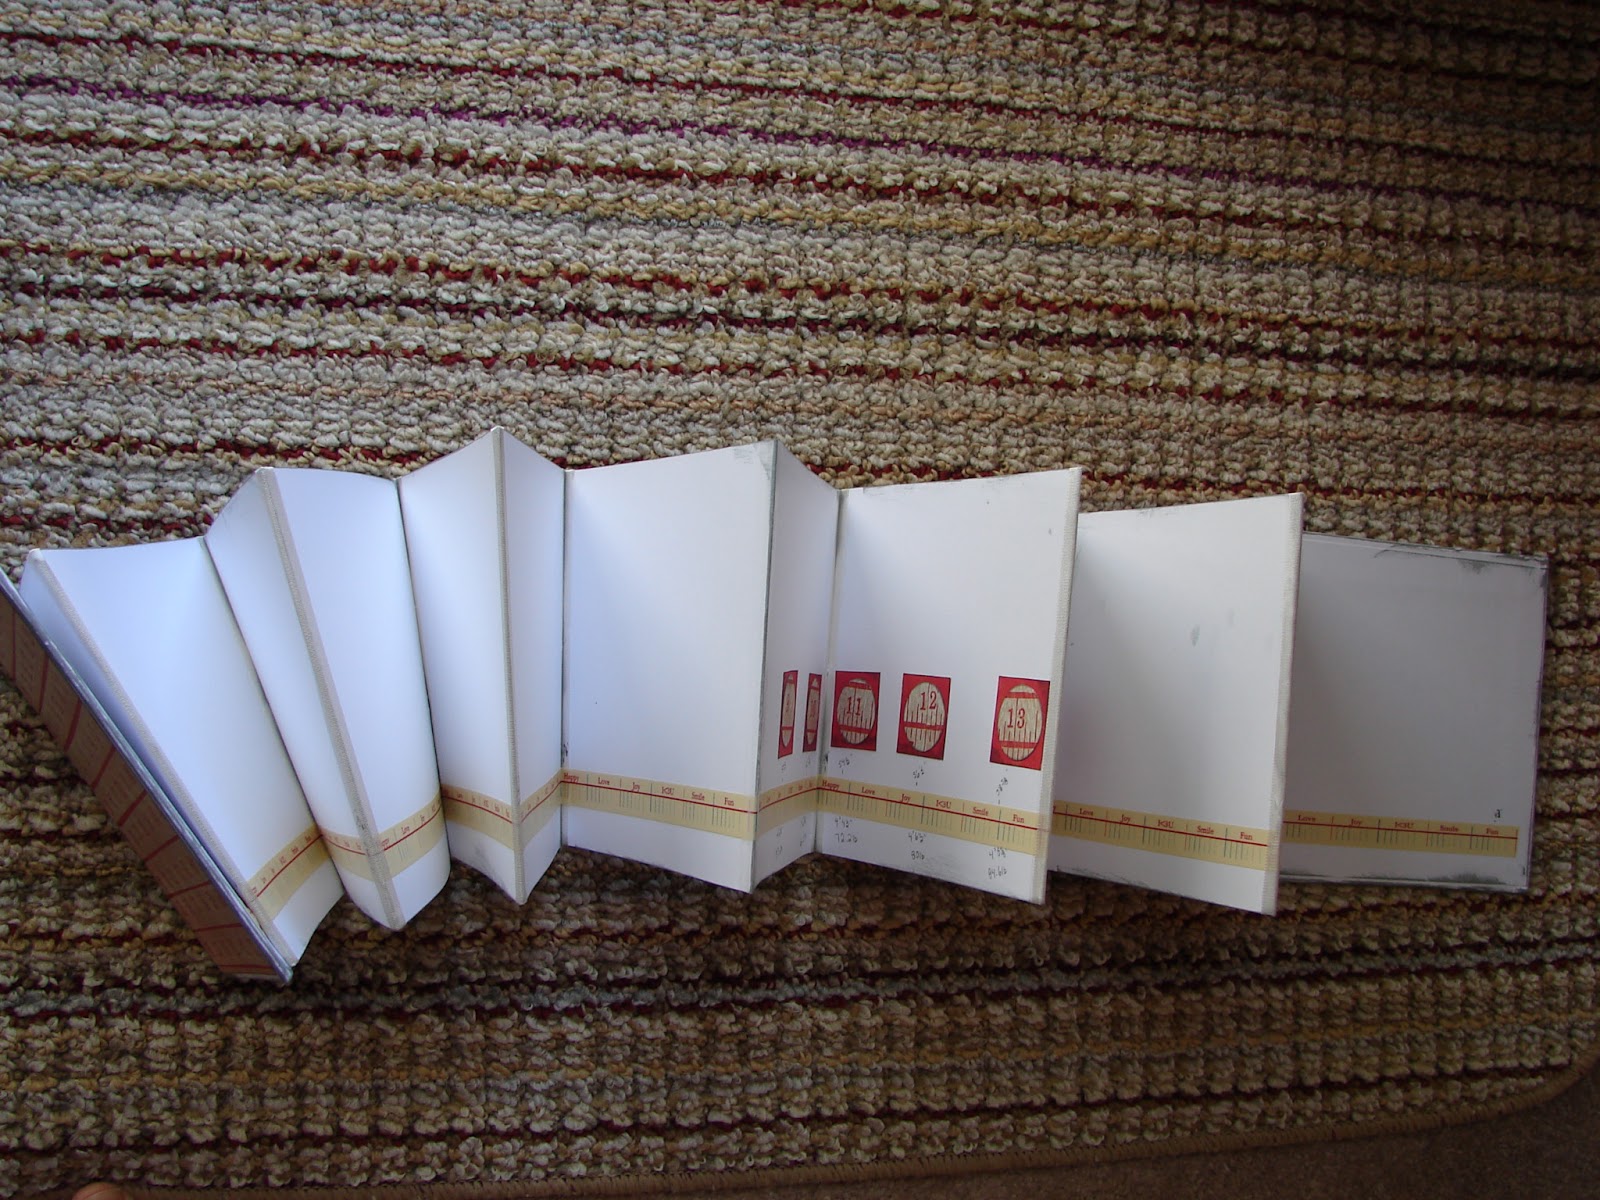
This is the top view of an accordion growth chart book I made. One side is to show growth in actual measurement, the other side is to showcase brag pictures.  I added extra accordion page with washi tape.  Read along if you like and I will tell you how I built it.
I cheated for the base and used the CTMH my creations memory showcase album z1195 as a starting point.  I cut it on the middle fold to split for lengthening.
Then I scored 3 pieces each of white daisy #1385 12"x12" cardstock at 6", turned each 90 degrees, then cut each into 2 6"x12" sheets.
Then I joined the cardstock with CTMH Seam binding z1732 to make sturdy bendy hinges.  Accordion books this long would tear at the folds, plus it makes a regular design feature.  Tip: don't stretch the seam binding, and burnish well after adhering.  I put a piece of kitchen parchment paper underneath so the ATG glue wouldn't gum it up sticking all together while assembling.  Keeping the other pages folded together while I worked made it manageable.  I cut the seam binding at an angle, started on one side, flipped it over to do other side.  The finish joins in the middle, snip the other end to match when I got there.  I  rubbed away stray adhesive with my thumb.  Very technical tool :-)

Scrapbook papers from my stashI used to decorate.  Many are old Basic grey papers, perfect for boy theme. The plain colours are recollections brand papers.  I recommend minimum 3 double sided pattern papers, 3 complementary solid colours.  Even smarter would be to use a paper pack where all the matching is done for you.  I just squint in the sunlight & it becomes apparent who the troublemaker colours are that don't get along.

This shows CTMH grey wool ink, on the right side it is spritzed with (distilled) water in the spray pen z1380 which softens the colour, but also it separates into component colours.  Well worth trying on scrap paper to see if you like the look. 
I did simple "direct to paper" technique, rubbing the ink pad on the papers to give a more grunge/industrial look.  I swiped it on the seam binding too.  I chose grey wool colour ink for the industrial teen boy look.  I deliberately did unbalanced inking with some more coverage for visual interest.  This hopefully shows the book progress from original 6 pages to 12 pages long. 
This is the growth chart side.  I used unknown brand washi tape to add to the tape measure look.  I punched numbers from the same paper as the covers to add continuity. Age, some heights (at actual measurements) & weights are penciled in.  This book is to celebrate my teenager!  I just have to go back & find pictures now.
This is the other side.  I recommend taking a few days to decorate this side.  Once I chose which paper was for the cover & back, I cut those 6x6" since the covers are 6.25x6.25".  I struggled with paper decisions and decided to just cut the majority down to 5.5"x5.5", 5x5" and some became accordion foldouts (11x5.5") extra pages, and pockets, added in with washi tape z1817.  The extras are spaced every other page.  I tried to keep the colour range child to teen transition so it will complement the age range when I get pictures put in.  Scraps become fake washi tape, tags, accents.  I visually went with 2/3 + 1/3 or 1/2's or 1/4+ 3/4 for extra pages to add interest.  I didn't measure, I just eye-balled it.  To keep this monster book manageable since it opens both sides, I will probably just a hair band elastic.
I did this project in stages, about 3-4 days (precious baby nap time).  No marathon craft times for me right now.  It would make a great 12 month first year baby brag book, a holiday book, favorites collection, or even a life celebration book.   Let me know if you try this, I would like to see what you tried.  Thanks for looking! 

Sunday, December 2, 2012

Quiet Book

I found this "Quiet Book," aka "Busy Book" at a rummage sale for 25CENTS!  What a score!  I made 2 of these types of books for my niece & nephew but picassa has sorted my pictures somewhere I can't find them to blog, of course.  These are such a labour of love to make, but so very worth it.

I cannot lay claim to making this book, I do not know who made it but I applaud their efforts.  It seems to be made from remnants & scrap fabric.  It looks to be well loved, some of the pieces are missing but it looks like it would still be appealing to any child. 

As always, click on any picture to enlarge.
Check out all the fun fabrics, all different qualities & types
Tie my shoe

Braid my hair...Put your hand in my mitten

Zip, now look inside...What time is it? (there is plastic hands on that clock to spin)

Make my face...Match the shapes

Fill my cars...Count the wheels

Hang the clothes...Tie my bow

Button my coat...Try my pockets

I can count...up to ten

Match the colours
It is on my list to restore the missing pieces of this book so my new little one will be able to enjoy it.  As with any activity a small child manipulates, they need to be adult supervised with common sense.  These home-made books do not come with safety certifications or recall notices.  If you choose to make a book for a child, please please please, advise the parents to be vigilant to choking hazard etc by supervising appropriate use of these fun manipulative little books.

Wednesday, November 28, 2012

Baby Shower Autograph book

My good friend recently hosted a baby shower for me.  It was a lot of fun & I really wanted to preserve a fun book of signatures from my guests.  This baby is expected early December 2012 so we planned to have the shower first & then a "meet the baby" tea late in January or early February 2013.  December is rife with holiday busyness, cold & flus and it just made sense to straddle the holiday rather than deal with all it's craziness.

 I found this old card kit in my stash.  It is still cute but quite dated looking, "Paper Magic, you make the Magic" by Sue Dreamer.  I Made a template, & used my Bind-it-all to punch 8 holes in the cards.
 I used some heavy cardboard to make the covers same as how I made the circle smash book.  I covered the covers with glue stick & "Max & Whiskers Basic Grey paper."  The baby nursery & shower theme is baby animals or zoo animals so this fit perfectly.  The covers are 1/8" larger than the card envelope size since I did punch a few envelopes to use as pockets inside the book.  I used the BIA corner rounder to round the outer corners.  Hockey tape sealed the edges of the covers nicely.  Tip:  Use sharp scissors to cut hockey tape, it is very sticky!
 Here is how it looks inside
 All the embellishments were premade as part of the card kit.  I had some making memories fabric tape that I used to cover the preprinted credits on the back of each card.  I used a bit of smash tape to note the date of the event and sticky notes to reserve the first & last pages for notes of the fun shower & tea party details.

I hope this post inspires you to have a look at your stash & think of new ways to enjoy using it.

Saturday, March 3, 2012

Smash swap returns

Well, not really a "smash book" since that is a brand, but that is how we've identified this swap.  

What's that you say?  Get to the pictures?  Okay, here ya go!  

One last thing before I dig in:  These are NOT my creations for this swap.  I added links for those that do have blogs.  Click to enlarge any picture.

On your left hand side is her calling card. The "life" tag which goes into a slot on the pink page.  The top 2 pages are one side, the bottom 2 pages are the back side.  You can visit her blog here Creations with Becka

The bottom 2 pages show front & back.  Isn't that so pretty the masking with plum mist spray?.  Those bands are meant to help hold the book together when its complete.  Check out the clear transparency page with the pretty swirls!  You can visit her blog here ScrapaholicJen
Look at all the lovely add in's!  Stamping, shiney, and oh, there's a lil green pocket.   Can't. stop. looking...
I couldn't resist, these were all different parcels, so I opened 2 different ones to show.  The top of the page is one package, the bottom is another.  Seriously, inspiring!  You can visit her blog here Jeannie Cards aka Image Queen


The top shows the front & back of one page, the bottom shows the front & back of the second page.    On your left hand side is a simple coin envelope stamped & look at the goodies inside!  You must enlarge to appreciate the details, these are real layers not just printed paper.

These are the fronts of 2 pages. so lovely!  That green butterfly with the brown tag sparkles.  I don't know how she did that but look at the double pocket on the right side.  The paper doesn't show, but that is some sort of printed transparency under the dragonfly & it hides the double pockets!  More beautiful extras too.

This is the front & back plus the extras.  The pro/con tag fits in under the green zigzag strip pocket,  really inspiring details!  The stopwatch has embossed texture, circled with a shiney accent glue of some sort.

Top is front of 2 pages, bottom is front & back of another page.  Aren't those sweet stamps?  Pretty clips and things too!  You can visit her blog here Crazy Cricut Lady

The top is 2 different front & backs of the same page entry with lovely misting and stamping.  The bottom is 2 different pockets (same page entry).  Some page tabs, and check out that key!  I tucked one into the side to show the pocket is open on 2 sides so it will be different depending how its bound.  You can visit her blog here Singing Shell

The top is one side, the bottom is flipped over to show the back. Can you see the hidden pocket on the butterfly paper? Clever!!!  You can visit her blog here Chasinkeegan
I now realize the light is kinda dingy in these photos, trust me, that's my winter daylight lighting again.  In real life they are very very fabulous!  My pages can be found here Not Housework- smash swap entry  and here is the link for my smash swap completed book in all its glory if you want to look.  It is fun hosting these swaps & getting first peek at all the gorgeous entries.   These were mailed back January 31 so just in the nip of time to stay as a January swap.  Happy spring everyone!