Sunday, February 27, 2011

Zombie Things

I've been working on the details of this party for about 1 1/2 months now.  Mostly happy & kinda sad its all done but by all accounts it was a successful party.  We started out with Zombie bowling & I made these nifty Tshirt decorations to have a coordinated Zombie bowling league.  
I started by hunting inexpensive Tshirts & it dawned on me undershirts are the ticket!  They work out to be about $2.50/shirt & that is definitely doable.  We won't talk about the time that this took, but it was so worth it.  

I got busy with my Gypsy & picked some graphics from the "Happy Hauntings" cartridge for the font & "Pumpkin Carving" cartridge for the face.  I have always wanted to try freezer paper stenciling.  There are lots of blogs & you-tube videos about how to do this & I extend a grateful thanks to bloggers who have shared their knowledge.  Freezer paper is a food grade paper that has plastic bonded on one side.  

I had to cut the freezer paper to 12X12 proportions to fit my mat & then made the stencils with my cricut expression.  I made sure to cut extras, which seems like overkill at the time, but it did save time since the "Zombie" word was fussy cutting & not all of the cuts came out cleanly.  Its a bit of a learning curve with the settings on the machine to cut nicely each time.  Every machine seems to cut slightly differently so I won't bother boring you with settings, especially since I can't remember which combination worked best.  I do remember playing around with pressure, blade depth & multi cut settings.  An older mat is less frustrating  to remove the paper, but a new sticky mat definitely cut better.  I highly recommend using the spatula tool to assist peeling paper off a new mat.

I washed the shirts in fragrance free dye free detergent & did not use fabric softener to dry.  This is the template face, ironed shiny side down onto the Tshirt, I used the cotton setting on the iron.  I did all the ironing in one batch.

This is a black Marvy Ushida brand permanent fabric marker that I used to mark out the stencil, I also used a red marker.  These markers are supposed to be permanent after 4 hours with no other preparations.  Best thing is to put some cardboard inside the shirt before starting & to work from the top down.  The ink does smear a little on your hand if you jump around.  I had 2 black markers in use & switched back & forth so the tips would stay juicy.

This is the fronts of the large child undershirts.  I was getting tired of dabbing markers & needed to speed up my process so I did a lot of the filler with Tulip brand black fabric paint, which is also supposed to be dry in 4 hours & can be washed after 72 hours.  I wanted a chunky tip Marvy fabric marker, but they were sold out.  Turns out the paint was faster & easier on my hands to apply, even if it was  a bit messier.  I let them all dry overnight & peeled the freezer paper off in the morning.

This is the fronts of the adult small undershirts.  I wanted the word to be on the left shoulder like a name badge but by the time I'd ironed & started it was too late to go back.  So to quote a good friend, if you can't be perfect, be consistent!  You know who you are & thanks for the gem of knowledge, it got me through!
 This is the back of the adult small shirts.  

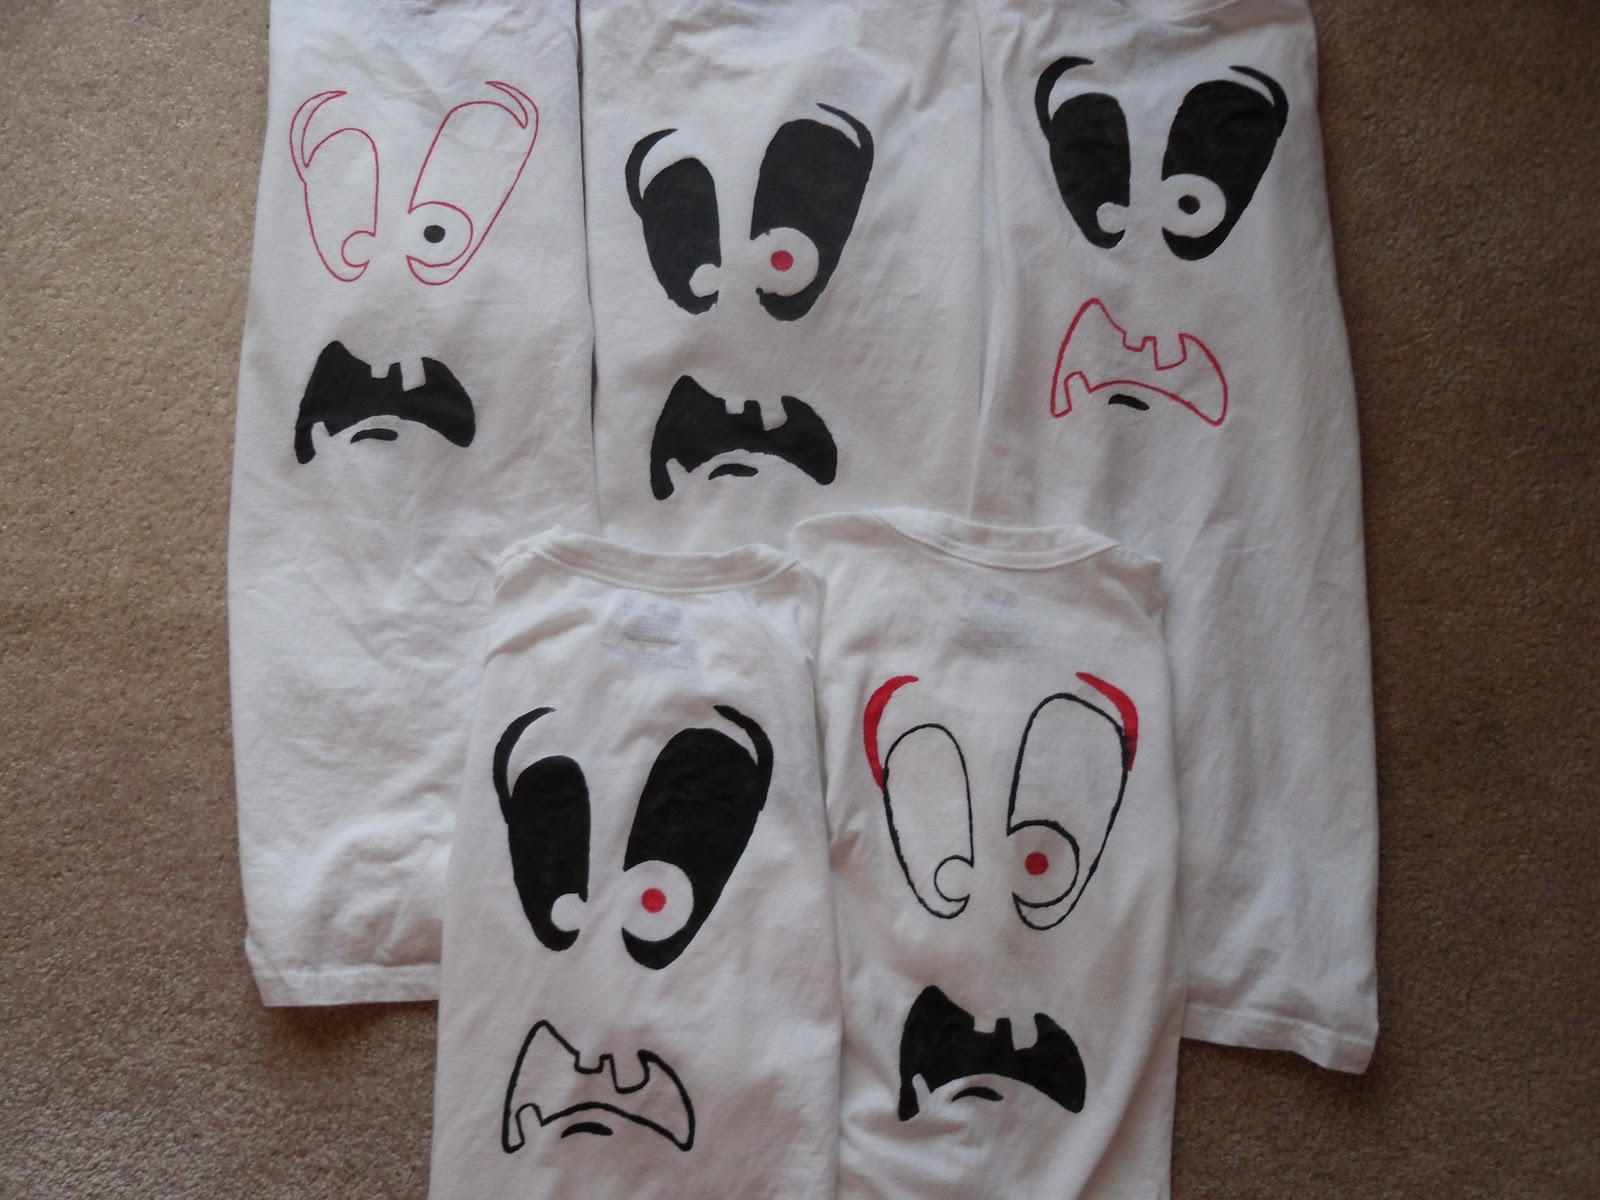
 This is some of the zombie bowling league in action!  I needed two different sized shirts since zombies are not all the same size!
Stay tuned, there's more zombie goodness coming!  I hope you have a  great week.

Saturday, February 19, 2011

Doodle Robots

Ever played around with paper dolls?  These are simple & easy to do.  It seems robots are trendy again so lets see what we can do with this.  Whats that?  Robots are always trendy?  Allrighty then!
Start with an accordion folded scrap of paper, & draw something that has connecting arms.  You could try flowers, animals, furniture, do what you like, no one has to know!  Go ahead, play around, you know you want to...

Nice sharp scissors make easy work of this. Remember to always point the tips of the scissors away from you & move the paper not the scissors for accuracy.  The only red robots we wanna see is painted or drawn, not bloody.  eeeep!
Here they are, the right 4 then the left 4 all doodled up waiting for somewhere to go.
Don't they make you smile?

I don't know what I did here for the text to be all central.  Oh, I see I can play with the text alignment, ah, I'll leave it for visual differences at this end of the post.  I was having trouble pulling pictures from my computer.    It seems I can pull pictures from a photo card, but I cannot pick & pull pictures from Picassa3 directly from my computer files.  It would really help if I labeled pictures I suppose.  The silly thing is they are labeled in my Picassa files, but I can't seem to upload them, yet.  Sometimes "yet" is  avery big word, eh!  

Ok, so what to do with this cute little paper chain?  Wouldn't it be cute dancing around a flower pot gift?  or around a flower vase?  or along the edge of a card? or on a scrapbook layout?  or along the edge of the bathroom mirror to see every morning?  or just laying around making everyone else wonder, 
why is that sitting there?

Thanks for the comments of encouragement, I have no idea how to direct reply to comments so bear with me.  I do apologize for the delay time lapse.  I've had good advice to moderate comments so everything is on the up & up, know what I mean?  I am excited to have followers too, I wish I knew how to become a follower of others blogs.  More learning to achieve, yipee!

I'm hoping to do about an entry a week, & to learn how to use more of the blogger settings.  There should be some cool detail pictures later, for a birthday party.   Soon a certain kiddo turns 13, & everyone knows that means teenager!  What better way to ring that in than with a Zombie themed party!  Cheers!

Saturday, February 12, 2011

Valentines projects

I've been busy getting ready for the big Monday Valentines Day.  Grade 7 kids are pretty hot & cool about this stuff but this is the last year they do classroom based Valentines projects.  I've been busy with my Gypsy, a portable design tool from ProvoCraft, that enables me to use my Cricut Expression for projects.  A Cricut is essentially a plot cutter for the crafting world & fairly easy to use once the learning curve is navigated.  It uses cartridges that have collections of images.  The cartridges can be linked up to the Gypsy & that speed-lines accessing the images.  There are piles of YouTube videos & information on the internet so I won't go into it more than that.  Thanks to all the fabulous bloggers, Cricut & Cricut Circle Message-board users I have been learning like crazy about all sorts of tricks & techniques.

I've been thinking about mailboxes & designing my own & it has been entertaining & challenging to create.  There is one already designed on the Cricut cartridge  "Love Struck 2010" but I didn't like the size limitations.  I got busy with the "George & Basic Shapes" cartridge & created a prototype file, cut out about 12 variations while I played with proportions.  If I were more mathematically inclined I could've done it easier I suppose, but I'm a more intuitive style crafter & it didn't bother be to do test cuts on yucky paper.

This is the best prototype mailbox, it measures 3" wide, by 2.5" high  by 3.5" long.  Cute huh!

This is the prototype file how it shows up on the Gypsy.  I used the "George & Basic Shapes" cartridge & played around until I liked it.  I don't know how to share these cut files yet, lots more learning for me.  I'm not a technological computer type gal.

I enlarged & split the prototype into 2 components, this is the base file.  Sorry its a bit blurry.

This is the roof & flag file.

This  is how the files look cut out.  It looks pink but its really red paper, funky light tricks somehow.  I will give one as a tracer for the class to use & one constructed to show how it looks.  I used good old poster-board, cheap & easily available,

I used a pencil to do the scoring.  Scoring breaks the surface tension of the paper & allows it to fold & crease nicely.

No measuring needed.  Lay the roof piece over the base piece & score it.  Lay the base over the roof to score the flaps.  Use a little ruler or any straight edge to score the little tabs.  Fold all the scored lines.

One side of the roof attached.  A glue gun would be simplest to use for a classroom project.  Adults needed depending on age & ability of the kids.  I recommend a bucket of snow nearby for immediate dip of singed fingers if it should happen.

Both sides of the roof attached.

 The inside of the mailbox with the tabs not stuck down very well yet.


Voila, completed mailbox!  It measures about 7" wide by 5 3/4" high by 8" long.  The flag is on with a split back attacher, very common in most schools.  If you have loads of time you could add 2 more score lines lined up with the big tabs on the roof to create a horizontal visual line.  That kinda shows up on the prototype picture.  The roof could be doodled & decorated before attaching.  I'm leaning more towards stickers to decorate.  Each kiddo can doodle their name in the opening flap.  I didn't bother with a paper closure on the design because its only going to be ripped off by the first impatient kiddo & spoil it.  Tape it closed at the end of the day to send home & everyone's happy.  A second split back closure could be centred at the top of the opening similar to old fashioned mailbox mechanisms but I never tried that.

There is tones of discussion to generate with this project among a class.  It would definitely challenge kiddos to think.  How would you make a 3D image like this?  Also I think this would be a great team project: tracing, cutting, scoring, folding, gluing, flag attaching, whew!  The discussion about assembly line production in factories everywhere would be enlightening.  How about child labour discussions?  Could you imagine assembling the same thing every day?  I don't remember discussions like that in grade school.

These are bookmark Valentines about 3.5" tall, from "Tags Bags Boxes & more" cartridge.

More bookmarks for Valentines similar size to the hearts, from  "Tags Bags Boxes & more" cartridge.

Happy Valentines Day!!!

Sunday, February 6, 2011

More doodling

I've been busy all over the internet, loooove You Tube, Google images, & of course blogs everywhere for inspiration. My first picture post was the last page of a doodle booklet i've got going on.  I made the booklet from a piece of poster board from some local dollar store.  I will try to remember how I made it & post directions in a few days.  I need to go back & find the artist blog where I learned to make it to give proper credit.  So if that was the last page of the book I really should show the rest of the pages.  I'm hoping they will inspire someone else to get doodling, its relaxing in a meditative way.  I like that no special tools or pens or anything are needed, just a few minutes to let my mind wander away constructively.  Go ahead & click on the pictures to magnify.  Another neat thing is "Ctrl" & "+"  magnify images & "Ctrl" & "-" reduce images, love using that to see details or to relieve my tired eyes.
This is the cover of the book opened out flat to show front & back.  Oooh, I just picked all my pictures out at once & then I can go through & add in the text.  More blog learning, yippeeee!!!!

 This is page 1, being a flap style book you can see a crease sort-of.  I don't mind it.  I think this is my favorite page of the book.

 Page 2.

 Page 3, I traced an old CD to get the nice uniform circles.

 Page 4, looks kinda like a shell or something swirling.  I'm not sure, but I will probably add to this one when it occurs to me.

 Page 5, its really 3 parts because of how the book folds out.  I like how the book changes appearance as it is unfolded.  That was a totally unexpected effect.

 Page 6, I may go back & drip some rubbing alcohol on this to spread the Sharpie ink around for visual interest, not sure yet.

 Page 7, this is one that looks different closed over page 6, lots of room for more details.

Page 8, this is the last pages.  I did this booklet entirely with a Sharpie pen, the dual point marker is my favorite as it is easy to switch fine or medium tip points all I like.  I worked on this book for about a month, in fits & spurts in 2010.  There is room for more to be added but I got stalled & put it away for awhile.  I wanted a reference point for all the cool techniques & styles I've seen & this was an easy way to dump it in one spot.  I've got a second book started somewhere using colour Sharpie markers & will post that some time in the future.

Friday, February 4, 2011

test

This is a page from my doodling :)  My good friend came & helped me get pictures figured out.  I figured something wasn't right when my screens didn't look like the help files.  My friend didn't recognize the screen shots that I emailed.  So, firefox was the culprit, blocking everything up.  I did as I was recommended & downloaded "safari" & now all my screens match what blogger help says.  I'm a happy happy blogger now!  So thank you to good friends, life is so much better with them :D

Tuesday, February 1, 2011

Gone doodling

For 3 days I've been playing around to figure out how to post pictures.  I've gotten some different advice from 2 people I trust.  I've tried clicking around (sounds bad, LOL) & looking for menus, sub menus, slide bars...  I tried 4 different attempts at posting & the blog ate 2, & I ended up deleting.  I gave up & went looking at google images for doodles.  I've got some of my own of course but its fun to see what others are doing.  So until I get this picture posting mastered, I recommend you go doodle too, its relaxing & fun.