Showing posts with label Doodling. Show all posts

Saturday, April 4, 2015

Busy Book aka Quiet Book aka Toddler interactive book

Long title, huge 16 page project!  We've been through 8 "bugs" since January so blogging went by the wayside.  I've been enjoying taking a detour from paper crafting to create a book for my toddler boy who is now 28 months.  Little hands will keep themselves busy, or we can guide them with interesting things.  Screens and electronics are nice, but they are only two dimensional.  How does anyone learn to manipulate their THREE dimensional environment without engaging with it?  Plus toddlers are major league growing and learning, even though their communication can't always keep up. 

So, last year I mined Pintrest and Google images and drove my family crazy planning 3 books.  All of March 2015 I've been driving everyone crazy as I try not to drive myself crazy building this one book.  I've had so much fun figuring out details and making sure it will grow with my boy for awhile.  I've also been researching "free motion sewing", basically doodle sewing by machine on Youtube. A new friend gave me her extra free motion sewing foot to try.  That lit a fire under my motivation and made it even more fun, and bonus it sped up the sewing.  Here are some process pictures to show the sheer mess I work with.  Trust me, I know what I'm doing and that works for me, LOL!  I think I take after my Dad's creative process, he would make a huge mess as he worked too.
organized piles of all my flotsam & jetsam donated and thrifted stuff

classic, sewing at the kitchen table complete with makeshift ironing board on a thick piece of felt fabric

free motion sewing in action

close up of altered free motion foot, zig zag stitch in use
Leah Day on Youtube shows exactly how to alter a generic free motion sewing foot to make this work.  The foot "hopping" she mentions wasn't a concern for my machine so I only altered the foot from closed (oval) to open (C) shape.  I recommend her videos if you are interested in learning free motion sewing.

Basically I checked my sewing tension, put on the free motion foot, left the feed dogs up, switched my stitch length to ZERO and switched from zig zag to straight stitch as needed, foot down of course.

After 7+ heavy days of sewing, many evenings of handwork details, I finished this book last night.  I will show more posts over the next few days since it is going to be an Easter gift to my little boy.  I'm so excited to see him enjoy it!  Happy Easter and Happy Spring everyone!!!

Tuesday, August 12, 2014

Your Stamping Notebook: page 11 of 14

Ombre effect
Over Stamping

The links will take you to more CTMH technique videos detailing how its done and showcasing pretty examples.

This page is all done with the water based blender pen and a bit of stamping .  Scribble off the colour from your blender pen to get Ombre or transitional colour effects.  This is how you clear the ink from your pen to switch colours.  The nibs will stain, but its no big deal.  If they get dry, I learned from "The Frugal Crafter" they can be re-hydrated with a mixture of 50/50 water and glycerine.  I always use distilled water for crafting because tap water gets funky as it ages.  I tried it, and IT DOES WORK!  That's a cool bonus tip.  I keep a container premixed and set aside, and pour a little into an old vitamin bottle lid.  That way if there is ink residue on the blender pen, it won't contaminate my main container.  The blender pen nibs will eventually wear out, but this really extends the life of a blender pen.  They're such a cheap tool to have, definitely a good idea to keep a few on hand.  What to do with the scribbles/doodles?  Overstamping!  Stamp over them with the same colour ink or any colours.  Now you have fun custom backdrop for cards, scrapbook embellishments, Picture my Life pocket scrapbooking (Project life)...

Monday, August 11, 2014

Your Stamping Notebook: page 10 of 14

This is all about CTMH water based blender pen tricks.  Stamp 4 images, any way you like.
A blender pen can:
Fix an unevenly stamped image
Touch-up, hide or cover details
Doodle any colour you like to accent a stamped image

Blur or haze any edge you want to soften the image
Shadow an edge or entire image
Darken an image and emphasize parts
Lighten the ink from an area or even remove ink if you get it fresh stamped - CTMH paper will pill or erode away if you rub at it a lot.

Pretty versatile, eh?

Sunday, August 10, 2014

Your Stamping Notebook: page 9 of 14

Sorry for my rustic handwritten notes on each pictured page, but that was simplest for me.  I used the CTMH water based blending pen to colour this stamped image (archival black ink).  Blending pens are dual tipped, just squish the lid to make an ink palette to pick up ink from, and scribble off the colour to change colours.  Easy doodling!  The blending pen tips will stain, but it is no big deal.  This is a great way to get maximum value from your CTMH water based dye ink pad collection. 

You can activate, trace, or enhance your water-colour-pencil colouring.  Using a heat embossed image or archival ink will help prevent the colour from migrating or muddying up your creation.  There is almost no odour or residue so this is a great activity for all ages and people with allergic sensitivities.  Pages 10 & 11 will show more blender pen tips & techniques.

Monday, August 4, 2014

Your Stamping Notebook: page 3 of 14

This technique is called Drop shadow.  I can't seem to find any "official" CTMH videos to complement this page.  Basically, it involves first and second generation stamping.  Stamp your image once, then offset it a smidge any direction and stamp a second time.  Many people have done this "by mistake" dropping the stamp.  If you want to take it to the 3D-cartoon-grafitti level, draw little lines to connect the images.  Think of what a cube drawn 3D looks like to get the idea.

The lower star flower image shows a drop shadow accentuated with the blender pen to make a more blurred flying look.  It is a great technique for accentuating motion of falling stars, snow, rain, leaves, running creatures...

Tuesday, July 29, 2014

CTMH + NEW Shin Han Touch Markers

CTMH is switching their markers to the Shin Han brand.  Here are three very good links showcasing the markers.  Shin Han Touch twin markers 1 min 2 seconds, Shin Han colourless blender pen 1 minute 2 seconds, and http://www.touchmarker.co.uk/.  CTMH will be releasing more videos detailing these markers but here's the 411 until then.  I have summarized this from multiple YouTube videos and CTMH consultant videos for your reference.  Sorry for the lack of pictures, this is pure information at its best that I can share.  I think of it as retro internet, lots of info, not much icing, LOL!

CTMH will be launching Shin Han markers with the new August annual 2014-15 Idea book catalogue.  There will be 24 marker colours to choose from, and one colourless blender pen, each  $5.95 USD or $6.50CAD.  The colours are complementary to CTMH colours, including neutrals and flesh tones.  They will be available for Hostess rewards redemption on gatherings (parties).

These alcohol based markers are square, so they do not roll off the table.  They are tried & proven quality Japanese product available for over 20 years.  They feature dual (replaceable) tips; a brush tip and a chisel tip.  They are comparable quality to Copic brand markers.  They are fast drying, low odour that dissipates quickly, and refillable.  It is not known at this time if CTMH will have refill ink or replacement nibs (marker tips) available.

Three things that are important to know:   Store these ShinHan markers horizontally, they will fit in CTMH small, medium and large organizers to store.  Use a light pressure with these markers.  A heavy hand will damage the nibs.  These markers are juicy, so they will seep through most papers to whatever surface is underneath.  A pad of scrap paper, or a non-stick mat under your project is ideal to prevent ruining your table.  Or just use high quality cardstock.

Using a light touch, and repeating layers is the best way to increase desired colour saturation for shading.  When colouring a line-drawn-style stamped image, it is recommended to use heat-set solvent ink, pigment ink, or heat embossed ink to prevent the lined image from being dissolved and smeared.  These markers will blur water based dye ink (stamped) images.  That is not a bad thing if you use a pale ink for a line-less effect for your project.

Utilizing the blender pen and blending techniques the colour variety is quite broad.  Layering ink lightest to darkest is the easiest way to control the level of desired colour saturation. This way achieves soft, blended, watercolour-like or pastel images.  OR go ahead and try dark to light blending for more masculine effects, heavy visual images, teenage style, graffiti, or cartoon images.  They're your markers, the more you play, the easier they get to use.

The colourless blender pen is an essential tool to complement your ShinHan marker set.  Simply scribble off to clean the colour away.  While a project is still fresh coloured or damp, you can:
Remove excess ink colour
Dilute or soften ink saturation
Patch a mistake
Tidy an edge
Blur an edge
Create highlights
Define a shadow
Create dots, stripes, and details

So, big deal, 24 markers, wow.  24 markers; each colour self layered 3 times =  4 colours per marker x 24 = 96 colours.  If you take those 96 colours and do a shade grid, one colour each line vertical, then repeat horizontal = 9216?!?   BUT half of those are duplicates because of the nature of the grid, so divide by 2 = 4608 colours?!?  That's a bit more versatile value I guess, assuming my math isn't too wonky.  Please correct me if I've goofed up and I will happily amend my calculations.

Alcohol ink Markers can be used for more than just colouring, after doing a test spot, try re-colouring these things:
canvas
chipboard
complementing your mixed media projects
gems & rhinestones
plastic- sequins, pearls, shrinky dink plastic
glass
ribbon
fabric
buttons
metal -brads, eyelets, staples, charms

Don't be afraid to cruise the internet to see what & how Graffiti Artists, Cartoonists, or Art Journaling Artists are creating with their alcohol markers.  Knock-off markers are available online for cheaper prices.  If they are not labeled "Made in Korea" they are fakes.  The fakes will have spelling mistakes on the labels, poorly fitting nibs, caps that are disagreeable to remove/apply, and are often more smelly.

Splitcoast Stampers Blending Alcohol ink markers tutorial.  Is there anything paper related SPC can't do?  Oh, and one last link Kaszazz brand Alcohol markers document, a really good resource for all things alcohol markers, beautiful instructional booklet.  I printed one out for reference, it's that good.  I know its not the same brand, but techniques are similar for almost all the alcohol marker brands it seems.

I will leave it with you to investigate techniques of using markers.  I am a complete newbie to these since Sharpie are my normal go-to alcohol markers.  I'd love it if you left a comment telling me about how you use your markers, techniques to share & try, fails...  Anything really!  Thanks for stopping by, I hope this is helpful information for you!

Spoiler alert!  I've got a fun stamping project share coming up, starting August 1!

Sunday, January 6, 2013

Nursery Vinyl

This project has been a labour of love.  I planned & thought & was stalled multiple times.  A friend helped me put up the vinyl in the nick of time, 4 days later my baby boy was born.  I will give you the details of what I did & the pictures can be clicked on to enlarge if you like.

 I ordered Oracal 631 (indoor) vinyl from OhMyCrafts.com on a sale of irregular vinyl with bonus transfer tape.  I snipped colour samples of each piece for reference with the cartridge handbook.  I then planned out the colours for the animal layers.  I had to do multiple pages on the gypsy with assigned colours for the layers.  I used cricut Zooballoo cartridge & my Gypsy to plan out the animals & letters. The animals are cute, and mostly only 2 layers.  The animals are 10.6" and the letters are automatically sized to match.  I spelled out the names of the animals on separate pages about 1/3 the size of the animal letters.  After double checking everything I kiss cut the vinyl on my Expression cricut machine (12x24" cutting mats).  I cut apart all the pieces, weeded the waste vinyl out, and sorted the animals layers so they would be ready to apply.  I won't go into vinyl application instructions here, there are plenty of talented youtube videos & other bloggers who have explained it beautifully.  My friend & I used a lazer level & post-it notes to guestimate positioning around the room.  I didn't note what measurement we used but the top of the upper animals is one height, and the bottom of the lower animals is the second height.  If I remember right it is about 2' between those lines.  I also could've cut a shadow layer for the base of each animal but I didn't want to add more work to this project.

The alphabet is purposefully mixed up for visual interest.  It will be a great memory game later, IE Where's the Fox? 

Here they are on your left as you enter the room & look to your right.


 Hippo & Elephant are kind of traitors, they were difficult to align and demanded multiple attempts by hand to apply.  Using transfer tape for the majority of the vinyl helped.  But, those two brats are probably going to have to be recut & redone since they languidly hang on the wall, baiting everyone who looks to smooth them back down (petting?).  They were threatened with the hairdryer to stay stuck but alas, they continue to rebel.  Washing or wiping the walls pre-application might've helped too.  The cricut tool kit was indespensible for this project. 

Sitting nursing my little one I see picky things like funny spacing.  Unicorn, Cat & Elephant layers are all the same with lilac as the top layer, pink as the bottom layer.  Giraffe could have had his layers the other way with tan on top, brown on bottom.  Interestingly, the tan vinyl seems to fade into the pale blue wall & is hard to see.  Sharpie markers helped to distinguish mouthes & details on a few animals.  I really like the hand doodling of lips, eyelashes & whatever other sweet details evolve with love.  Quail was outlined while on the wall , Vulture & Tiger could also use outlining.  It would've been smart to graffiti them before they go on the wall, but hey, they're up now & I might get to it, eventually. 
2 hours paper planning
4 hours planning on gypsy
2 hours cutting
2 hours weeding
1 hour organizing layers
5 hours visiting with friend & putting up
 = 20 hour project worked on over 2 months, well worth it!

Happy New Year everyone!

Wednesday, October 19, 2011

Canadian Online Swarm ~ Challenges 1 & 2 of 4


I did eventually complete the challenges for the swarm, albeit completely out of sequence.  I was inspired to take some autumn pictures with the lovely showcase of fleeting colours.  As always, click on the pictures to "bigify."

Challenge 1 of 4
Saturday Oct 1, 2011.  Autumn or Thanksgiving themed card
also National cardmaking day
Using all 3 criteria create a card with 
1.  punch at least 3 “holes” anywhere (square, round, large or small) 
2.  use vellum/plastic/transparency  
3.  Use a Cricut cut, your choice of image.
Using my gypsy, I cut the card from "Sophie" cartridge at 8.79" x 5.5".  I used the Chomas Creations mini gel pen holder to write "It's Pumpkin Time" at 1" height, font from "Blackletter" cartridge.  With a second screen on the gypsy I had the cut layer arranged to match the pen.  I like how the cut out sort-of looks like an exclamation point.  I backed the "holes" with printed vellum from my stash.


Challenge 2 of 4

Friday, September 30, 2011  In memory of summer, RIP 
Create a scrapbook layout with all 3 criteria:  
1.  flowers, butterflies or bugs, at least one cricut cut  
2.  stitching  (your choice how:  hand, machine, rubons, stamped or doodled) 
3.  a favorite quote

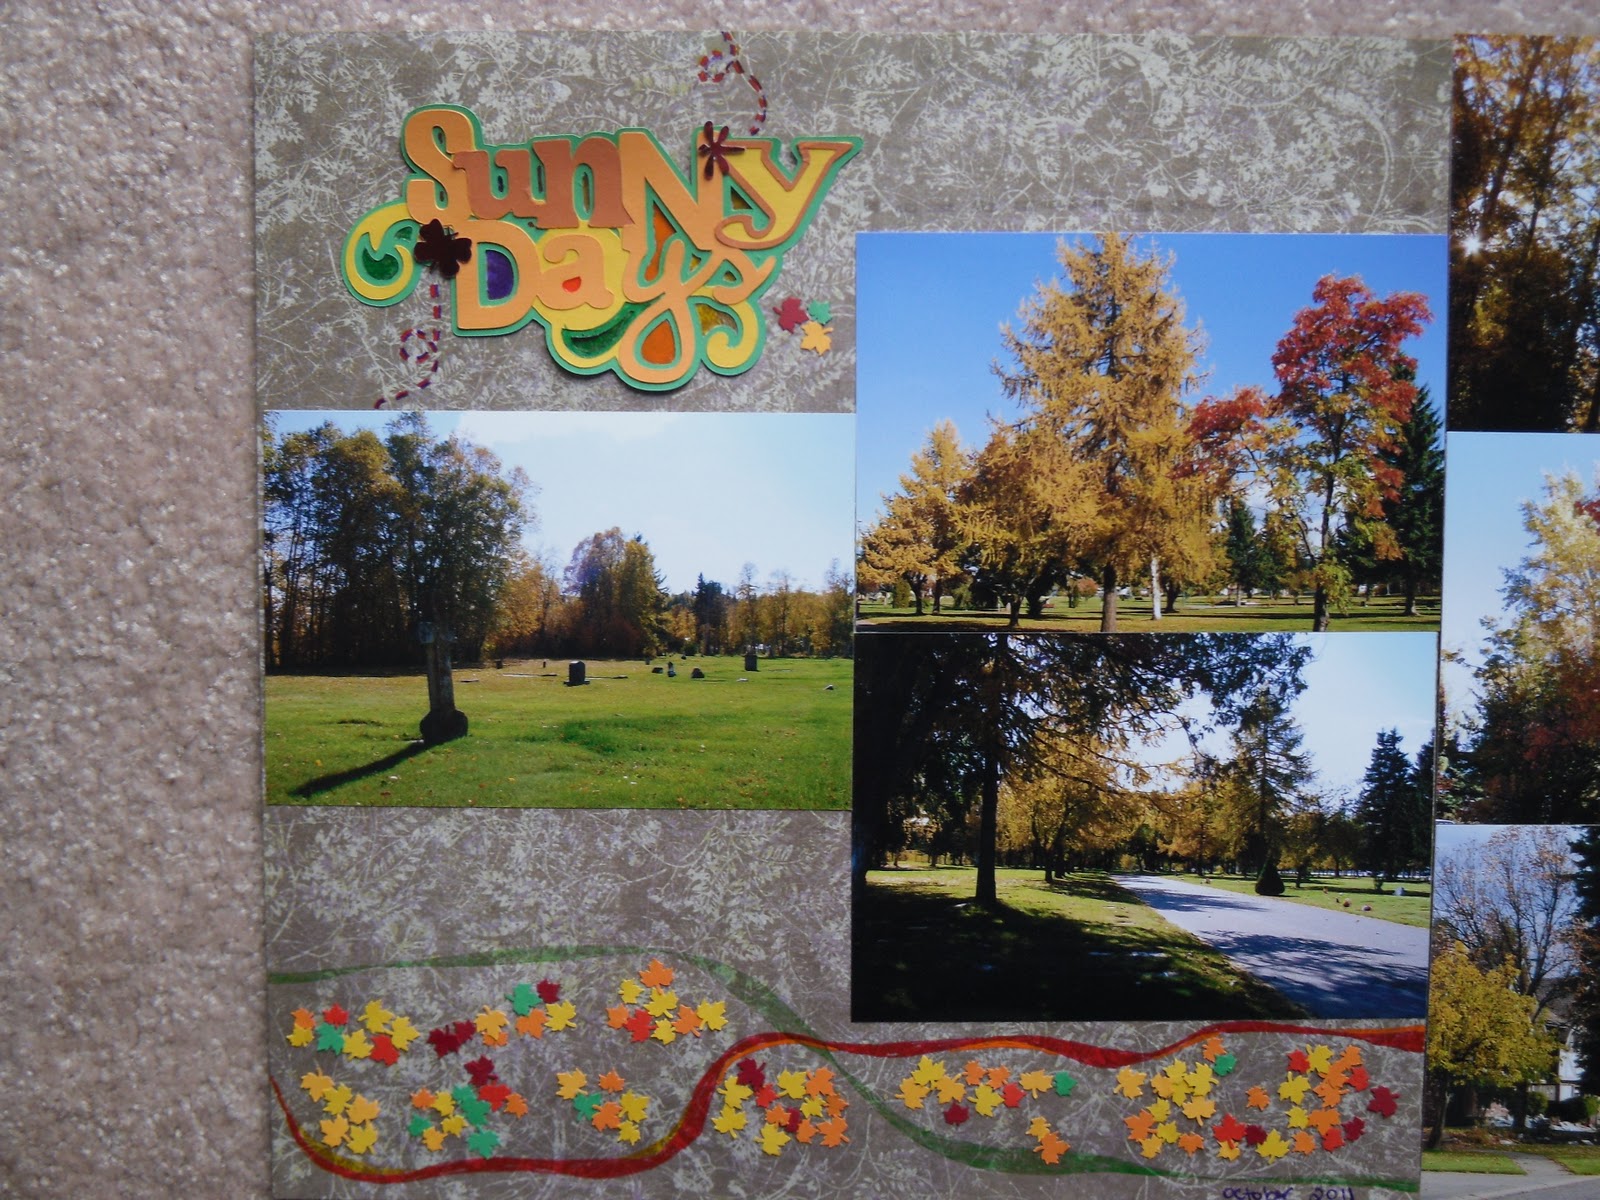
 Normally I do not prefer fall, primarily because it is a harbinger of winter.  The last picture shows this 2 page scrapbook layout, 12x12 size pages.  The next 2 pictures show the left and right pages.
 The quote is from a page of vellum quotes, DejaVues brand.    
"Sunny Days" was cut using gypsy "celebrate with a flourish" cartridge.  It is 5.36" x 2.73", green base, yellow, orange, and burnt orange for layers.  I used Sakura Glaze 3D ink pens to doodle around the punched butterfly & dragonfly, to doodle fill in blank areas of the cut out, and to do the "ribbons" of colour at the bottom borders.
 I used 2 small punches (shown) to do the spray of leaves, I kept the balance of colours yellows and oranges, from scrap paper from the "Sunny Days" title, with about 1/4 green.  I randomly rolled several strips of re-positional dot adhesive glue across the bottom of the page, then rubbed some away irregularly before sprinkling the leaves across.  I just pressed them down with my fingers, picked up the pages & tapped off the loose ones, repeatedly until I was happy with the visual effect.  All supplies were from my stash, I do not know the brand of background paper.
hmm, I wasn't expecting the background paper to blend into the carpet so mysteriously.
I've got 2 more posts to share from this swarm; my swap contribution, and my return swap mail.  It was a push to make myself do the challenges.  Joining in is great motivation to jump in and do something.  I'm glad I did!

Sunday, October 9, 2011

Canadian Online Swarm ~ Challenge 3 of 4


The Challenge:
Sunday Oct 2, 2011.  Silly pet or animal scrapbook layout ,
A favorite stuffed toy is okay too.
Using all 3 criteria:
1. Use texture: fuzz, fibre, ribbon, string, thick paint, emboss/deboss…
2.  lumps/bumps: lace, buttons, folding, popdots, pop-ups…
3.  Use at least one cricut cut, your choice of image.

I intend to do the rest of the challenges, but I am running out of time, the deadline is October 10, 2011.  Some of you know I have been in slow motion from a bad cold for September so its very nice to be doing a little more now that I'm feeling better.

 Using the cricut, gypsy, and "French Mannor" cartridge, I cut out the scalloped sheet from "coordinations" paper.  It is 2 sided, but it has a coloured core so the paper can be manipulated different ways to allow the core colour to show through.  I started off doodle embossing on the 12x12 rubber sheet I got with the embossing tips from Amy Chomas Creations product line.  Check out my posts labeled "cricut tricks" if you are interested.  I used my old Fiskars dry Embossing table kit, aka "Scrap Boss" as the base surface.  I couldn't find my distress tool kit so I improvised with the cricut tool kit, the little spoon tool has a very sharp tip, perfect for doodle scraping the paper.  I will definitely try that again.
 I used the gypsy to cut the kitty from "four legged friends" cartridge at 6.4" x 3.55"   See the grey star paper, it was a nice surprise to see it made the perfect accent for Boomer colour.  I used some of the trendy twine I won from the last swarm, "blueberry" colour, some thread for whiskers, and foam dots to lift it off the page for some dimension.  I doodled the checkerboard pajamas with cricut markers after running the tip of the marker around the cut to dull the bright white borders of the cutout.   I'd never used cricut markers this way and highly recommend it.  The stubby end and thick plastic holding the nib makes it almost impossible to scribble the marker off the edge. 

 Boomer is modeling some cool socks that I made by running some dollar store socks through the serger to make narrow tubes 2 years ago.  I saw them blogged as an April fools joke a few years ago & thought it was so funny!  He did not prefer the closed toe socks and became adept at pulling them off very quickly.  Conversely, he didn't mind the leg warmers since he could still walk and climb, however hysterical his gait was initially, hee hee!  He's such a good sport, he really doesn't mind.

 "The cat's Pajamas" was from "meow" cartridge, but I reduced the right & left border manually with scissors.  
It took the whole afternoon puttering along but it was so relaxing to make this fun layout.
Happy Thanksgiving!

Thursday, September 22, 2011

Creative mending

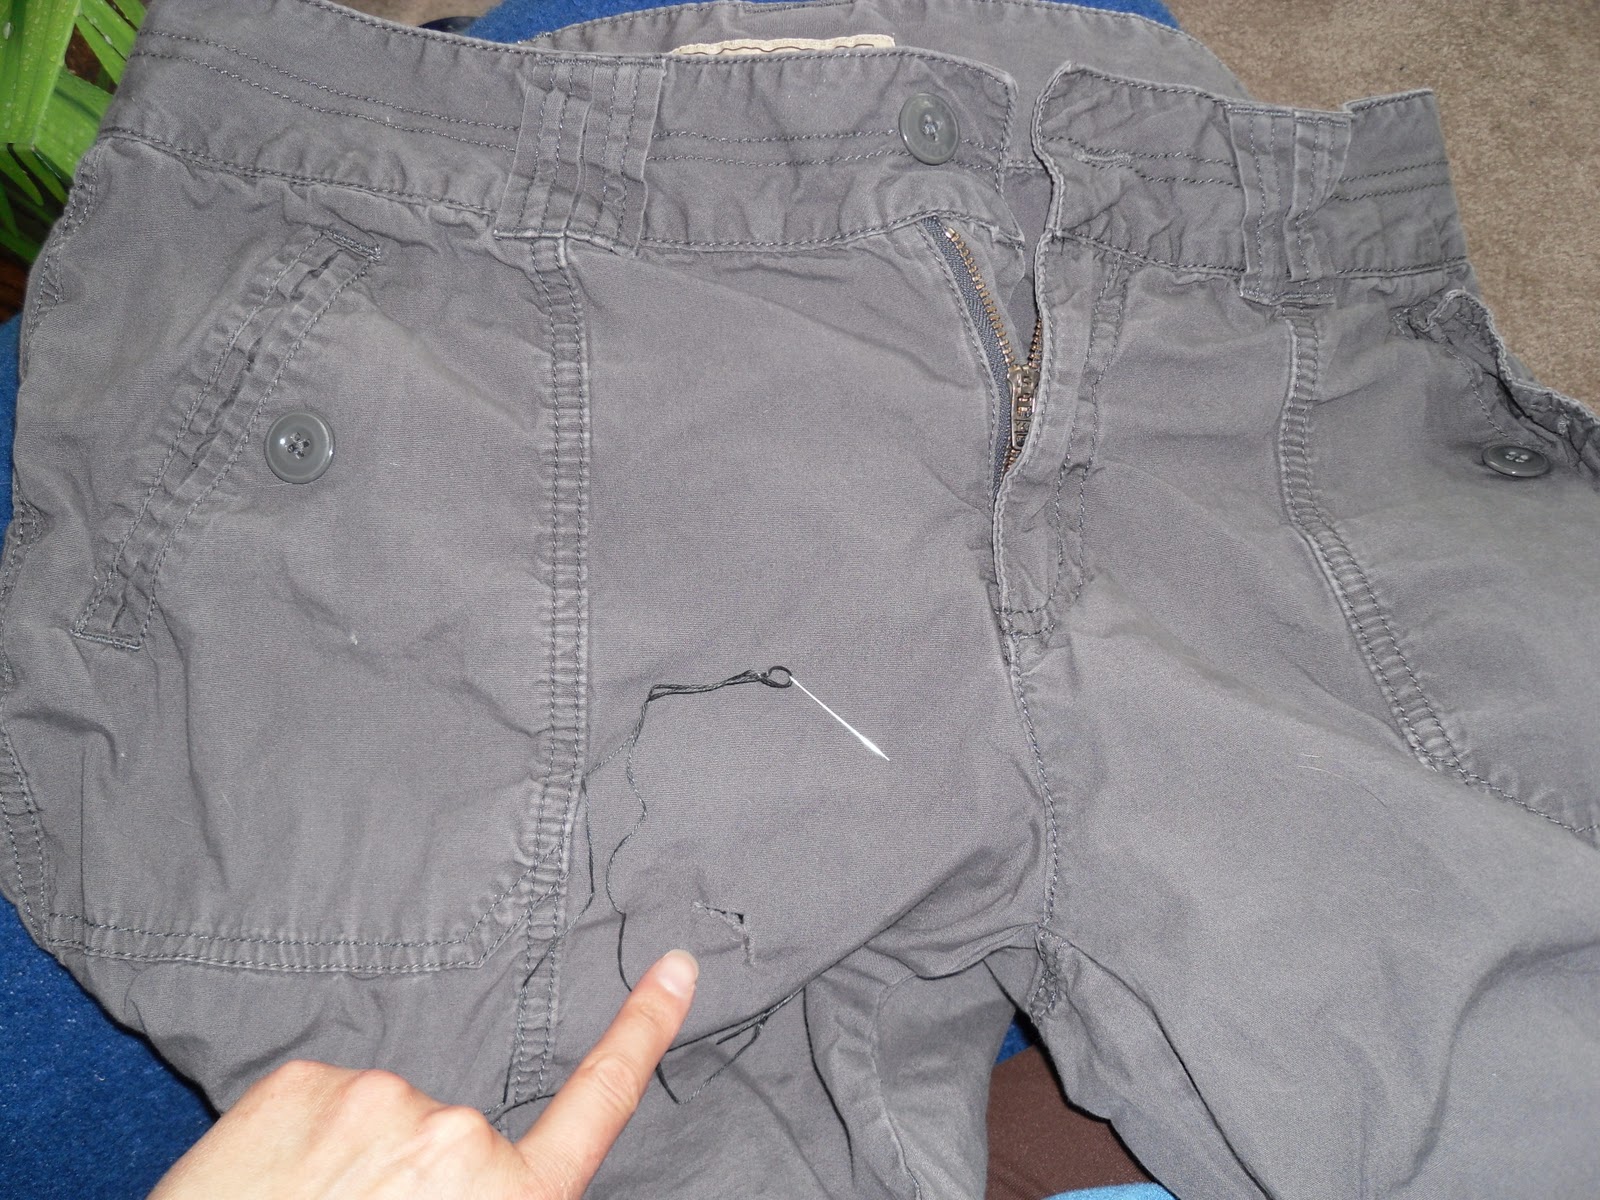
Holes in pants, not very appealing.  They still fit, they're comfortable but not ready to be tossed.  Only one thing to do, fix them to look better.  These pants started off with an odd L shaped tear in a not exactly flattering spot.

I don't bother with an embroidery hoop since these pants are always kinda wrinkly looking.  I thought on it awhile & then started with the baseball stitch mending, or that is what I call it.  The repair looks very industrial and chunky.  I used 2 strands of 6 strand embroidery floss, unknown brand for these repairs.

 I set it aside for a day to let the details develop.  When I looked at it again it made me think of squares since the pocket and stitching details are very linear.
 White chalk and an old phone card helped me to rough out placement of lines.  Since this is hand stitching, I am using, perfect is a term not needed.
 I added more stitching similarly on the pocket to echo the effect an make it more deliberate looking.  You can click on the picture to enlarge if you like.
Here's another pair I repaired awhile back.  The complete "flower" was a hole in the centre of the flower.  I used variegated blue/white embroidery floss.  I was pleased with how they turned out.
 Same repair, close up picture.


When I am needing inspiration I google doodling, doodle stitching, embroidery, henna tattoos, graffiti, cartoons, zentangle, squiggle drawing...  Clicking along the internet does not let me down for ideas.  I encourage you to try this type of repair some time, its just a needle and embroidery thread with a wandering idea.  The best part is, if its a flub, well, the clothing is already paid for & destined for the rag bag anyways.  Here's some more creative mending ideas if you need inspiration.  http://whipup.net/2011/03/26/creative-mending/ 

Sunday, May 8, 2011

Doodle book

I have been hunting around to find where I learned how to make these dandy little posterboard books & gosh durned it I cannot find it.  I can't take credit for the idea, but I can share it.  
You will need a sheet of posterboard (dollar store, stationary section of most stores...), ruler, calculator, pencil, needle & dental floss.
Measure & divide the sheet into thirds.  It will not come out evenly, don't stress out.  Add the slight extra to one end, make the other two of the thirds sized the same.  The bigger one is the cover.  Boomer says "See how that works out?" If you mix them up just pile them up together, they will show you which one is the bigger one.  The bigger third is divided in half to become the cover.  The other two need to be divided into thirds.  Posterboard will fold much nicer if you score the lines first.  The picture below shows how they are overlapped to become a book.  It does not matter which way you lap them as long as the thirds pages are offset.  Mark each spine fold sheet into thirds, poke holes in each sheet.  Something about thirds makes this easy to remember, hmmm...
 
Start in the centre of the inside of the book & poke the needle threaded with dental floss through to the outside.  It doesn't matter if you go top to bottom or bottom to top.  You will poke it back from the outside to the inside.  Then the inside to the last outer hole & back to centre.  If you picture a figure 8 for the thread path it will make more sense.  Tie a knot.  If you double twist the knot will cinch tighter.  Like you tie your shoes, except loop twice, repeat & no bunny ears.
 

 See how the cover sticks out more than the pages.  Score a line about 1/8" more than the pages & fold them in.
This is how the book looks from the top profile.  If you are like me & didn't measure carefully, its okay to cheat & trim the edges of the book to allow them to fold in.  Dig out your old deckle scissors from the kids craft pile & make the edges funky if you like.
If you need the book to be a little more durable I suggest to poke 4 holes binding for the construction, then picture over & under stitching ending up on the inside when done.  I find the thirds thread construction the pages twist a bit. Now get busy, art it up, doodle, glue in things from magazines, go  have fun playing around.  This is the very same booklet style that I doodled in my earliest blog posts.  I would post a direct link if I knew how to do that.

Sunday, April 24, 2011

Paper Dolls


Good day!  I have been itching to use the paper dolls cartridges for cricut ("Paper Dolls for Everyday" & "Paper Dolls Dress Up" cartridges) & then opportunity appeared.  I know a sweet little 4 year old who is very fashion conscious & would love to play with something like this.  I got busy with my trusty Gypsy to pick all the components before cutting.  I used cardstock from my stash to cut out 12 paper dolls 5.5" tall to make 2 boys & 2 girls.  The reason for the multiples is to glue-stick them 3 layers thick so they are tougher for play time.  I glued the hair & footwear on permanently so they would be less frustrating to little hands, then detailed the faces, hair, & shoes with markers.  Pictures taken with my cell phone again.  I clicked them X-Large to bring up the details since they seem to be lost in the smaller size.  I like their googly eyes, the pictures don't show but some dolls have blue eyes, or green eyes or black eyes.  I've had them in my stash forever & its satisfying to finally use them.

 Flip the dolls over & this is what the other side looks like.

Heres some dolls trying on clothes.  I resisted the urge to fold back the tabs, they are a gift & I didn't want them to look "used."
 Here are the rest of the doll clothes, some are double duty with double sided details.  I thought it was a nice thing to help encourage memory that way.  I detailed some with markers & little stickers & left some blank in case kiddo or her Mommy would like to decorate some too.  They are easy to detail right over the cut lines.

Those are sweetheart candy valentine sticker sayings like, "Kiss me, Hug me, XOX, Be mine" on the little orange-yellow sundress.  The pastel stars are fuzzy stickers, & the sea stickers are sparkly.  White gel pen really brings up the details & add nice contrast to the black.  I forget the brands of pens & stickers, sorry but they're from my "stash."

I like the t-shirt sayings, "Just say MOO," "MEOW power," & "Everybody say WOOF!"  The little blue squiggle dress started out as an oops, messed up outlining it when the marker slipped.  I kinda like it better all squiggled up.  Outlining the cutouts really gives nice definition don't you think?
Its okay to channel your inner child sometimes, thats why they call it play.  I don't think adults laugh or play enough anymore.  I'm not talking juvenile immature rudeness either.  I hearby give you permission to go goof off & play with something creative.  Go ahead, you know you wanna!


Saturday, February 19, 2011

Doodle Robots

Ever played around with paper dolls?  These are simple & easy to do.  It seems robots are trendy again so lets see what we can do with this.  Whats that?  Robots are always trendy?  Allrighty then!
Start with an accordion folded scrap of paper, & draw something that has connecting arms.  You could try flowers, animals, furniture, do what you like, no one has to know!  Go ahead, play around, you know you want to...

Nice sharp scissors make easy work of this. Remember to always point the tips of the scissors away from you & move the paper not the scissors for accuracy.  The only red robots we wanna see is painted or drawn, not bloody.  eeeep!
Here they are, the right 4 then the left 4 all doodled up waiting for somewhere to go.
Don't they make you smile?

I don't know what I did here for the text to be all central.  Oh, I see I can play with the text alignment, ah, I'll leave it for visual differences at this end of the post.  I was having trouble pulling pictures from my computer.    It seems I can pull pictures from a photo card, but I cannot pick & pull pictures from Picassa3 directly from my computer files.  It would really help if I labeled pictures I suppose.  The silly thing is they are labeled in my Picassa files, but I can't seem to upload them, yet.  Sometimes "yet" is  avery big word, eh!  

Ok, so what to do with this cute little paper chain?  Wouldn't it be cute dancing around a flower pot gift?  or around a flower vase?  or along the edge of a card? or on a scrapbook layout?  or along the edge of the bathroom mirror to see every morning?  or just laying around making everyone else wonder, 
why is that sitting there?

Thanks for the comments of encouragement, I have no idea how to direct reply to comments so bear with me.  I do apologize for the delay time lapse.  I've had good advice to moderate comments so everything is on the up & up, know what I mean?  I am excited to have followers too, I wish I knew how to become a follower of others blogs.  More learning to achieve, yipee!

I'm hoping to do about an entry a week, & to learn how to use more of the blogger settings.  There should be some cool detail pictures later, for a birthday party.   Soon a certain kiddo turns 13, & everyone knows that means teenager!  What better way to ring that in than with a Zombie themed party!  Cheers!