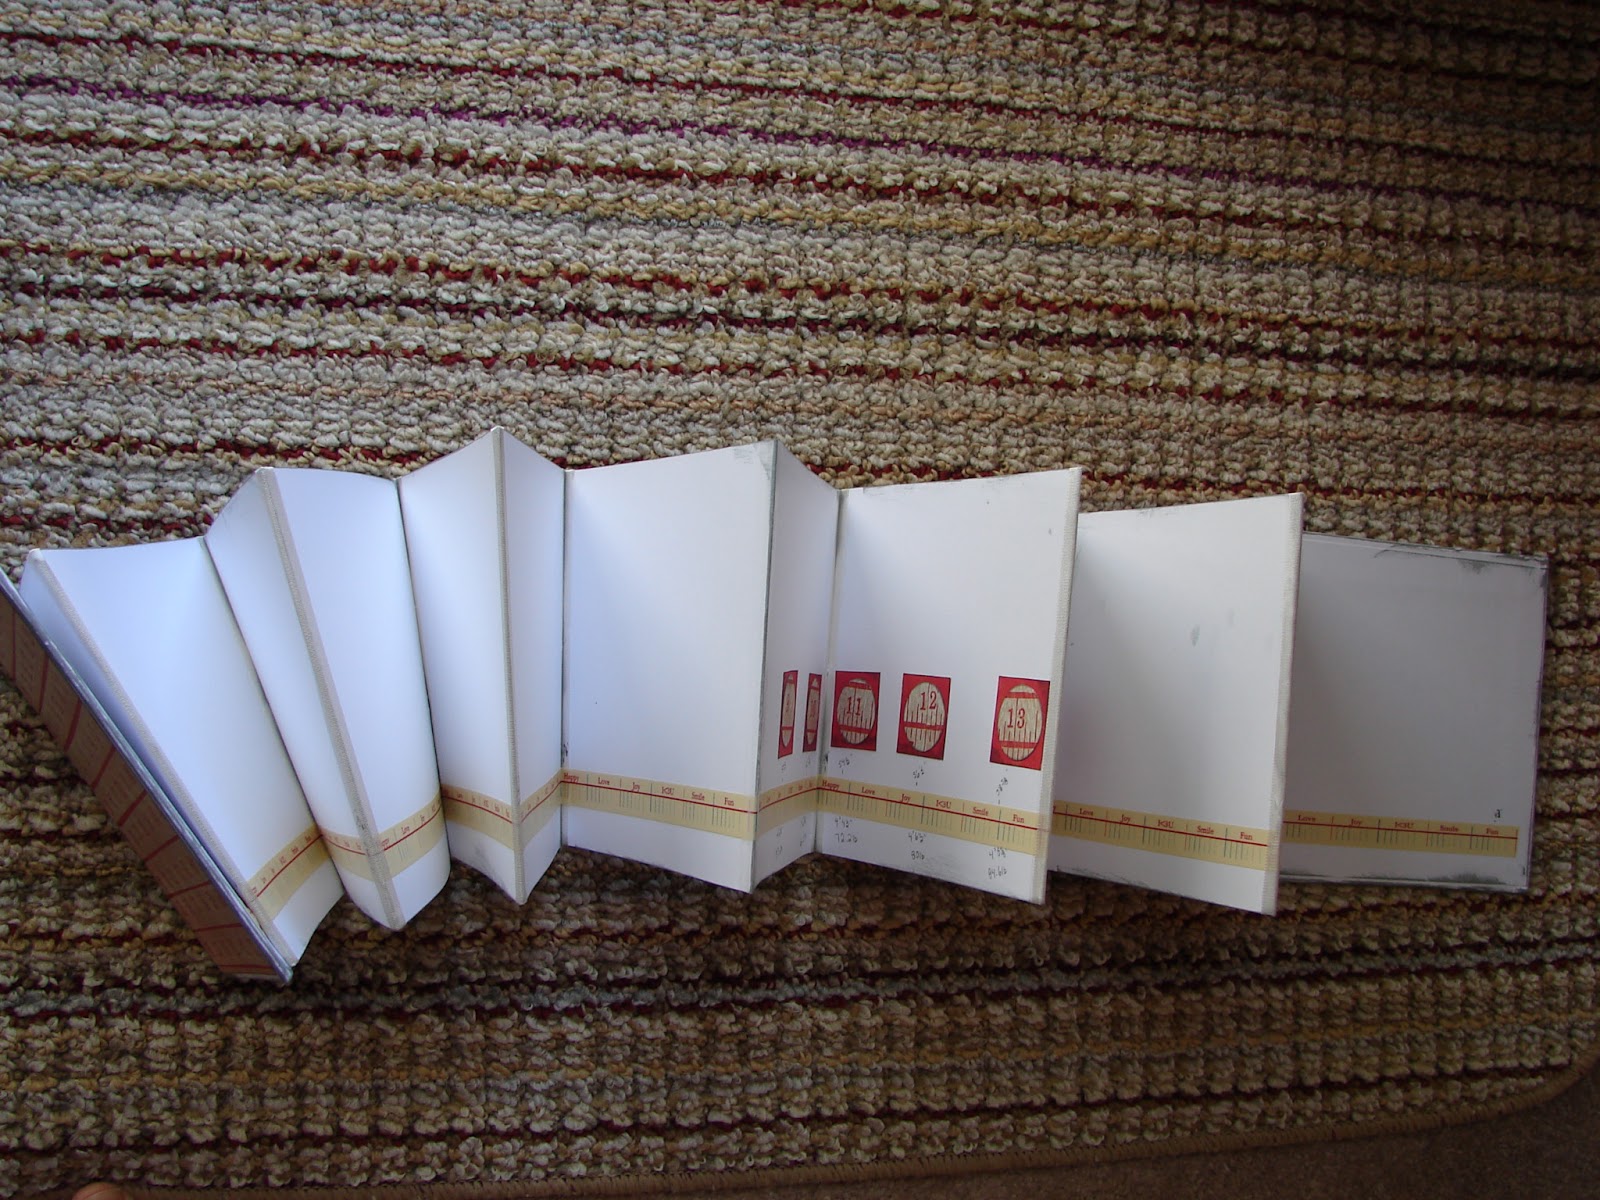
This is the front cover, I know its funny to do it last but I enjoy irony. I put washi tape on the edge since I goofed up and bound the folded edge. Oops. I like the way it distinguishes the cover so Hooray for a goofy win!
I stamped the black image with Archival black ink, and the "ticket stub" in White daisy ink. I poured clear embossing powder over both and used my Tim Holtz heat gun to melt it. I am not very experienced with heat embossing, so a sample book is a good opportunity to try it again. Of course, stamping white ink on white paper is clearly not my forte. I sponged Pacifica ink over the white embossed ticket stub, the technique is "Embossed Resist Stamping." If you have allergies or sensitivities, I recommend heat embossing in a well ventilated area since embossing powder is essentially powdered plastic. Heat + plastic = fumes. Gotta protect our health!
That's it, we have finished the project, 14 pages, 22 techniques, and a cute lil booklet to not forget them! Thanks for playing along with me!
My crafting meanders from a sparked idea, or a dreaded deadline. Sometimes it will seem like this site is abandoned. My crafting might be unoriginal or eccentric but least its not housework! I hope you enjoy your visit, all I ask is that you make or do something that makes you happy too.
Showing posts with label Ink. Show all posts
Friday, August 15, 2014
Wednesday, August 13, 2014
Your Stamping Notebook: page 12 of 14
I have always wanted to do this. Stampin' Up demonstrators have some really nice YouTube videos showcasing this technique. The upper picture shows the basic image cut out, mounted on 3D foam tape on white paper, cut out again, and glued to the black fold out paper. I did this to save space in my booklet.
Chalkboard technique: Stamp an image on black paper with white daisy pigment ink, clean off your stamp. Let the image dry or speed it up with a heat gun, pigment ink is sticky & slower to dry. Re-stamp the same image in any coloured ink to make coloured chalk effect.
Tip: WINK. Close one eye to make it easier to line up the double stamped image.
Chalkboard technique: Stamp an image on black paper with white daisy pigment ink, clean off your stamp. Let the image dry or speed it up with a heat gun, pigment ink is sticky & slower to dry. Re-stamp the same image in any coloured ink to make coloured chalk effect.
Tip: WINK. Close one eye to make it easier to line up the double stamped image.
Tuesday, August 12, 2014
Your Stamping Notebook: page 11 of 14
Ombre effect
Over Stamping
The links will take you to more CTMH technique videos detailing how its done and showcasing pretty examples.
This page is all done with the water based blender pen and a bit of stamping . Scribble off the colour from your blender pen to get Ombre or transitional colour effects. This is how you clear the ink from your pen to switch colours. The nibs will stain, but its no big deal. If they get dry, I learned from "The Frugal Crafter" they can be re-hydrated with a mixture of 50/50 water and glycerine. I always use distilled water for crafting because tap water gets funky as it ages. I tried it, and IT DOES WORK! That's a cool bonus tip. I keep a container premixed and set aside, and pour a little into an old vitamin bottle lid. That way if there is ink residue on the blender pen, it won't contaminate my main container. The blender pen nibs will eventually wear out, but this really extends the life of a blender pen. They're such a cheap tool to have, definitely a good idea to keep a few on hand. What to do with the scribbles/doodles? Overstamping! Stamp over them with the same colour ink or any colours. Now you have fun custom backdrop for cards, scrapbook embellishments, Picture my Life pocket scrapbooking (Project life)...
Over Stamping
The links will take you to more CTMH technique videos detailing how its done and showcasing pretty examples.
This page is all done with the water based blender pen and a bit of stamping . Scribble off the colour from your blender pen to get Ombre or transitional colour effects. This is how you clear the ink from your pen to switch colours. The nibs will stain, but its no big deal. If they get dry, I learned from "The Frugal Crafter" they can be re-hydrated with a mixture of 50/50 water and glycerine. I always use distilled water for crafting because tap water gets funky as it ages. I tried it, and IT DOES WORK! That's a cool bonus tip. I keep a container premixed and set aside, and pour a little into an old vitamin bottle lid. That way if there is ink residue on the blender pen, it won't contaminate my main container. The blender pen nibs will eventually wear out, but this really extends the life of a blender pen. They're such a cheap tool to have, definitely a good idea to keep a few on hand. What to do with the scribbles/doodles? Overstamping! Stamp over them with the same colour ink or any colours. Now you have fun custom backdrop for cards, scrapbook embellishments, Picture my Life pocket scrapbooking (Project life)...
Monday, August 11, 2014
Your Stamping Notebook: page 10 of 14
This is all about CTMH water based blender pen tricks. Stamp 4 images, any way you like.
A blender pen can:
Fix an unevenly stamped image
Touch-up, hide or cover details
Doodle any colour you like to accent a stamped image
Blur or haze any edge you want to soften the image
Shadow an edge or entire image
Darken an image and emphasize parts
Lighten the ink from an area or even remove ink if you get it fresh stamped - CTMH paper will pill or erode away if you rub at it a lot.
Pretty versatile, eh?
A blender pen can:
Fix an unevenly stamped image
Touch-up, hide or cover details
Doodle any colour you like to accent a stamped image
Blur or haze any edge you want to soften the image
Shadow an edge or entire image
Darken an image and emphasize parts
Lighten the ink from an area or even remove ink if you get it fresh stamped - CTMH paper will pill or erode away if you rub at it a lot.
Pretty versatile, eh?
Sunday, August 10, 2014
Your Stamping Notebook: page 9 of 14
Sorry for my rustic handwritten notes on each pictured page, but that was simplest for me. I used the CTMH water based blending pen to colour this stamped image (archival black ink). Blending pens are dual tipped, just squish the lid to make an ink palette to pick up ink from, and scribble off the colour to change colours. Easy doodling! The blending pen tips will stain, but it is no big deal. This is a great way to get maximum value from your CTMH water based dye ink pad collection.
You can activate, trace, or enhance your water-colour-pencil colouring. Using a heat embossed image or archival ink will help prevent the colour from migrating or muddying up your creation. There is almost no odour or residue so this is a great activity for all ages and people with allergic sensitivities. Pages 10 & 11 will show more blender pen tips & techniques.
Thursday, August 7, 2014
Your Stamping Notebook: page 6 of 14
Rock and Roll
Base & Shade aka Two Step
CTMH video links for you.
This shows combination techniques. WHAT? Stop the DJ! Combining techniques?!? YES, we can, its not "just plain stamping" any more. This is how we get the most versatility from our supplies. No boring one-hit-wonder stamps anymore are they?
Rock and Roll technique has some fun YouTube videos out there.
This is how its done:
1. Ink and stamp the image as usual.
2. Pick up the same colour or another colour of ink and rock the edges of the stamp along the ink pad.
3. WINK, and Stamp it again.
The Two Step technique goes by a few names, and some stamp sets are designed in layers for this purpose. CTMH made some roses stamps, and some others over the years, but I don't have any to show you today. This technique works best with symmetrical stamps. I think a non-symmetrical stamp you could cheat and make a rough background with your blender pen like I showed on page 6.
1. Flip your stamp, (using the reverse side) ink it, then stamp it twice, side by side (first and second generation stamping). Clean it off.
2. Using the front of the stamp, ink it, WINK and stamp it on the second generation from step 1.
The tip is to "WINK," or to close one eye to line up the images, then stamp it. Using one eye makes lining up images more accurate if you like that look ;-)
Base & Shade aka Two Step
CTMH video links for you.
This shows combination techniques. WHAT? Stop the DJ! Combining techniques?!? YES, we can, its not "just plain stamping" any more. This is how we get the most versatility from our supplies. No boring one-hit-wonder stamps anymore are they?
Rock and Roll technique has some fun YouTube videos out there.
This is how its done:
1. Ink and stamp the image as usual.
2. Pick up the same colour or another colour of ink and rock the edges of the stamp along the ink pad.
3. WINK, and Stamp it again.
The Two Step technique goes by a few names, and some stamp sets are designed in layers for this purpose. CTMH made some roses stamps, and some others over the years, but I don't have any to show you today. This technique works best with symmetrical stamps. I think a non-symmetrical stamp you could cheat and make a rough background with your blender pen like I showed on page 6.
1. Flip your stamp, (using the reverse side) ink it, then stamp it twice, side by side (first and second generation stamping). Clean it off.
2. Using the front of the stamp, ink it, WINK and stamp it on the second generation from step 1.
The tip is to "WINK," or to close one eye to line up the images, then stamp it. Using one eye makes lining up images more accurate if you like that look ;-)
Saturday, August 2, 2014
Your Stamping Notebook: page 1 of 14
Note this is not the front cover page (page 1) we will be doing that later. This is page 2 in your booklet.
This is stamping at its most basic. Just following the instructions in the enclosed leaflet.
1. Gently peel the stamp from the carrier sheet and apply it to an appropriate sized clear acrylic block. A block that is too big or too small works, but can be annoying. If you are rough with peeling stamps from the carrier sheet, the stamp (especially more delicate ones) may tear. CTMH won't replace those because of user error. The good news is you could tear a stamp or even cut it apart if desired (GASP!) and it would still stamp quite well if you place it neatly back together again.
2. Season the stamp by stamping your bare arm OR cleaning it with spritz & stamp scrubber OR rubbing it gently with Rub & Remove eraser. Doing this removes the manufacture processing residue for a better image. If you have highly sensitive reactive skin, I recommend using the spritz & scrubber for this step or the R&R Eraser.
3. Put the foam cushion insert under the paper.
4. Ink up the stamp, tap-tap, twist-twist, tap tap. Look to check it has satisfactory ink coverage.
5. Stamp your image.
6. Stamp it again on your scratch paper, to unload more ink = less cleaning. Clean the stamp with your spritz & stamp scrubber. This is the scratch paper I mentioned in yesterday's post, save it if you like.
I used an edge distresser to roughen the edges of all the pages in this book. A word of caution, CLOSE your ink pads first. The bits of fluff mess up stamping images, and that fluff goes everywhere!
On the bottom right corner I rubbed the stamp pad directly across the paper, aka, swiping it. Notice how it is streaky looking? its a great grunge look.
On the upper right corner I used a sponge to ink the corner, a much softer effect.
On the upper left corner I used a sponge dauber to make dots. Here is a video link showing more Dauber Dynamite tricks.
This is stamping at its most basic. Just following the instructions in the enclosed leaflet.
1. Gently peel the stamp from the carrier sheet and apply it to an appropriate sized clear acrylic block. A block that is too big or too small works, but can be annoying. If you are rough with peeling stamps from the carrier sheet, the stamp (especially more delicate ones) may tear. CTMH won't replace those because of user error. The good news is you could tear a stamp or even cut it apart if desired (GASP!) and it would still stamp quite well if you place it neatly back together again.
2. Season the stamp by stamping your bare arm OR cleaning it with spritz & stamp scrubber OR rubbing it gently with Rub & Remove eraser. Doing this removes the manufacture processing residue for a better image. If you have highly sensitive reactive skin, I recommend using the spritz & scrubber for this step or the R&R Eraser.
3. Put the foam cushion insert under the paper.
4. Ink up the stamp, tap-tap, twist-twist, tap tap. Look to check it has satisfactory ink coverage.
5. Stamp your image.
6. Stamp it again on your scratch paper, to unload more ink = less cleaning. Clean the stamp with your spritz & stamp scrubber. This is the scratch paper I mentioned in yesterday's post, save it if you like.
I used an edge distresser to roughen the edges of all the pages in this book. A word of caution, CLOSE your ink pads first. The bits of fluff mess up stamping images, and that fluff goes everywhere!
On the bottom right corner I rubbed the stamp pad directly across the paper, aka, swiping it. Notice how it is streaky looking? its a great grunge look.
On the upper right corner I used a sponge to ink the corner, a much softer effect.
On the upper left corner I used a sponge dauber to make dots. Here is a video link showing more Dauber Dynamite tricks.
Friday, August 1, 2014
Your Stamping Notebook: 1 of 15 daily posts
Do you struggle with information overload? Forgetful of cool techniques? Stuck in a creative rut? Spend way too much time on the computer feeling the spinning of your mental cogs but not in the good way?
Ya, me too. So I got to thinking of all the notebooks I've started & scribbled haphazard ideas into, usually one a year, sometimes overlapping so multiple notebooks are in play. Sound sort-of familiar? The notebooks were a solution to the haphazard slips & scraps of paper with scribbled "great ideas," pre-Pintrest, and the habit continues. I surf through my rambling notebooks sometimes and discover there is very little repetition, awesome!
I decided I needed another little notebook and to actually DO sample stamping techniques in it to keep with my stamp supplies. It is only 4" x 4", short and sweet, but not too runty either. I spent a whole morning playing with this creation and I really enjoyed just following the impulse and rounding it out as I made it.
Are you interested in creating one too? (I hear a resounding, "YA, sure!" reply, in my mind, LOL!)
For the next 15 posts, I am going to show how to do at least 22 techniques, a page-a-day, in about 15 minutes/day. Or you can wait until the end and do all 14 pages, in any sequence you prefer in about 3-4 generous hours if you prefer. You can change the page order if you like, I am happy. I will include YouTube videos produced by CTMH showcasing the techniques, since they know how to show it all pretty and clear.
Here we go, this will take about 30-60 minutes, set aside these supplies please:
Supplies, I use CTMH supplies, you use what you have Mmm'k?
Measure 4" to create a "tick-tac-toe" grid, and a trimmer or scissors. Cut on the solid black lines. The dotted lines are fold lines for the front & back covers. I put the folded edge of the covers on the open side (not the bound edge). I used my Zutter "Bind-it-all" to punch the holes, but any heavy duty hole punch tool will work. Or take a few minutes with a hand punch, just use what you have. Place the blender pen against the spine as a spacer, and wrap twine or yarn around the pen as you thread the holes. This keeps the book from being bound too tight. I snipped apart the pages, trimmed them tidy, and ran an edge distresser along the edges. If you have loads of white envelopes or other white paper, feel free to use whatever size suits you, its your note-book.
All the pictures I took on my sadly weathered deck in one day. Feel free to click on any of the pictures to enlarge details. Now your mini-book is done, come back tomorrow to see what comes next. Here is more information about inks: Pigment or Dye inks.
A tip for this project: do test stamping on a scrap of paper or on another sheet of white daisy cardstock. If you cut out all those test stamp images during TV time or with your kids, you will have a pretty assortment of embellishments for cards or scrapbook accents. Cluster those test stamp bits with glitter glue, ribbon, buttons, sewing... Whatever suits you really, now you have embellishments you would've paid quite a lot more for from the store. Still don't want them? Swap them with friends, give them to a school, a youth group, a women's shelter, a senior centre... Or just throw them in the recycle bin, its no big deal, just have fun playing with your stuff!
Thanks for stopping by!
Ya, me too. So I got to thinking of all the notebooks I've started & scribbled haphazard ideas into, usually one a year, sometimes overlapping so multiple notebooks are in play. Sound sort-of familiar? The notebooks were a solution to the haphazard slips & scraps of paper with scribbled "great ideas," pre-Pintrest, and the habit continues. I surf through my rambling notebooks sometimes and discover there is very little repetition, awesome!
I decided I needed another little notebook and to actually DO sample stamping techniques in it to keep with my stamp supplies. It is only 4" x 4", short and sweet, but not too runty either. I spent a whole morning playing with this creation and I really enjoyed just following the impulse and rounding it out as I made it.
Are you interested in creating one too? (I hear a resounding, "YA, sure!" reply, in my mind, LOL!)
For the next 15 posts, I am going to show how to do at least 22 techniques, a page-a-day, in about 15 minutes/day. Or you can wait until the end and do all 14 pages, in any sequence you prefer in about 3-4 generous hours if you prefer. You can change the page order if you like, I am happy. I will include YouTube videos produced by CTMH showcasing the techniques, since they know how to show it all pretty and clear.
Here we go, this will take about 30-60 minutes, set aside these supplies please:
Supplies, I use CTMH supplies, you use what you have Mmm'k?
- 1 sheet White Daisy cardstock #1385 12"x12" paper
- Line drawing image clear stamp set
- Solid image clear stamp set
- Words & sentiments clear stamp set
- Clear CTMH acrylix Stamp blocks of appropriate size
- CTMH Water based blending pen: Item # 3174
- 3-4 CTMH Water based dye inks in colours that make you happy (I used Pacifica, Smokey Plum, Sorbet, and Topiary)
- Watercolour pencils (optional)
- pencil & eraser & pen
- scrap paper or more white daisy paper
- paper towel
- washi tape and/or scotch tape
- clear embossing powder
- white embossing powder
- heat gun tool
Measure 4" to create a "tick-tac-toe" grid, and a trimmer or scissors. Cut on the solid black lines. The dotted lines are fold lines for the front & back covers. I put the folded edge of the covers on the open side (not the bound edge). I used my Zutter "Bind-it-all" to punch the holes, but any heavy duty hole punch tool will work. Or take a few minutes with a hand punch, just use what you have. Place the blender pen against the spine as a spacer, and wrap twine or yarn around the pen as you thread the holes. This keeps the book from being bound too tight. I snipped apart the pages, trimmed them tidy, and ran an edge distresser along the edges. If you have loads of white envelopes or other white paper, feel free to use whatever size suits you, its your note-book.
| 14 page 4"x4" book. |
All the pictures I took on my sadly weathered deck in one day. Feel free to click on any of the pictures to enlarge details. Now your mini-book is done, come back tomorrow to see what comes next. Here is more information about inks: Pigment or Dye inks.
A tip for this project: do test stamping on a scrap of paper or on another sheet of white daisy cardstock. If you cut out all those test stamp images during TV time or with your kids, you will have a pretty assortment of embellishments for cards or scrapbook accents. Cluster those test stamp bits with glitter glue, ribbon, buttons, sewing... Whatever suits you really, now you have embellishments you would've paid quite a lot more for from the store. Still don't want them? Swap them with friends, give them to a school, a youth group, a women's shelter, a senior centre... Or just throw them in the recycle bin, its no big deal, just have fun playing with your stuff!
Thanks for stopping by!
Saturday, February 22, 2014
Scrapbook page re-do
I've been looking at this scrapbook page layout for some time now, and decided to re-do it. I detest re-do's, my free time is precious and limited. I did learn a few things: a redo is still creative time; a redo is a chance to step out of habits; a re-do is okay because it says no one is perfect; I really like this re-do so it wasn't a waste of time.
The redo was inspired by Make it from your heart Volume 2, page 9 pattern 2 adaption. The base paper is "white Daisy" with a 3/8" border of "sky" blue paper. The large "Sorbet" colour gear is cut from Cricut CTMH Artiste cartridge 10", and sponged with twilight ink. The border gears are cut at 1.5" from "twilight"colour paper. The centre band of paper is "Twilight" colour, textured with the Quatrefoil embossing folder. The stamp in the upper right corner is B1433 Hostess Rewards "Family photo" set. The stamp in the lower left corner is C 1566 "Tech speak", inks used are sorbet and twilight. I used the Masking technique, a blending pen #3174 to highlight, and the "Rock and Roll" technique. Between the pictures is faux matting of Lagoon Houndstooth Washi tape #Z1850 on strips of the "sky" coloured paper. Sorry to be so link heavy, I don't know a simpler way to list all the stuff simply without getting too wordy.
I hope you are having fun playing with your supplies too. Thanks for stopping by to take a look.
| This is the re-do using CTMH products. |
I hope you are having fun playing with your supplies too. Thanks for stopping by to take a look.
Tuesday, January 7, 2014
Card kit
The Close to My Heart January 2014 "National Paper-crafting Month" special is a Cloud Nine card kit valued at $46 of products. It is deeply discounted to just $15 with a minimum $35 purchase. Here are my slight variations of the 10 cards.
Aggg, sorry this is sideways, I don't know how to rotate it for
you. This is my second time trying to fix it today so I have to concede
to the computer gremlins. The silly part is that both picture attempts were not taken sideways. Gotta love it when technology is so smart it goes boink.
Tip #1: Despite seasoning the stamp by pre-stamping a bunch of times on scrap paper and using proper technique, some images stamped poorly. Smart bloggers call that the "distressed look" and call it done. The right hand side of the mustache is fixed, the left is just okay. Please click on any pictures to enlarge and you will better see what I am showing you. The fix is as simple as colouring. Before opening the ink pad, squish the lid, open it and then pick up ink with the tip of the blending pen item # 3174. Touch up the faded areas from the lid ink pool. I think I had trouble because the pre-cut kit shapes were from lesser quality paper? Thats how it seemed compared to the scraps of CTMH white cardstock scrap I was pre-stamping on anyways. I used my snowflake waste paper (January 1 post) for stamping off ink and the images were far better.
Tip #2: If the stamp images and your technique are good, but the results are not, try a different paper.
Tip #3: Save bigger pieces of waste paper to stamp off on before they hit the recycle. I figured I paid good money for good paper, may as well get all the use of it I can. If you are inclined, it can be collaged or made into handmade papers too.
Here the card on the right is fixed, the left is stillblotchy distressed looking. This kit was easy to do. I hope to try it again with different papers just for fun. Baby nap timer allowing of course. That's another advantage of a kit, once you have the cutting/assembly instructions, it is yours to make more. Happy January!
Tip #1: Despite seasoning the stamp by pre-stamping a bunch of times on scrap paper and using proper technique, some images stamped poorly. Smart bloggers call that the "distressed look" and call it done. The right hand side of the mustache is fixed, the left is just okay. Please click on any pictures to enlarge and you will better see what I am showing you. The fix is as simple as colouring. Before opening the ink pad, squish the lid, open it and then pick up ink with the tip of the blending pen item # 3174. Touch up the faded areas from the lid ink pool. I think I had trouble because the pre-cut kit shapes were from lesser quality paper? Thats how it seemed compared to the scraps of CTMH white cardstock scrap I was pre-stamping on anyways. I used my snowflake waste paper (January 1 post) for stamping off ink and the images were far better.
Tip #2: If the stamp images and your technique are good, but the results are not, try a different paper.
Tip #3: Save bigger pieces of waste paper to stamp off on before they hit the recycle. I figured I paid good money for good paper, may as well get all the use of it I can. If you are inclined, it can be collaged or made into handmade papers too.
Here the card on the right is fixed, the left is still
Wednesday, November 20, 2013
Fall Banner Challenge
Banners are trendy in paper crafts these days. I've never made oneand I wanted to try for a challenge in the 3rd Canadian cricut circle online swarm, closed Nov 15. This was for challenge #2: Create a Fall or Autumn banner.
Materials:
CTMH cricut Art Philosophy cartridge, button 28 cut at 1.5"
White daisy cardstock
D1558 Washi Wonder CTMH stamp set
CTMH inks: Cranberry, Juniper, Honey, Sunset, chocolate
E1027 Framework alphabet stamp
water based blending pen
Harvest bakers twine
Method:
1. Cut the banner, stamp it with washi wonders patterns.
2. Stamp letters in chocolate ink.
3. Squish each ink pads as needed, the lids become colour palate for the blending pen. Use the same colour pattern stamped to colour in the letters. I originally left it like the top picture, but it looks unfinished. I went back & used the blending pen to outline each pennant and it looks a lot better to my eye.
4. Tip: Put a dot of liquid glass adhesive on the tip of the bakers twine, give the string a hard twist, let dry. It is much easier to thread through the banner, think of the plastic coating on the tip of shoelaces and it makes sense. Just a dot of this glue this way dries really quick, YAY!
I hope to use this on a scrapbook layout later. Thanks for looking!
CTMH cricut Art Philosophy cartridge, button 28 cut at 1.5"
White daisy cardstock
D1558 Washi Wonder CTMH stamp set
CTMH inks: Cranberry, Juniper, Honey, Sunset, chocolate
E1027 Framework alphabet stamp
water based blending pen
Harvest bakers twine
Method:
1. Cut the banner, stamp it with washi wonders patterns.
2. Stamp letters in chocolate ink.
3. Squish each ink pads as needed, the lids become colour palate for the blending pen. Use the same colour pattern stamped to colour in the letters. I originally left it like the top picture, but it looks unfinished. I went back & used the blending pen to outline each pennant and it looks a lot better to my eye.
4. Tip: Put a dot of liquid glass adhesive on the tip of the bakers twine, give the string a hard twist, let dry. It is much easier to thread through the banner, think of the plastic coating on the tip of shoelaces and it makes sense. Just a dot of this glue this way dries really quick, YAY!
I hope to use this on a scrapbook layout later. Thanks for looking!
Saturday, November 9, 2013
Distress?
This isn't an overly exciting post. There are loads of examples of detail oriented "distressing" of details to make projects more visually interesting. I'm all in favor of colours, not just edging everything in brown or black. This is how I use the sponge from CTMH. Sponges can be rinsed out and reused, no big deal. I have started a system of tabbing my sponges, and just putting a star on the inks that have a mate sponge. White Daisy paper cut to 1" x 2" fits the top of these sponges perfectly. I note the ink colour, swipe it on the paper & staple it on. This is not a new idea, Stampin up demonstrators use a tab punch to make prettier handles, same purpose.
CTMH recommends sponges be cut into quarters, shown on the right. I don't care for how thick it is in my hand so I cut in 6ths. Uncut sponges stay in the package with papers waiting to be assigned. The whole works store in a zipper baggie, until I get fed up with that system and try something else.
Thanks for stopping by, at least its not housework!
CTMH recommends sponges be cut into quarters, shown on the right. I don't care for how thick it is in my hand so I cut in 6ths. Uncut sponges stay in the package with papers waiting to be assigned. The whole works store in a zipper baggie, until I get fed up with that system and try something else.
Thanks for stopping by, at least its not housework!
Saturday, July 27, 2013
Growth chart book
| I cheated for the base and used the CTMH my creations memory showcase album z1195 as a starting point. I cut it on the middle fold to split for lengthening. |
| Then I scored 3 pieces each of white daisy #1385 12"x12" cardstock at 6", turned each 90 degrees, then cut each into 2 6"x12" sheets. |
| Then I joined the cardstock with CTMH Seam binding z1732 to make sturdy bendy hinges. Accordion books this long would tear at the folds, plus it makes a regular design feature. Tip: don't stretch the seam binding, and burnish well after adhering. I put a piece of kitchen parchment paper underneath so the ATG glue wouldn't gum it up sticking all together while assembling. Keeping the other pages folded together while I worked made it manageable. I cut the seam binding at an angle, started on one side, flipped it over to do other side. The finish joins in the middle, snip the other end to match when I got there. I rubbed away stray adhesive with my thumb. Very technical tool :-) |
| This shows CTMH grey wool ink, on the right side it is spritzed with (distilled) water in the spray pen z1380 which softens the colour, but also it separates into component colours. Well worth trying on scrap paper to see if you like the look. |
| This is the other side. I recommend taking a few days to decorate this side. Once I chose which paper was for the cover & back, I cut those 6x6" since the covers are 6.25x6.25". I struggled with paper decisions and decided to just cut the majority down to 5.5"x5.5", 5x5" and some became accordion foldouts (11x5.5") extra pages, and pockets, added in with washi tape z1817. The extras are spaced every other page. I tried to keep the colour range child to teen transition so it will complement the age range when I get pictures put in. Scraps become fake washi tape, tags, accents. I visually went with 2/3 + 1/3 or 1/2's or 1/4+ 3/4 for extra pages to add interest. I didn't measure, I just eye-balled it. To keep this monster book manageable since it opens both sides, I will probably just a hair band elastic. |
I did this project in stages, about 3-4 days (precious baby nap time). No marathon craft times for me right now. It would make a great 12 month first year baby brag book, a holiday
book, favorites collection, or even a life celebration book. Let me know if you try this, I would like to see what you tried. Thanks for looking!
Saturday, April 13, 2013
Spring Cards
I never used to be a fan of "matchy-matchy" or coordinated sets. They always seemed to be too perfect, prissy even on my first impression. I guess I'm a bit damaged from the thought of sweater sets and the 80's pastels? I have changed, in the name of simplicity & limited time on precious baby naps. These cards were just playing around experimenting with scraps from the Chantilly paper packet, when I made the MyCreations recipe box in the previous post. I also used washi tape, Happy Thoughts stamp set, Twilight ink, champagne ink, corner rounder (that does double duty to make scalloped edges too), 4mm gems and scissors. I don't have any measurements for you other than these are standard A2 cards size - 4 1/4" x 5 1/2". Some open left to right, others open bottom to top.
I see everywhere on the internet pretty piecy, layered scraps of paper cards & scrapbook layouts & thought, I can do that too! Since these are pastel cards I used a piece of black posterboard to pop-up my colours for the pictures.
I never saw the point of all the inking fussy detail that I see done on scrapbooking & cards. It always seemed to be done with black or brown & reminds me of dirty tobacco or grubby stains. I thought about it & decided it could be done with colours, and I like it a lot better. See that little brown & white polka-dot arrow on the upper left card below? That's covering a little oopsie with ink. The upper right card has a scrap of patterned paper fussy-cut as the centre accent. The little sayings are the "zip strips" from the edge of the patterned papers, one side identifies the paper line & the other side has pretty details so I used it. I enjoyed clipping in notches & snipping the washi tape to create visual interest. I was surprised that I really like the look of inking the edges. Not all of the scraps were inked on the edges for these cards, but that's okay with me.
A little tip I picked up along the way: Use corrugated cardboard scraps on cards to give dimension, much more economical than foam sticky dots. As always, click on any of the pictures for a closer look. I enjoyed the girly spring like impression of these cards. I used cardstock 8.5x11" weight paper from a box store instead of card/envelope sets because I was just playing around. Now I need to get a bulk pack of A2 envelopes to complete the set. I hope you are happy where-ever you are & playing with your supplies too. Thanks for stopping in to look.
I see everywhere on the internet pretty piecy, layered scraps of paper cards & scrapbook layouts & thought, I can do that too! Since these are pastel cards I used a piece of black posterboard to pop-up my colours for the pictures.
I never saw the point of all the inking fussy detail that I see done on scrapbooking & cards. It always seemed to be done with black or brown & reminds me of dirty tobacco or grubby stains. I thought about it & decided it could be done with colours, and I like it a lot better. See that little brown & white polka-dot arrow on the upper left card below? That's covering a little oopsie with ink. The upper right card has a scrap of patterned paper fussy-cut as the centre accent. The little sayings are the "zip strips" from the edge of the patterned papers, one side identifies the paper line & the other side has pretty details so I used it. I enjoyed clipping in notches & snipping the washi tape to create visual interest. I was surprised that I really like the look of inking the edges. Not all of the scraps were inked on the edges for these cards, but that's okay with me.
A little tip I picked up along the way: Use corrugated cardboard scraps on cards to give dimension, much more economical than foam sticky dots. As always, click on any of the pictures for a closer look. I enjoyed the girly spring like impression of these cards. I used cardstock 8.5x11" weight paper from a box store instead of card/envelope sets because I was just playing around. Now I need to get a bulk pack of A2 envelopes to complete the set. I hope you are happy where-ever you are & playing with your supplies too. Thanks for stopping in to look.
Friday, March 15, 2013
CTMH Anniversary
Its a bit hard to believe, but today is my one year anniversary for being a Close To My Heart consultant. I got into this for the great incentive package, the learning opportunity, and they truly are top quality products. I've been kinda hostage to a little baby, 15 weeks and counting. Big bro is 15 years old now. Shudder. Oh, and a car crazy husband... Being overrun with male influence means I need to keep my own interests going to keep the winter crazies away. I will try to get back to blogging once a month minimum, I figure that's a reasonable goal.
I've accumulated a modest (cough, giggle, snort, I hear you laughing at my understatement out there in internet land, go ahead, it's good for ya!) stash of CTMH products. During precious baby nap time I played. Here are my results, click on any picture to enlarge details. The font stamp set used is Urban Alphabet, # D1507 and the white paper is white daisy cardstock item #1385. Read on for Stamping technique links at the bottom of this post.
I think there is great value to playing with our supplies. That is how
cool effects are found, and making our stash new & fun again. As promised, here are the Youtube links I've learned from. I hope they inspire you to go play with your stash or try something new too.
I will be posting more experiments as I play around with my supplies. It's better than grumbling about stupid winter thumbing its nose at us with big dumps of sn*w so close to the first day of spring.
I've accumulated a modest (cough, giggle, snort, I hear you laughing at my understatement out there in internet land, go ahead, it's good for ya!) stash of CTMH products. During precious baby nap time I played. Here are my results, click on any picture to enlarge details. The font stamp set used is Urban Alphabet, # D1507 and the white paper is white daisy cardstock item #1385. Read on for Stamping technique links at the bottom of this post.
| Left to right shows my results using "Gypsy" colour water dye ink #Z2190. Top row is called generational stamping & shows how the dye ink lightens with subsequent stamping. The next row shows stamped twice in the same spot, a drop shadow, and then dripped with distilled water droplets. Third row shows swiped stamping, where I dragged the stamp across the ink pad to make streaks horizontal, vertical, then angled. The last row shows my result stamping without the foam pad (that comes with each CTMH stamp set) on bare table, and a plastic table. |
| Left to right shows my results using "Holiday red" colour water based dye ink which is no longer available to purchase. All were stamped with the cushion insert under the paper. Top row is generational stamping again. Second row is drop shadow x 3 layers generational style, double stamped, triple stamped, then quadruple. Third row down is drop shadow x2 layers generational style, "kissed" with "Diverse Backgrounds" #D1508 floral clear acrylx stamp and it's mirror kiss from the texture stamp. The last one bottom left was done with the stamp freshly cleaned with My Acrlyx Spritz cleaner # 1778My Acrlyx Spritz cleaner item # 1778 |
| Ink residue from stamping through the woven food bag & mesh onion bag. |
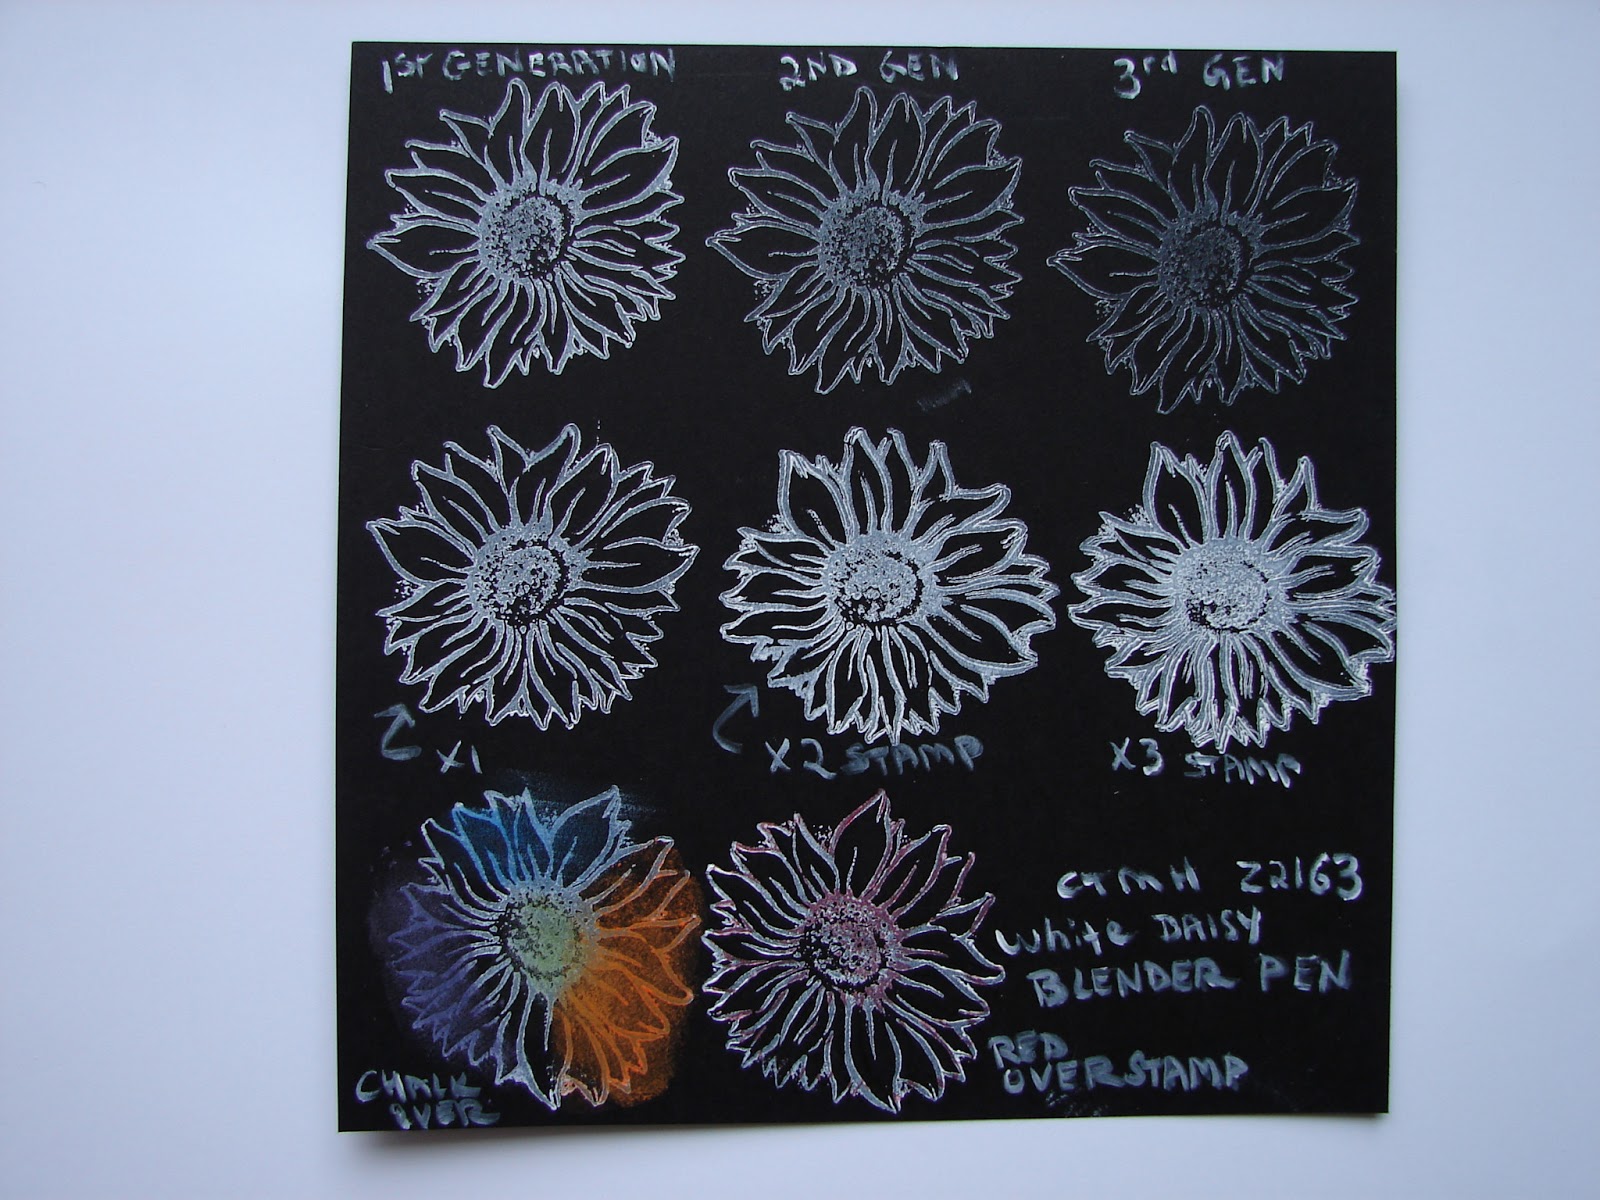
This is unknown source black paper from my stash. White Daisy pigment dye ink #z2163 was used. The stamp is from the now unavailable Stamp of the month May 2012 "FriendshipBouquet" S1205. I just needed to try a detail stamp & was tired of letters. Top row is generational stamping. Second row is single, double, then triple stamped. Third row was single stamped; left was rubbed with coloured chalk (unknown brand kids chalk) and the right was ovestamped with the same Holiday red ink. I wrote on the black paper by dipping my Blender pen #3174 into the white ink. |
| Here is the mess from stamping off the extra ink on scrap paper & wiping away ink from the blender pen to clean it off. |
I will be posting more experiments as I play around with my supplies. It's better than grumbling about stupid winter thumbing its nose at us with big dumps of sn*w so close to the first day of spring.
Happy Crafting everyone!
Edit note: I've been reading CTMH product information, turns out the water based blender pen is essentially the same as a water brush. A water brush is refillable. A blender pen is always ready to use & finer control for blending. I still think distilled water needs to be used for crafting, as tap water is full of minerals that gunk up our supplies if stored for any period of time...
Subscribe to:
Posts (Atom)