Showing posts with label Christmas. Show all posts

Wednesday, December 4, 2013

In case of Coffin


This was my entry for challenge #4 in the 3rd Canadian cricut circle online swarm.
The challenge was 
1. Make something for Halloween without using green purple yellow or orange
2. Make something for Thanksgiving without using orange, brown, red, or golden yellow.
3.  Make something for Christmas without using green red or pure white.
A prohibited colour may be used if it is a shade NOT traditional.  

My inspired is the "emergency (gift) kits" that are all over Pintrest and the internet.  
Materials used are listed at the end of this post.

I cut the coffin cut from the Artiste cartridge, button 46, page 76 feature 3D object at 7.5".  I tried 12" and found the lid uses less paper than the base.  Go figure, the base is deeper so it uses more paper.  Also, I found the lid is the "shift" cut, and the base is the non-shift.  That matters when planning papers.  What clued me in is the example and the layers are in different colours in the handbook.  I took a pen and wrote in my handbook (base, lid) so I don't forget.  I give you permission to write in your handbooks, and to rip out all the extra sheets of  languages you don't use.
 These little tiny stamps are for the note card.  I chose Art philosophy cartridge, button 50 cut at 3.5" because it looks a bit like a tombstone.  A nice way to use clear CTMH stamps is not having to think backwards like rubber stamps do.    Pick out the letters, arrange on a ruler face down so the letters & words read correctly.  Then use an acrylic block to pick them all up at once.  I recommend doing a few test stamps to check alignment and make sure there is no factory residues interfering with imprint quality.

Stamping before assembling the coffin makes the job easier.
I set in the potion stamp just for fun and tied it all up with the tag & brown bakers twine.
Materials used:
CTMH Artiste cricut cartridge
CTMH Art Philosophy cricut cartridge
CTMH slate ink
gold sparkle poster board ($3 for a big sheet!)
Super bright yellow cardstock from my stash
CTMH Creepy creatures stamp set #c1522
CTMH a typeface alphabet #a1117
CTMH Magic potions stamp set #c1509
CTMH CC1025A stamp of the month alphabet
redline super sticky tape
Honey, tea, tissues, cough candies
Bakers twine

What do you think?  Challenge me to try something a bit off the normal path, I dare ya!
Thanks for stopping by, now go make something unconventional & fun!!


Saturday, November 30, 2013

Frosted WOTG

This is the "Frosted workshop on the go, card kit" from Close to my Heart.  All that is needed is a paper cutter, and 4 inks (cocoa, olive, ruby, and twilight).  I made 15 cards from this kit with enough scrap papers to make more cards if I get to it.    I followed the cutting diagrams & assembled them in about 2.5 hours.  It would've been faster if my paper cutter wasn't worn out.  Time for a new one! 

Notice the 2 "Holly Jolly Christmas" cards,  particularly the stamping in the upper right corner.  After assembling the 2 vertical strips of paper, how do I align the stamping so it shows up?  With the clear acrylic stamp & block, it is pretty easy.  I placed the phrase panel where I wanted it, inked the snowflake stamp on an acrylic block, hovered it over the phrase until it was approximate, slipped out the phrase, stamped, set aside the stamp/block and then adhered the sentiment.  I felt pretty pleased with myself for figuring out that trick.  I don't mind that there are variations in my cards from the kit directions, that's part of the charm of handmade projects.
Season's greetings!

Wednesday, November 27, 2013

Sparkle Xmas Card

This was a new technique I learned at the November 2013 scrapbooking crop sponsored by Kimi Orton, owner of ScrapTherapy.  She gave very good written & verbal directions on how to use glitter, I will paraphrase them here.
1.  Sprinkle glitter on Sookwang adhesive paper in the usual way, save the remainder & dump it back in the container.
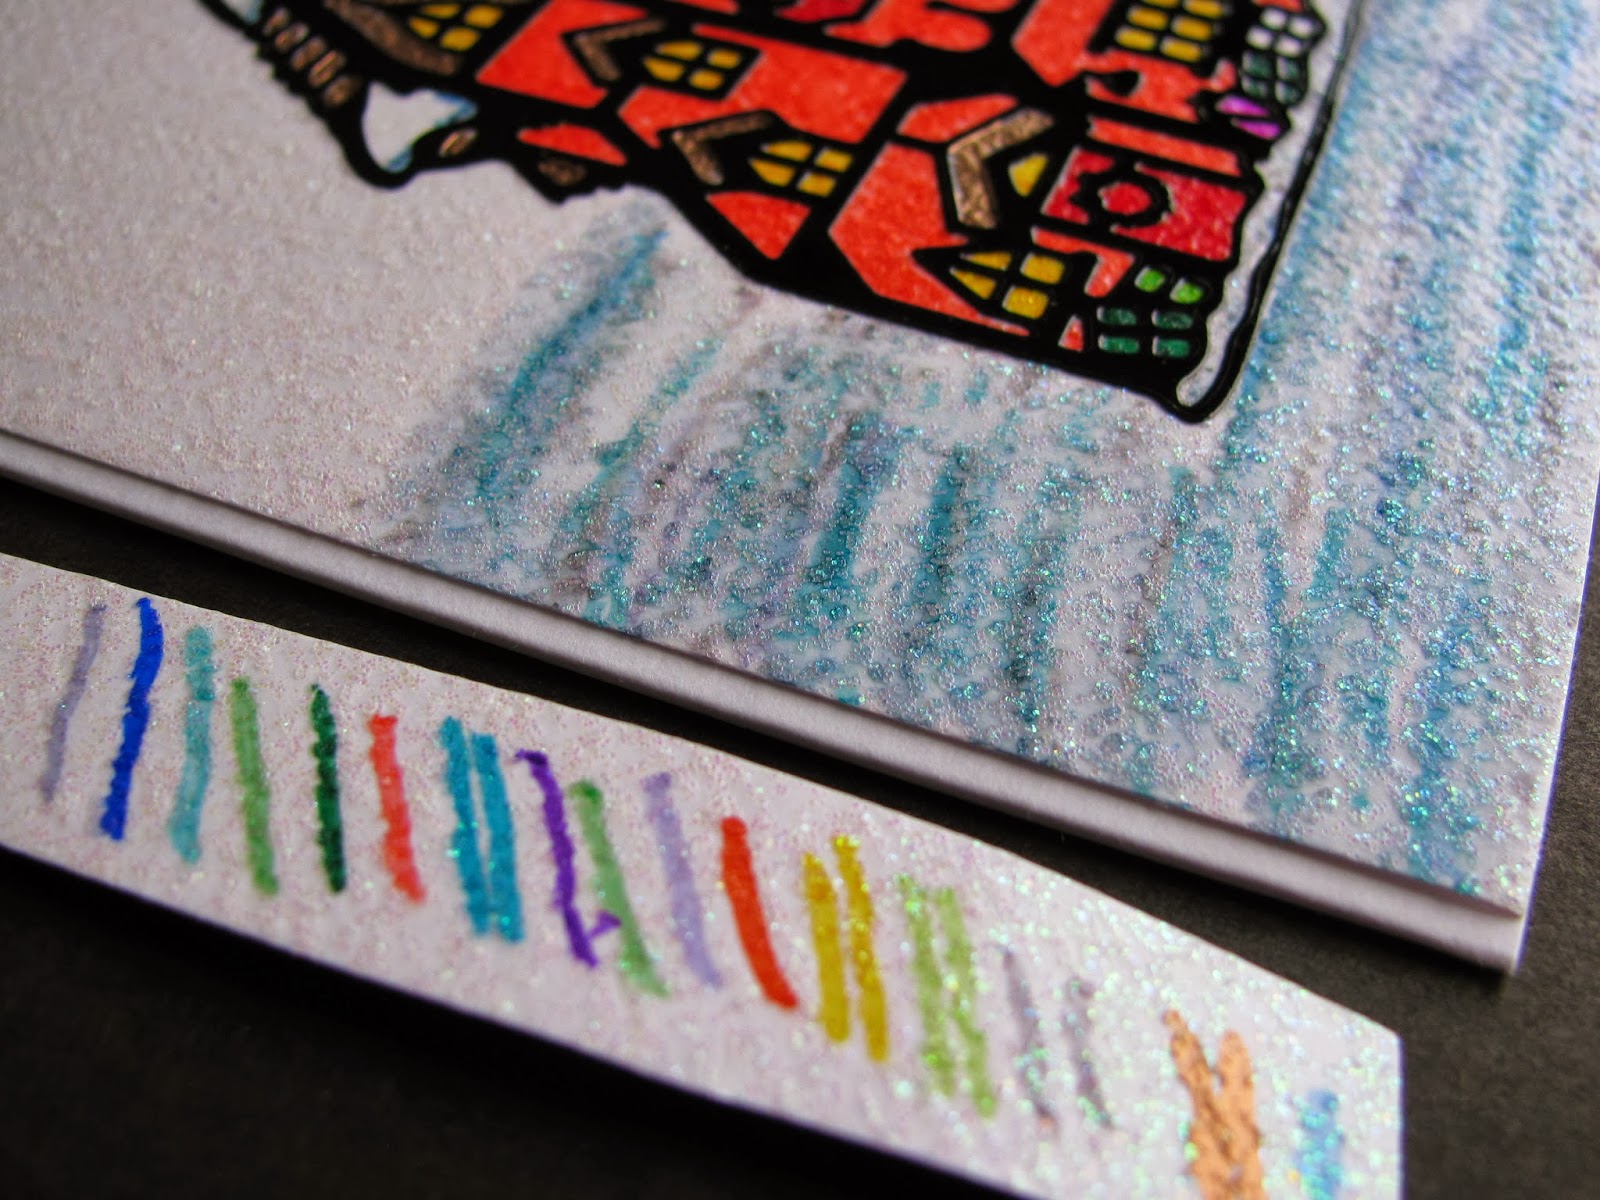
2.  Spend some time with a "peeloff" of choice.  What is a peeloff?  It is a lazer cutout vinyl sticker, sortof like a stained glass window if that makes sense? Peeloffs come in all sorts of variety so have a look at your local scrapbook store to see what you can find.  Weed the vinyl: Use a pokey tool to remove the filler pieces, or save them in a 2 step process with transfer tape if the image allows dual use.  I didn't save the packaging to tell you what this Christmas village house was from, sorry.
Tip:  I used the tip of my microtip nonstick scissors to poke the little bits out.
3.  Trim a piece of transfer tape, apply it to the vinyl, burnish well.
4.  Peel up transfer tape & apply vinyl to glitter paper.  Remove the transfer paper.  Question: is it okay to use preglittered paper?  Answer: YES.
5.  Get busy colouring with alcohol based markers (copic, CTMH, Sharpie, Bick...)
I used Sharpie markers because that is what I have.  I couldn't find my alcohol blending pen, so I bought a Copic 000 no  colour blending pen.  Blending the variegated stripes of colour softened them nicely.  I was even able to fix an oopsie colouring on the overhanging snow in the roof.  You can see I was testing Sharpie markers on a scrap; I used a range of blue, grey, silver for the "snow."  I'm not entirely happy that it looks like the house is floating on the background.  Considering I was first time playing with technique I don't think it was a big deal, it's still pretty.  The card is a CTMH shaped card, from my consultant kit, they come all tucked in their envelopes.   It was a pleasant surprise to have a lovely edge on the card.  I traced the shape on the back of the sparkle paper and manually trimmed it out.  That's it.  I will have to percolate on it a bit to decide what will fix the floating look, maybe some doodling?  Its now winter, so time to enjoy avoiding the cold!

Wednesday, November 13, 2013

Advent Cubby Calendar

I have been planning to make this thing forever.  When I went to a November weekend crop with good friends I finally got it done.
Supplies used:
Magical Days #d1552 stamp set,
Sparkle & shine paper packet,
MyCreations Cubby
CTMH cricut Artiste cartridge, button 50 cubby box
Juniper, Ruby, and Slate ink pads as recommended on the zip strip edges of the paper pack.
Sookwang 7mm adhesive tape.
3D foam tape
sparkle bling assortment
2" scallop punch, while supplies last,
1 1/4" circle punch
CTMH Versamat
stamp scrubber  & Spritz cleaner
borrowed 1" and 1 1/4" square punches.

The paper pack and stamp set are  limited seasonal items in the Holidays from the Heart seasonal Idea book.  There is a slight shine in the silver paper print that just doesn't show up until you see it in person.  I used my gypsy and the cubby box image from the CTMH cricut Artiste cartridge, button 50, sized at 2.5" to cut 2 per 12"x12"page.  Then it was time to get on with it, assembly line style.

I was able to crank the papers through the cricut in about 15 minutes to get the cubbies cut.  I saved the waste papers to punch at the crop.  15 minutes punching the patterned papers with the scallop punch.  About 30-45 minutes at the crop scoring the cubby boxes so they would fold nicely.  I tried one without scoring and the folds were not as crisp looking.  Plus scoring made the folding go easier.  Trim & snip the sookwang tape into strips, and  stuck them to the edge of my CTMH Versamat speeded up the job.  When you have to redundantly handle each supply multiple times, in multiple sequences, it adds time, which adds fatigue.  The cubby boxes were assembled in about 30-45 minutes.  Then came the fun part, stamping.  The foam side of the Versamat also helped since I could lay out the solid colour paper scraps, inks, the stamp set, a scrap of paper to stamp off, and the scrubber and just go for it.  I stamped most of each number in different colours on different papers to give more visual options to match to the cubbies.  A few images I liked right away so they didn't get multiple stamped effort.  Punching them out after stamping kept little bits from jumping around.  I was pleasantly surprised to see the ones that were punched then stamped stayed put on the Versamat.  I spent a few minutes aligning them 1-25 on the mat.  It also took some time arranging the cubbies so that there wouldn't be blocks of any one colour overwhelming the whole surface.  I wanted to have a variegated appearance, yet it remained unified because everything coordinated.  I started at the crop at 9am, settled to work by 930am, and was done by lunch at 1230pm.  It really helped to have good friends help with fresh eyes before sticking everything down permanently.  I edged the cubby in a champagne sparkle ink to give it pretty detail.  # 25 got sparkle bling to fancy it up.

Having a plan & kits really made the most of my crop time, but I still over-packed! I'm getting better at pre-planning which really makes the most of it.  Happy scrapping!


Monday, January 9, 2012

Happy New Year!!!

I can still wish everyone a Happy New Year, it is my first post of 2012.  Wow has it ever been Busy with Christmas, NYE festivities, work, life...  blah blah blah, boring.  Onward, I finally photographed the rest of the swap tags to showcase.

Lots of pictures coming, I tried to note blog links to share the talent. Not everyone blogs & I respect that but I won't post nonbloggers identities unless I have been given express permission to.  There were 19 participants, a record for our swaps.  Many generous people did multiple tag entries to help get us to the goal, 25 tags!  Here is the blog post showing the ones I made Christmas swap- tags x 3, and here are the returns from the Christmas tag swap hosted on the  Cricut circle messageboard Canadian, chat.

As always, click on any picture to enlarge. Unless specified, these are all by different people.

These 3 tags are one entry by image_queen.  Aren't they gorgeous?  Looks like she had some real fun playing with variables, they're similar but not the same.  Here's a link to her jeanniecards blog
These 3 tags are one entry by image_queen.  She also sent her cute mini calling card with her tags.
These 6 tags are also one entry by image_queen.  I had a hard time dividing them out, I realized pictures were the best way to show what she did.
Here's a link to GypsyLady's blog, she made the Santa tag.
Gorgeous!
I tried to capture the shine in the embossed ink, but the iridescence of the snowflake tag background was too elusive, trust me, it's lovely!
Here is the embossing of the animal and the pretty but subtle shine & curve of the poinsettia.  The pointsettia tag was created by this blogger, Scrapaholicjen.
These 3 tags were from one person.  The metal charm for the tags on the left hand side had all different words: wishes, jungle, yuletide, Christmas, season, greetings, joyful, merriment, holiday, tradition, SantaClaus, and snowflake.  The centre tag has red fabric.  The right hand tag is a mini snow globe with Santa & his reindeer flying through a snowstorm.  They were all created by ginaballoons
Soooo sweet!
Check out the embossed texture.  Here is the link to the blogger that made the snowman Chasinkeegan
The picture really doesn't do these justice, I did try...  Here is a link to the blogger who created the lil elf tag Ms.Mara.  Here is a link to Scrapperdee's Blog, she created the green Christmas stocking tag.
Are you jealous yet?  Here is the link to the Santa dancing tag Croatiancrafter.
These are from the same person.
I didn't show the backs of all the tags, but I tried to showcase the more unusual ones.
Whew!  I'm ready for a nap.  I never did get them organized into an advent  calendar like I meant to, but I'm all ready for Christmas 2012 now!  I'm so proud to be able to participate in these great swaps.  The talent and sharing is so very inspiring.  Happy New Year everyone!!!

Wednesday, December 14, 2011

Christmas Tag swap

Here are the tags I made for the Christmas tag swap on the cricut circle message-board, Canadian chat.  I had time in November and made 3 types of tags but only got around to blogging them now, that's life eh.  I used my gypsy and cricut expression machine.  I extra challenged myself to use non-traditional papers and I'm pleased with how they turned out.  Click on any picture to enlarge.

The first one is cut from "Picturesque" cartridge at 2" x 3" with the top layer cut from vellum.  I've said it before, and I'll say it again, "always cut extra."  The vellum was fussy at this size.  I thought they would be able to run through my little xyron sticker maker, nope, I forgot it had to be 1" or less to fit into there, doh!  So I skipped the gluing and just used the cropadile and eyelets with some pretty sparkle thread to hang them.  I didn't take a picture, but the backs are stamped with a to/from stamp from Inkadinkado Christmas Wishes.  I coralled the eyeletes with a roll of double-stick tape while I was working.  I added Pewter stickles to give the birds eyes, but didn't get a picture of that.  I was just proud of myself just for getting this one assembly line photo of the process.

NOTE:  Vellum likes a medium sticky cricut mat.  That mat needs to be well scraped of flotsam & jetsam or the blade will skip around while cutting the vellum.  Yet another reason to cut extra, sigh.

 These  are the "fails."  I cut yellow tags at 6.39"x4" using the "Sophie" cartridge and yellow Recollections brand paper.  I had an idea to spray them with shimmer ink but decided that would be too messy.  I traced out a template on a page protector and used it as a resist to make a green tree.  The page protector was too flimsy, it took forever for the ink to apply and dry, and it was messy.  I abandoned the experiment.

I then dug out the sparkle gelly pens and hand drew around the trees.  I figured out quickly to put a dot at the tip of the branches where I wanted to end up and thought of smiles, to make the lines curving upwards over the image.    I then pulled a variety of pen colours and dug some scrap out of the garbage to test colours to make ornament dots.  This was very relaxing to do.
I decided I wanted a little sparkle to make the top of the tree pretty, how in the world do you attach anything to a hole?  I use a plastic flexible cutting board from the dollar store on my work surface.  Nothing sticks to it, I can beat it up, cut, ink, or glue on it, no problems.  I added the rhinestone, added a glob of glue & let it dry.  Wha LA!  The trees have a star.
Now, I wasn't quite satisfied with the little bitty star.  I have these old clear epoxy stickers, sometimes known as page pebbles.  These are old dollar store goodies.  I tried them in the cropadile and it punches perfectly.  I tried a centre hole and didn't like it so I put the holes at the bottom of the sticker and they look quite radiant now.
 I inherited these next 2 to/from stamps from family, the silver pigment ink looks great.  We won't even wonder why there is almost no room to write names.  You're supposed to be in awe of how lovely the tags are right?  I run the edges through the paper trimmer ripple blade.  I like how it looks peeking through.  Simple cotton green & white yarn for the string.

 These were the simplest tags to make.  I had a sheet of Graphic 45 brand paper, "Christmas past Letters to Santa" which cut up beautifully with Fiscars stamp-edge deckle scissors.  I cut the tags from "Tags bags Boxes & more" cartridge, unlinked the dimensions to 5.25"x 4" using Recollections brand cardstock.  I made fiddly little bows from raffia and gluedotted them on.  I also added tiny stardust stickles dots to the corners of the "stamp" to add some visual interest.  Still no comment on the amazing amount of room to write names!
 For all the work that goes into these tags, it makes sense to see if they can be double use.  See how the middle can be ripped away from the yellow tag? The back of the green tag can be clipped away too.  These are the first Christmas tags I have made since elementary school when we recycled old cards to make tags.  Remember those days?

Happy Holidays!

Sunday, December 11, 2011

Christmas crafts

I offered to help out at my son's school and was suggested Christmas ornaments or little containers so kids have something they can give away to their friends & families.  5 sheets of white poster-board later, have  a look.  They are white so there is more choices of how to decorate them.   I started with 10 minutes planning them out on the gypsy and then 2 separate hours of steady cutting yielded:

40 pillow boxes (4 per 12" x 12" page) image cut from "Easter 1010" cartridge but I hid the bunny cut out.  Each is 5.57" x 5.75" after cutting.  I prescored one and left notes on the benefits of scoring to reduce frustration.

 About 10 door hangers from the "Christmas"  cartridge about 4" wide x 7" high.  I welded 2 together to use the narrow scraps of poster-board and just snipped off the extra partial loop from the bottom edge. This way the bottom edge can be folded up to make a pocket for a little treasure after decoration.

3 of these are cut from the "Christmas" cartridge, the lower left corner ornament and the 3 in the last picture are all from "Christmas Village" cartridge.  All are about 5" high.

 I didn't even count how many ornaments were cut, but there's LOTS!  I had to put them on Christmasy paper to make them all show up for photos.  I won't be able to help out in class because of work but I did enclose some notes.  I suggested the ornaments could be decorated as is, glued to coloured tissue, cellophane, or aluminum foil and the excess cut away.  I also noted aluminum foil can be coloured with permanent markers.  I'm hoping that the kids have fun decorating them so they can look forward to having something lovely too.  I'm also gifting them a pile of Christmasy paper leftover from the recipe swap.  It was a huge package of paper and too lovely to not share.

Season's greetings!

Thursday, December 1, 2011

Advent Calendars

December first brings a whole new flurry of winter activities for most families.  Never mind I missed my one year "blogiversary."  A whole year of blogging and I'm happy to have met my goal to learn something new (blogging) and I'm grateful to all my kind followers & great comments.

I'm hosting a Christmas tag swap, but they're not quite all in to share so I will post a few at a time starting with my own over the month of December. I had this great idea to string them along a garland with each one showing family fun ideas for the month of December.  An advent calendar of beauty and function.

Here is the list I've drafted of "things to do" in no particular order.  Feel free to pick & choose what suits your family if you wish to make your own advent calendar.  Yes, there is more than 25 things listed, more fun to do, and who says we have to do just "one" thing a day.  A lot of these ideas were collected form a discussion on the Cricut circle messageboard.  They're too great to not share.


  • Make a list for Santa's Helpers (its hard to give things to people who have everything, give them clues so you get what you need instead of more guesses & clutter)
  • Children can make their letters to Santa
  • Make Christmas cards
  • Make Christmas tags from last year's Christmas cards
  • Prep and send out Xmas cards
  • Go window shopping to see all the gorgeous store displays
  • Go sledding
  • Bake Xmas cookies 
  • Organize or join a recipe swap among your friends & family
  • Wrap Xmas gifts for friends and family
  • Watch TV Xmas specials
  • Clean & donate gently used toys to charity
  • Prep for Santa (Xmas Eve)
  • Make some Christmas or winter crafts, go ahead, make a mess too!
  • Read a Christmas story together
  • Go for a drive to look at holiday lights while dressed in pjamas
  • Visit a nursing home
  • Make a snowman
  • Have a snowball fight
  • Put up the Christmas tree and decorate it
  • Go Christmas caroling or sing Christmas songs
  • Read a Christmas book or a story
  • Make & have some egg-nogg, peppermint hot chocolate with marshmallows, or hot apple cider
  • Sing Christmas carols
  • Telephone Santa, there are some Santa Hotlines where children can leave a message
  • Look at past Christmas pictures
  • Take pictures with Santa
  • Hang stockings
  • Pick your favorite ornament and tell why you like it so much
  • Make an ornament or wreath
  • Choose a new dish to make for Christmas dinner or lunch
  • Eat a candy cane
  • Make reindeer snack mix for Santa's reindeer, recipe ideas via internet
  • Go have annual family photos taken, don't forget the out-takes are good too
  • Make some silly family photos
  • Play board-games, cards
  • Learn a new game
  • Take a walk at night in the snow with your dogs, chased by a hot drink fresh from the crock pot
  • Have a pyjama day
  • Plan a Christmas scavenger hunt
  • Make a donation to charity or food banks
  • Attend Christmas parties
  • Throw a Christmas party
  • Go to community events IE: lighting of the tree; visit nativity displays; candle-light vigils


In case you are wanting to make an advent calendar, this site has a nice collection of great ideas.  Homemade-advent-calendar-roundup  I will update this post if I find any more great collections.  We all know it is important to simply celebrate the season in your own cultural & family way.  We need to spread kindness, this is a tough time of year for many families, winter is hard on everyone.  I have some ideas for January since that is always a tough month of winter.  I invite you to think of & share your ways to make the winter season easier.  There's 45 ideas to get you started, they don't all have to be exclusively for December.

Happy Holidays!