Showing posts with label Plastic. Show all posts

Saturday, December 14, 2013

Monoprint envelopes

Remember those monoprint papers I posted about Dec 4, 2013?  Or the hectograph post from back in July?  Here's what I did with them!  That tube in the middle is to make the envelopes lick-em-stick-em.  Splitcoast stampers has a homemade recipe for it, but for $4, the job is done.  I could always refill it I guess?  I saw http://canadianscrapbooker.ca/  Fall 2013 magazine featured this cool Kreatealope EnvelopeTemplates.  I first saw them on Splitcoast stampers email and I was hooked, I had to try this.  In the summer I found the templates at an out of town scrapbook store.  Who can travel without visiting scrapbook stores, pet stores, candy stores...  I digress :-D

The Kreatealope website has a video that shows just how easy it is; tear, fold, snip corners, glue 2 edges.  Like magic a pile is done very quickly if the steps are done assembly line style.  I don't mind the torn edges, they're just envelopes.  I could always trace & cut out to make neat ones if needed.  The bonus is that I monoprinted the papers double sided so the insides are just as pretty.  I think they would make cool security envelopes too.  This template is sturdy enough to get the job done, yet takes up almost no space to store.  The cellophane packaging is not going to stand the test of time.  I think I will punch a hole in the corners to hang on ring on the wall so they don't get lost in the craft room.  I bet crafty children would have fun making these?
Happy crafting to you!

Wednesday, December 11, 2013

Monoprints

These are plastic templates I cut with my cricut expression from the CTMH cricut Artbooking cartridge.  They are dirty because I have been monoprinting with my Hectograph that I made back in July.  To make these templates, I used plastic pocket folders that I got for 30cents each with back to school sales.  That tip I learned from Lindsay at "the Frugal Crafter" on youtube. 
One side is shiny, the other matte.  I saved the scraps and used them as window accents in my recent Halloween-mini-book.
Here is a really good cricut tip:  cricut image direction.  She expains how to know which direction an image will cut on your mat.  I put a piece of tape on my cricut to remind me.  Glamorous?  Fashionable? No, not even remotely.   Practical, you betcha!
The arrow of green painters tape on the handbook shows you the 6" x 12" overlays are in different orientations (vertical and horizontal).
So here are my monoprints!  I was so excited to finally try these.  In about an hour, with a modest selection of cheap inexpensive acrylic paint I got on sale at Michaels, (50 cents each, a real score!), I went with the recomended 4-7 colours, and played with a brayer and wasted printer paper.  Here is a fun video showing how to do it Gelli plate monoprinting layers.  I kept it simple with these, but some of the uglier less pretty pages can get overprinted later to get more visually complex.  That's where some real art comes in.


I have a stack of blank school-work that a certain teenager generates.  Well, the school doles them out, he just leaves a lot of them blank.  They are begging to get monoprinted, and will be even more interesting with the assignment questions and various doodles that did get done.  I will show you in another post what I've done with these papers.

Playing with supplies, it does my art happy!

Saturday, July 20, 2013

?!Hectograph?! what?


I have happily stumbled into the world of youtube surfing.  And pintrest, and craft gawker...  I'm doomed to not have any free time with these great eye candy sites, and a busy family too.  I really enjoy Lindsay from "The Frugal Crafter."  permanent gelatin printing plate aka hectograph video & post.  I was inspired to try it too.  The first video I saw she showed a recipe using alcohol and water and gelatin.  Another youtuber told of her trial & error & this, and the horrible stink it made in her home.  Revisions were done & showed Linsay changed her recipe to 7 packages of gelatin, 1.5cups glycerine, 1.5 cups boiled water.  I also heeded cautions not to use equipment that would be used for food.  I even commented asking what type of tray she used, but I couldn't find anything similar.  So at the dollar store I bought a cheapie 8x8 pan, a plastic measure, and a little silicone loaf pan to try it out.  For the 8x8 pan I went with 3 packages gelatin, 3/4 cup glycerine, 3/4 cup boiled distilled water.  The mini loaf pan took 1 pack glycerine, 1/4 cup glycerine, 1/4 cup boiled distilled water.  Why distilled water?  Our water has a lot of calcium, some iron and fluoride, which I didn't want to chance react with it.  I prefer to use distilled water for my crafting because it doesn't get scummy as fast if it sits forgotten in the craft lab.

I left the experiment on the counter & it set up slowly.  I stuck it in the fridge to move it along.  Hours later it did indeed gel up firmly.  The little one  was disappointing to unmold.  I had high hopes since the silicone pan is bendy & easy to twist.  It was a gooey mess.  I put it back in the microwave, remelted & tried again in the fridge.  It did set up again, but is getting tacky at room temperature.  The 8x8 pan, straight from the fridge was nice & firm but sitting on the counter at room temperature became sticky.  Phooey.  I thought once it became plastic it would be okay at room temperature?  I'm not digging another thing to store in the fridge.  Did I mention we are currently in a heat wave?  Precious fridge space is for cold meals & drinks, priorities right?  Maybe I don't have quite enough gelatin in there?  I will remelt & add a bit of alcohol & see if that helps.  It can't hurt as it is destined for the garbage otherwise. 

Saturday, November 5, 2011

What to do with Shrinky Dinks

Better late than never!
Here's the post that shows what I made for the exchange BoomerKnows Charm for swap
As promised, here's the photos of the charms I received from the "Christmas In July 2011 shrink plastic charm swap."   I don't have permission to post other people's names and information but I can post the beautiful charms I received.  There were 26 people involved in this swap.
There were 2 charms that didn't have identifying information the mittens in the upper right corner in the picture above, and the red & green stocking in the left of centre in the picture below. One tag was missing a charm so a mini mystery for me!


 I'm so glad I joined in and did it.  If you've never tried a swap, 
its worth the work to get so many lovely returns in the mail!


A good friend mentioned how cute the finished shrink plastic charms look but she also asked, what do we do with them?  That got me to thinking and while I was doing my weekly craft blog surfing I jotted down a decent list.  I noticed that several ideas are transferrable to polymer clay (FIMO) .  It just goes to show, ideas are everywhere.  Here is my list, in no particular order:

pet tags
wine charms
fridge magnets
key ring charm or identifier
ring
cell phone charm
knitting or crochet stitch marker
charm bracelet
necklace pendant
earrings
inspiration word reminder charm
zipper pull
doll with moveable limbs
sun catcher
bookmark charm
hair accent
mini Christmas tree ornaments
card accent
handmade book spine adornment
scrapbook accents
miniature house accents
tea light adornment
custom buttons

I have no idea how long wearing decorated shrink plastic would be if used for clothing accents.  
If anyone knows about shrink plastic survival rates for regular everyday machine wash/dry use 
I'd love to hear from you!

While I was surfing I found other things people did to manipulate shrink plastic:
Sand it before applying chalk or pencil crayons
ink
markers
stamps
etching
layer them
emboss while still warm
twist and distort them
print them through home printer 
(not for a lazer printer, the heated plastic will ruin the machine)

Monday, August 15, 2011

Challenge Charms

Here are the charms I made for the online Christmas in July swarm via the cricut circle.  I used the Christmas stocking from the Gingerbread cartridge.  I sized it 2.62" wide x 3.27" high, it just looked good.  I copied & grouped it to make rows, then filled in the digital mat.  On the messageboard it was specified to make charms 1" finished size, so using shrink plastic, it should start 3".  I found with my last experiments that its a different shrinkage ratio so I went a bit smaller, using the same brand plastic I used to make the Canadian circle charms.  I placed a 8.5x11" rectangle on one layer so I would have the grey ghost boundary. That is to show me where to place the stockings on the mat, and where to place the plastic sheet on the mat before cutting.

I have found my little 6X12 cricut cuts more thoroughly than the big expression does, but each machine works ever so slightly differently.  I used multi-cut 4, pressure 6, blade depth 6 with the deep cut blade & housing.  I struggled with each sheet & cut lots of extras anticipating problems as this is fairly fussy cutting for plastic.  Several pages I had to recut 2 more times before unloading.  Once I had them cut I ruined quite a few separating them from the waste.  I used my basic grey brand fine file tool set to burnish off the burr edges because it just wasn't a cooperative cutting session.  Any nail file type tool is useful to clean up the edges for nice results once melted.
I tried a shadow cut by mistake on the right, I didn't like the sizing so I didn't use that cut.  The middle shows the centre pieces not removed yet, the left one is ready for markers. The picture below shows how much darker they get & size difference once it is shrunk.  I used Permapaque metallic markers by Sakura.  The metallic doesn't really show up which disappointed me a bit.  These are meant for writing on slick surfaces and is known to be  a good product brand.  I'm just using what I have.
Here are all 26 finished, with two 6mm jump rings ready to go.  I slipped them into little jewelry bags I got from the dollar store with a slip of paper with my details.  They went into the mail  August 8, and the return swap will be sent August 20.  I will definitely post pictures of what comes back!
Here is another reason to make extra when using shrink plastic.  Sometimes under the heat gun it has a mind of its own, it twists, sticks to itself, & just won't comply.  I cut 5 sheets of 9, ruined a lot separating them, then these 2 brats resulted.  I went back & cut one more sheet from another package, and of course it cut perfectly, punched out of the plastic easily, & fully cooperated.  I have read that "older" packages of shrink plastic are more temperamental to use than "fresh" plastic.  There's an irony I would never have thought of!
Lessons learned in addition to my last shrink plastic experiments:
1.  Peek at the cut before unloading to check that it cut through.  Once it is unloaded it will never load & cut exactly where it left off, 1mm difference with the unload & reload screws up the cuts.
2.  A dry static duster is a marvelous thing to pull away the little plastic shavings produced from cutting.  After each page of cutting it is good to remove the blade housing, poke out the blade & clear away the shavings so they don't build up & interfere with cutting.
3.  Working outside is best for shrink plastic, but being close to a wind break is important to keep from losing any under the deck.  
4.  Don't rush the separating cuts from the waste plastic, fussy cuts split, tear, rip, and are SHARP and POINTY.
5. Keep the Gypsy plugged in to prevent glitchy hang-ups with even slightly low battery.
6.  Using parchment paper is great, sandwiching still hot shrink plastic between PP & putting a cool iron or book on top to get it flat works nicely.
7.  Sakura Permapaque markers are nice, but they dry a little bit slower than Sharpie markers.
8.  Colour with scrap paper underneath, save your table top.
9.  Colour in circles if filling in areas of colour, it shrinks up less visually irregularly.
10.  Trace around all the edges with the markers to make the colours more finished looking.
11.  Some markers need to be sealed to keep colour from bleeding if these are worn against the skin as a pendant.  I would try UTEE (Ultra Thick Embossing Enamel) or Modge-Podge. Clear nail polish would be okay, but it tends to get yellow & brittle with age.   I didn't seal these charms and am hoping for the best.

Sunday, June 19, 2011

Canadian Cricut Circle Calling Card

I've been torturing the participants of the CCC Swap about an surprise enclosure for everyone for participating.  I decided that I'll probably never be able to afford to go to a big Cricut Swarm gathering.  The only other way to get an official circle charm is to participate in a swarm or Circle membership.  
 I've already posted my experiments with shrink plastic.  Here is what I was really wanting to make.  I cut out the circle antennae thing on my expression with Gypsy assistance.  I punched holes using my "CropaDile" tool.  I used that liquid sharpie & traced a Maple Leaf that I printed from the internet somewhere.  It wasn't perfect sizing so I had to trace a bit smaller.  This is the before & after pictures.
I definitely made extra & played around with an older magnetic Making Memories stamp set.  The supporting tool wasn't quite long enough so I improvised with a 6" metal ruler which worked well.  I used pigment ink from my stash, its dollarstore unknown brand.  The red paper is leftover posterboard from the post about making a Valentine mailbox.  The maple leafs I punched with a manual Marvy brand paper punch.

 I had a post all done about making these additional calling cards to go with the Canadian charm, but it went bu-bye by mistake for me.  Maybe one day I will learn how to back up my posts in case Blogger bites the bullet & all my posts vanish.
Here is the charm compared to the original charm I received when I signed up to be a circle member.  The green string was a lucky find at a chinese store.  It took me awhile to figure out how to attach the charm to the CC when it occurred to me to just tie it on & call it done.

Wednesday, June 15, 2011

Shrinky Dinks!

Well, I remember them being called ShrinkyDinks.  I have read a few places online that say plastic with the #6 recycle symbol also works as shrink plastic, but I have not tried that.  Other internet reading cautions that when heating plastic to do it in a well ventilated area.  Apparently some plastics when heated release a very fine powder, and of course fumes are always something to be cautious of.


Here's my nice set of sharpie markers.  I wrote each colour on a scrap of this shrink film to see how the colour changes when heated.  The strip on the right is what some permapaque markers by Sakura look like once shrunken.    A little experimenting up front helps get better results.  The colour gets darker after shrinking for some, more intense for other colours..

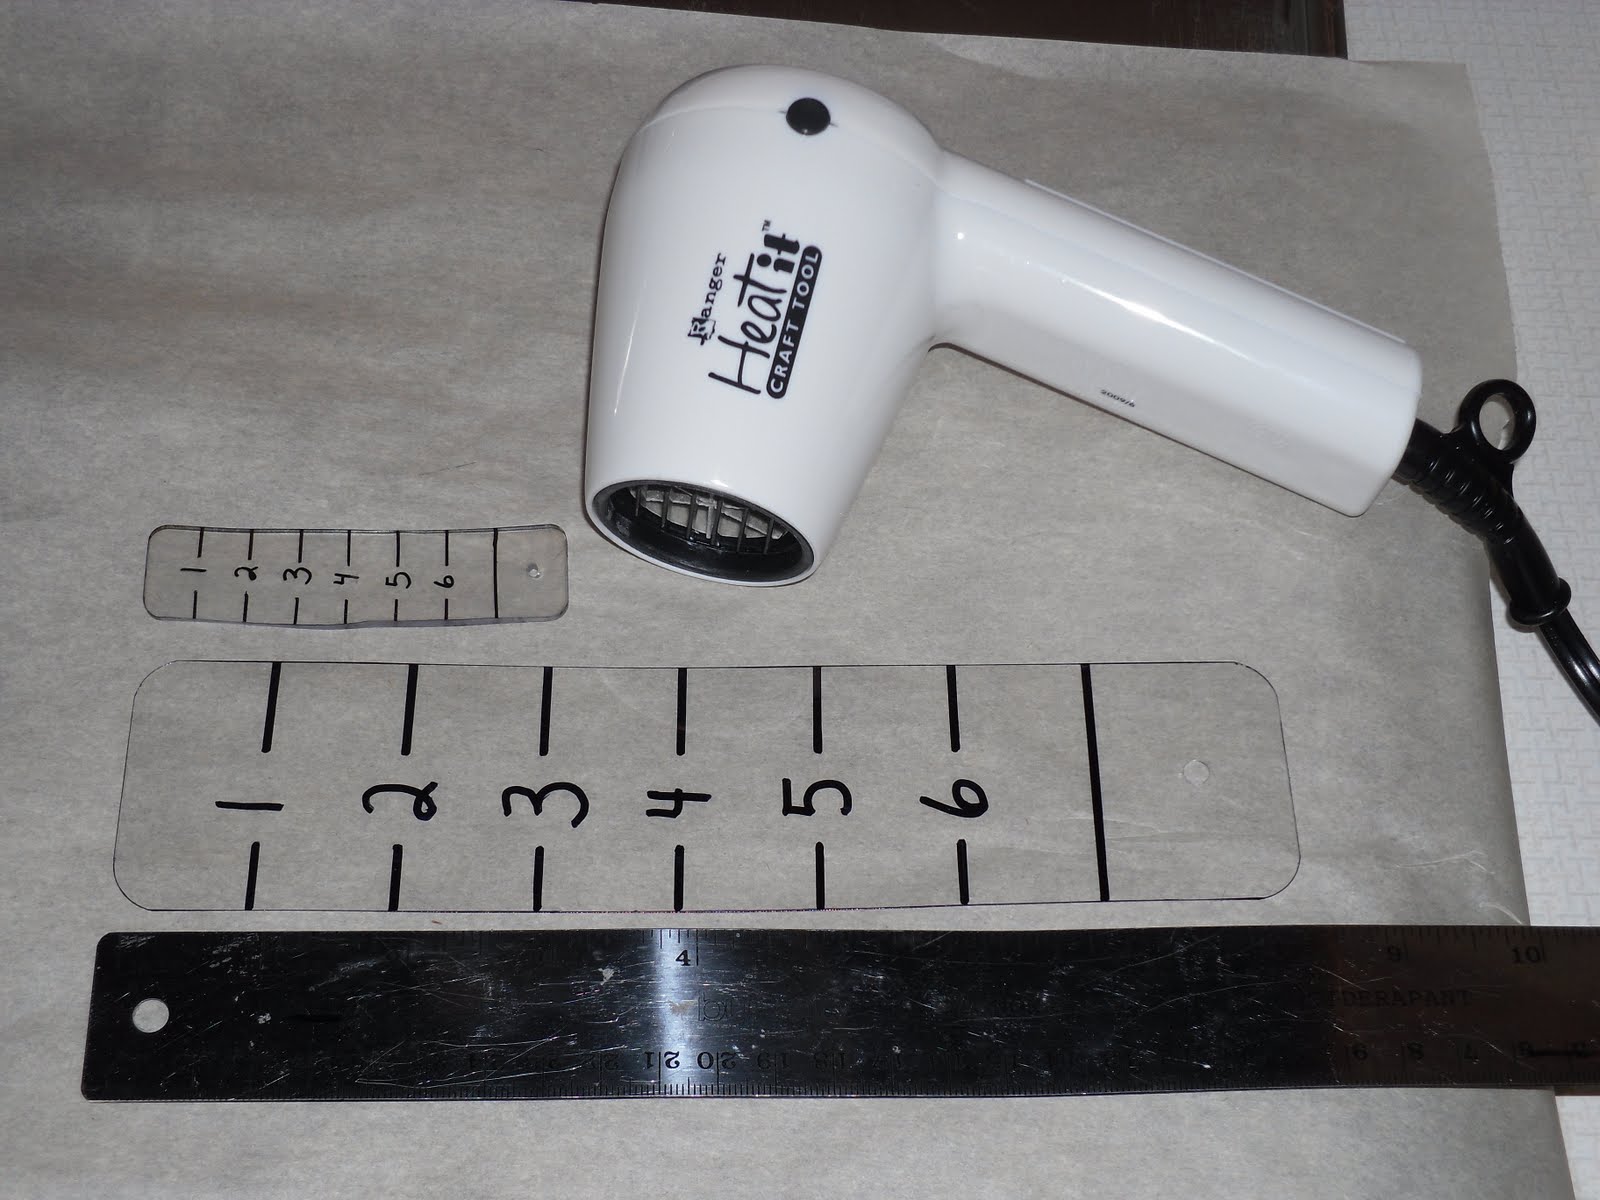
This is a sample ruler to determine shrinkage.  The package says it will shrink 20%.  Ya, using cross multiplication I figured out its more like 35-37% shrinkage.  I'm not a math person but I do remember how useful that equation is to solve for an unknown.  Here is where going back and forth between imperial & metric is an asset for simple measuring.  6"=15cm.  I have no idea how to make a teeny decimal point number translate into imperial.  I'm no math teacher so you can do an internet search for "cross multiplication" if you need a refresher.

I did an inch ruler, each number is one inch apart.  The side bars on one side are 1/2" marks, the other side is 3/4" marks.  They don't lay 100% flat once shrunk to the stopping point.  I really like my Ranger heat gun, its hot, low force, easy to hang onto, and best of all its quiet!
This shrink film stuff gives me ideas like the little shrunken head apple faces from old elementary school projects.  I wonder how distorted I could get doodle faces to look on shrink plastic, hee hee hee!  I shrunk these on an inverted cookie pan with parchment paper to prevent super bonding to the pan.  I used an old chopstick to push the pieces around while heating.  I did it over my stove cooktop with the fan blowing high and the patio door open to drag in fresh air.  Be careful if you try this yourself.  There will be another post using shrink plastic in July.