These are 4" cuts from my new "Elegant Edges" cricut cartridge. On the Cricut circle messageboard, Canadian chat, a lady posted that the first person to private message her would win a cartridge. I sent a message, thinking its gone for sure, she posted 15 minutes earlier. I won! She had a spare cartridge & decided to give it away as a "Random Act of Kindness" for Friday the 13th. I got it, but the plastic case was crushed in delivery. I've been doing all sorts of test cuts to make sure its okay, so far so good, the cartridge seems to work properly. After posting to the MB for help, and fairly extensive testing I learned that 54 border cuts will not work if cut at 2", they're too big for the cutting mat. Thats just one of many interesting quirks that you learn via trial & error with some of the images on the cartridges. Sometimes images cut out portrait vs landscape & its unexpected. To check these things in advance the graphics can be checked 4 ways: trial & error; "design studio"; Gypsy, or the newest program which is online only, "Cricut Craft Room."
One sheet of double sided paper torn in half yielded all these flower layers & 4 book pages cut with my baby bug (cricut).
Here's how I made the flower in the centre of the above picture. I didn't use the same paper so the colours don't match, but you get the idea. Flowers are trendy again, all over the internet people are making paper, tissue, felt, and cloth flowers.
These are cut at 1". You will need 5 symmetrical flowers, folded into quarters and a stapler or glue gun. This is my new TimHoltz tiny attacher, with tiny little 1/4" staples. It is very easy to use.
Once the flowers are folded into quarters open them into halves. Lap them one over the next.
The above picture shows 3 halves. The below picture shows how the fourth half is lapped in. It helps to think of how you would lap the 4 flaps of a box to close it if you were not taping it closed.
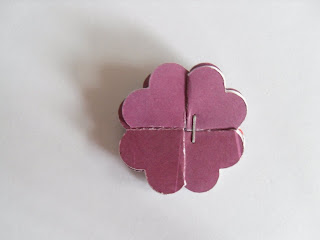
Here they are snugged in with one staple to secure it.
2 staples & its secure. I pushed open the petals with my finger to bring up the dimension. I also twisted some of the flaps back on themselves to open them up. It will need a button, bead or glitter glue in the centre, just something to pretty it up a bit. You can't be afraid to wreck an experiment, sometimes its in the destruction the learning comes. This paper isn't as pretty, plum on one side/red flowers on white on the reverse, but it does contrast how the flower looks.
Here's Boomer sniffing the flower. I used 3 single binder rings to turn it into a little book with the extra flowers interspersed inside. Its not quite done yet, need a bit more jazzing up with ribbons & stuff.
By the time this post is published, I am hoping the recipient will have it because I am giving it away to someone from the Canadian Calling Card Swap. What do you think? Have you ever done a Random Act of Kindness (RAK)? If everyone in the world did one just once a week we may all have something to be happy about.


Very nice. I love the colours you used. Thanks for the tutorial on the flower. Cheers.
ReplyDeleteOh, that is a neat technique on the flower. I wasn't the lucky recipeint of your flower, but feel like you gave us all a RAK by coordinateing the swap. While I would like to say I do my share of RAK's, I realize that I could probably do more of them.
ReplyDeleteI saw the flowers made several places on the internet & I knew someone might ask how I made them. I'm pleased with how they turned out. Thanks for the kind support, thats RAK too:)
ReplyDelete